Web、负载均衡、代理、WebDAV 综合实践.note
一、配置 综合实践
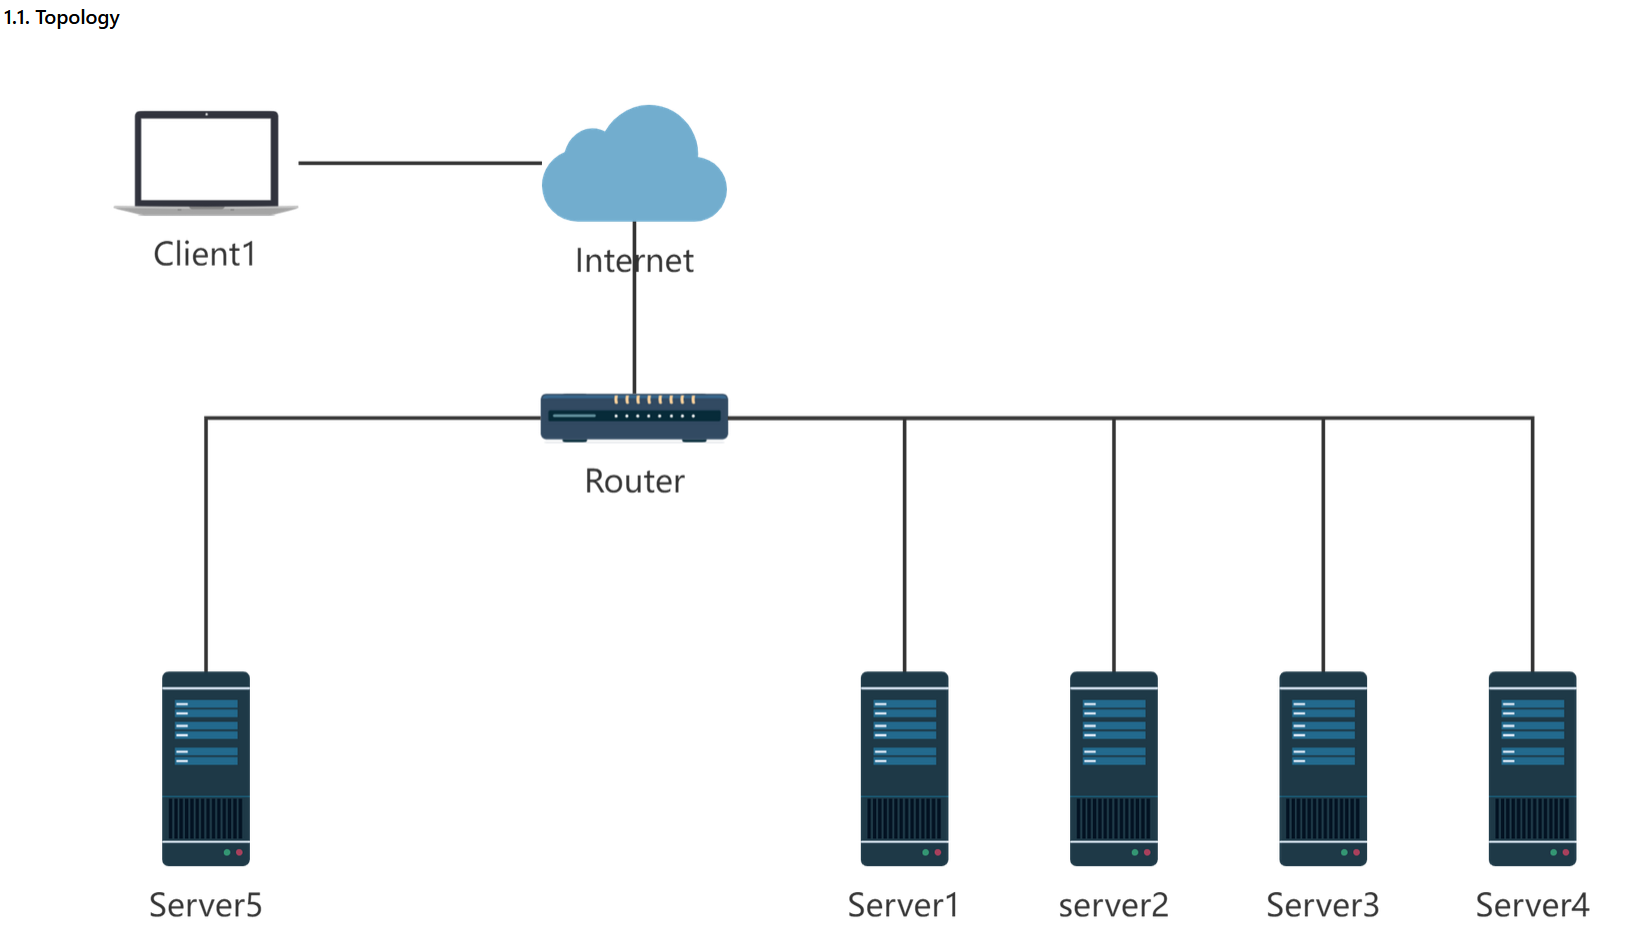
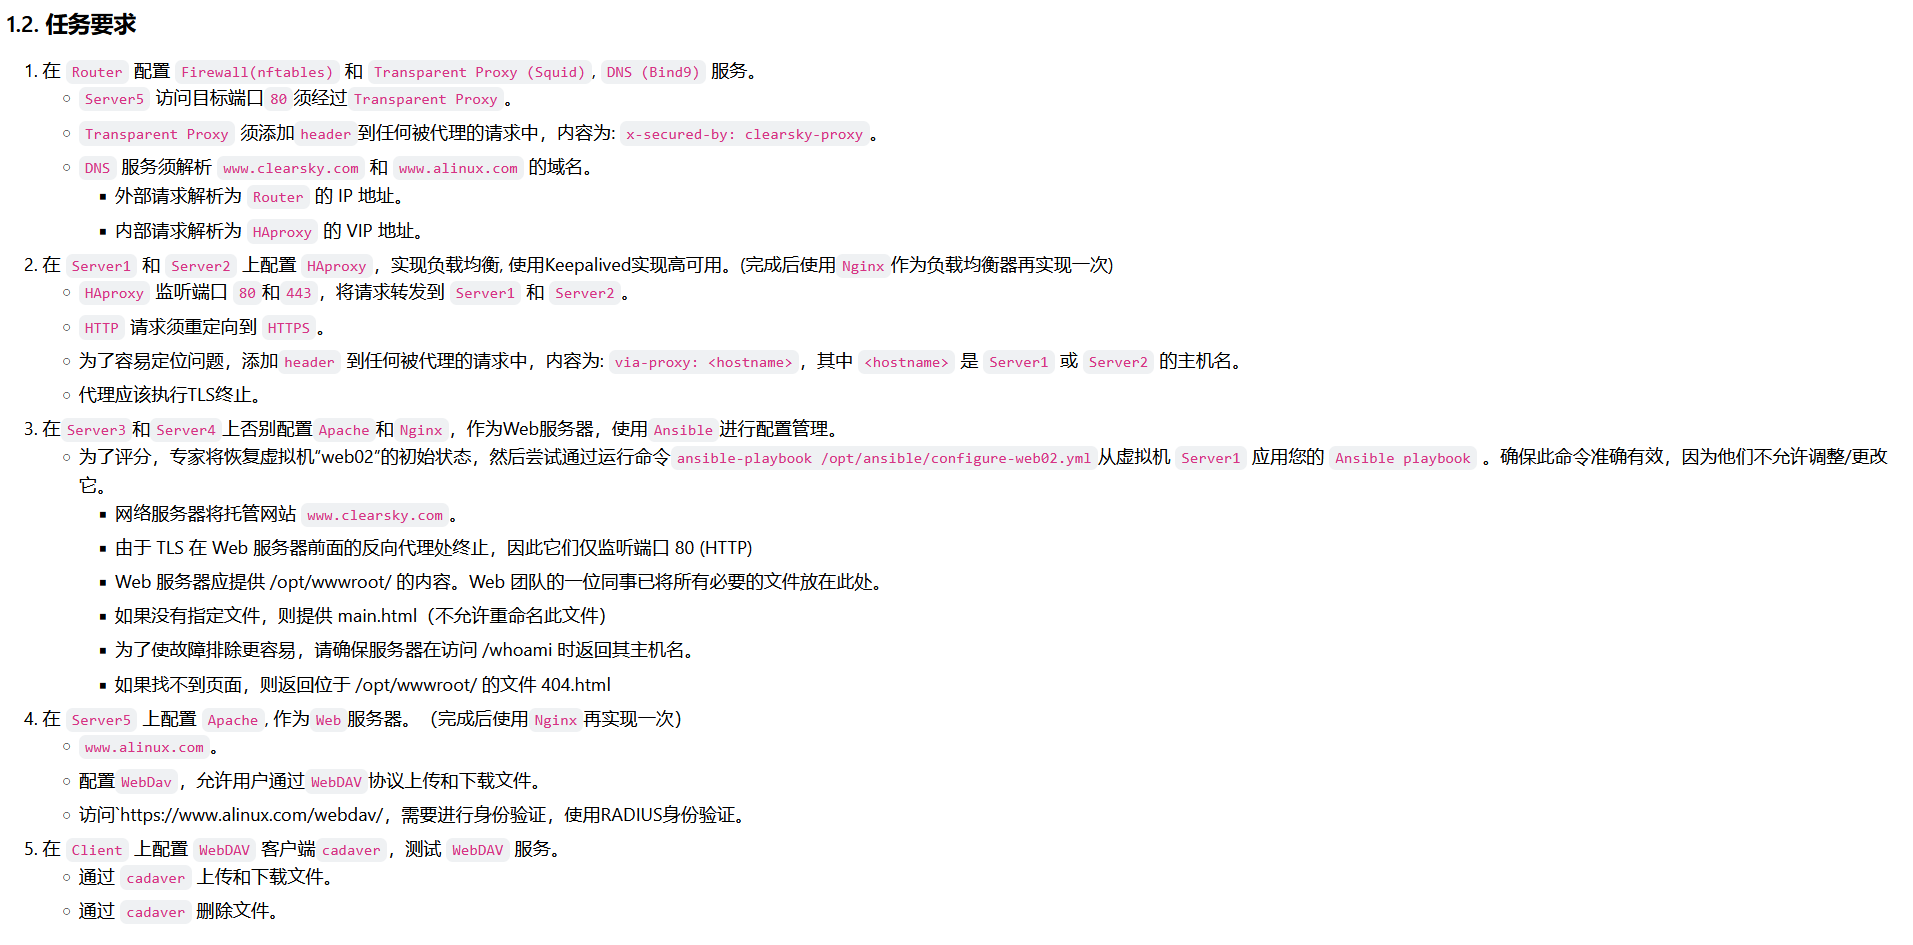
1、配置 DNS、nftables:(Router)
(1)dns:
vim /etc/bind/named.conf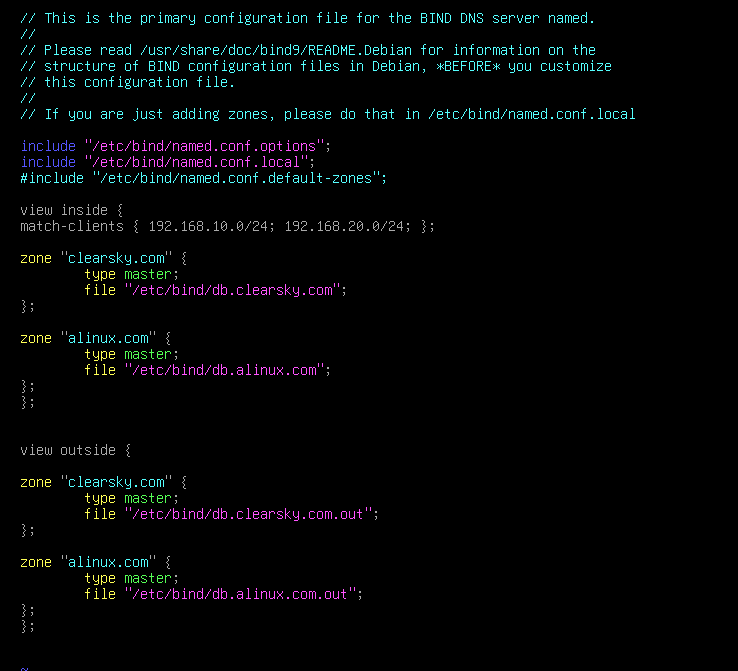
vim db.clearsky.com
vim db.alinux.com
# 内容一样: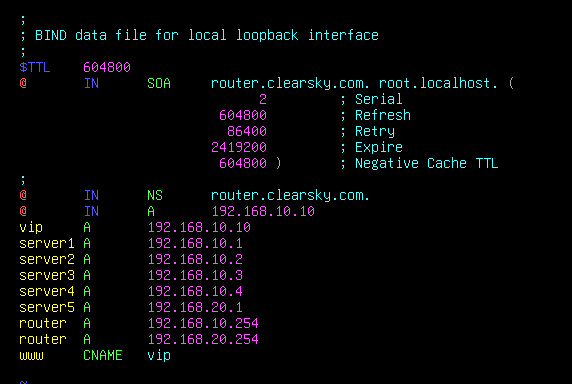
vim db.clearsky.com.out
vim db.alinux.com.out
# 内容一样: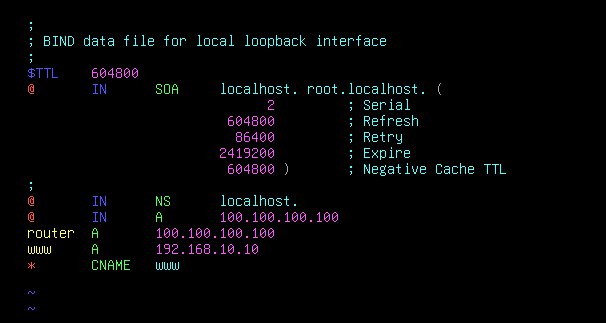
(2)证书:
# 证书字段:
vim /etc/ssl/openssl.cnf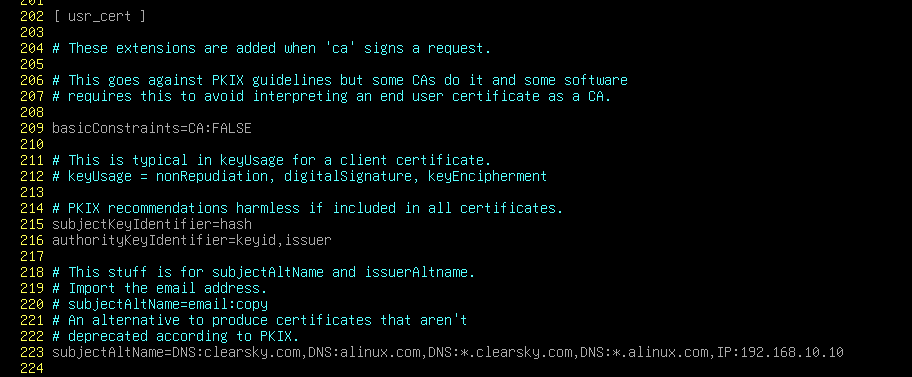
(3)nftables:
防火墙需要在 input 链放行 lo 接口,因为如果squid无法访问到lo接口,重启就会报错
systemctl enable nftables
vim /etc/nftables.conf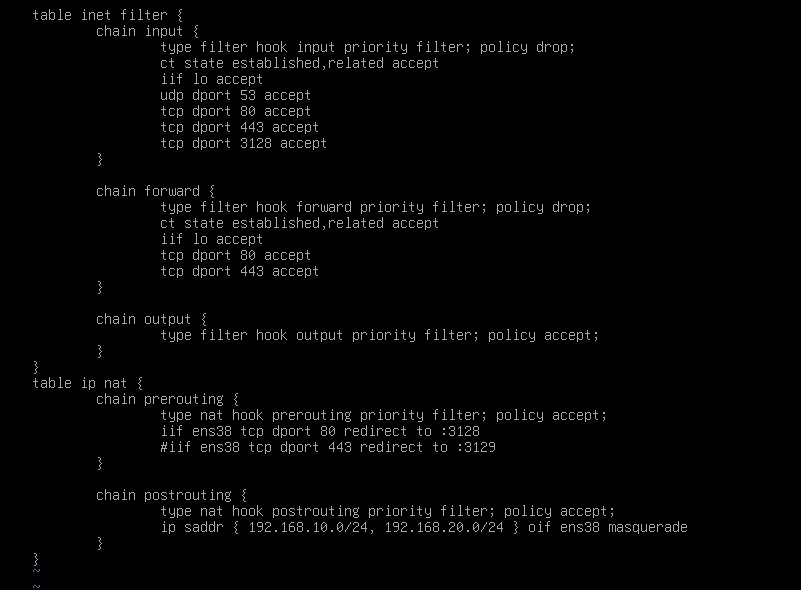
2、使用 Ansible 配置 后端Web服务器:

(1)初始化剧本:
vim 1-init.yml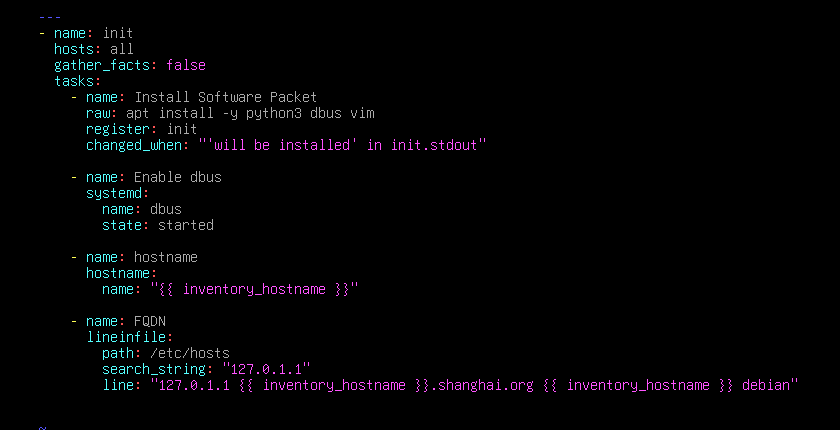
(2)Web剧本:
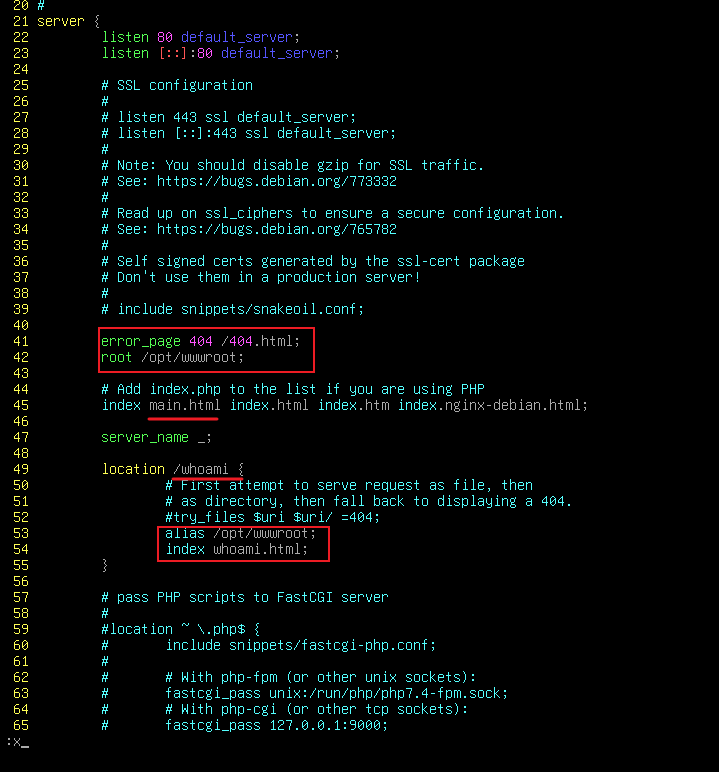
vim 2-web.ymlnginx:
vim /etc/nginx/sites-enabled/default
---
- name: init
  hosts: all
  gather_facts: false
  tasks:
    - name: Install Software Packet
      raw: apt install -y python3 dbus vim
      register: init
      changed_when: "'will be installed' in init.stdout"

    - name: Enable dbus
      systemd:
        name: dbus
        state: started

    - name: hostname
      hostname:
        name: "{{ inventory_hostname }}"

    - name: FQDN
      lineinfile:
        path: /etc/hosts
        search_string: "127.0.1.1"
        line: "127.0.1.1 {{ inventory_hostname }}.shanghai.org {{ inventory_hostname }} debian"


- name: Web
  hosts: Server3
  gather_facts: false
  tasks:
    - name: Install Apache2 Server
      apt:
        name: apache2
        update_cache: false

    - name: Configure Web
      lineinfile:
        path: /etc/apache2/apache2.conf
        search_string: "<Directory /var/www/>"
        line: "<Directory />"
      notify: restart

    - name: Configure Web
      file:
        path: /opt/wwwroot
        state: directory

    - name: Configure Web
      lineinfile:
        path: /etc/apache2/sites-available/000-default.conf
        search_string: "DocumentRoot /var/www/html"
        line: "DocumentRoot /opt/wwwroot"
      notify: restart

    - name: Configure Web
      lineinfile:
        path: /etc/apache2/sites-available/000-default.conf
        search_string: "# modules,"
        line: "directoryindex main.html"
      notify: restart

    - name: Configure Web
      lineinfile:
        path: /etc/apache2/sites-available/000-default.conf
        search_string: "LogLevel"
        line: "Alias /whoami /opt/wwwroot/whoami.html"
      notify: restart

    - name: Configure Web
      lineinfile:
        path: /etc/apache2/conf-available/localized-error-pages.conf
        line: "ErrorDocument 404 /404.html"
      notify: restart

    - name: Configure Web
      copy:
        src: /etc/ansible/data/main.html
        dest: /opt/wwwroot

    - name: Configure Web
      copy:
        src: /etc/ansible/data/404.html
        dest: /opt/wwwroot

    - name: Configure Web
      template:
        src: /etc/ansible/data/whoami.html
        dest: /opt/wwwroot

  handlers:
    - name: restart
      systemd:
        name: apache2
        state: restarted

- name: Web
  hosts: Server4
  gather_facts: false
  tasks:
    - name: Install Nginx Server
      apt:
        name: nginx
        update_cache: false

    - name: Configure Web
      file:
        path: /opt/wwwroot
        state: directory

    - name: Configure Web
      copy:
        src: /etc/ansible/data/main.html
        dest: /opt/wwwroot

    - name: Configure Web
      copy:
        src: /etc/ansible/data/404.html
        dest: /opt/wwwroot

    - name: Configure Web
      template:
        src: /etc/ansible/data/whoami.html
        dest: /opt/wwwroot

    - name: Configure web
      copy:
        src: /etc/ansible/data/default
        dest: /etc/nginx/sites-available/
      notify: restart

  handlers:
    - name: restart
      systemd:
        name: nginx
        state: restarted
3、HAproxy、Keepalived:(Server1、Server2):
(1)Keepalived:
vim /etc/keepalived/keepalived.conf
# Server2的优先级是150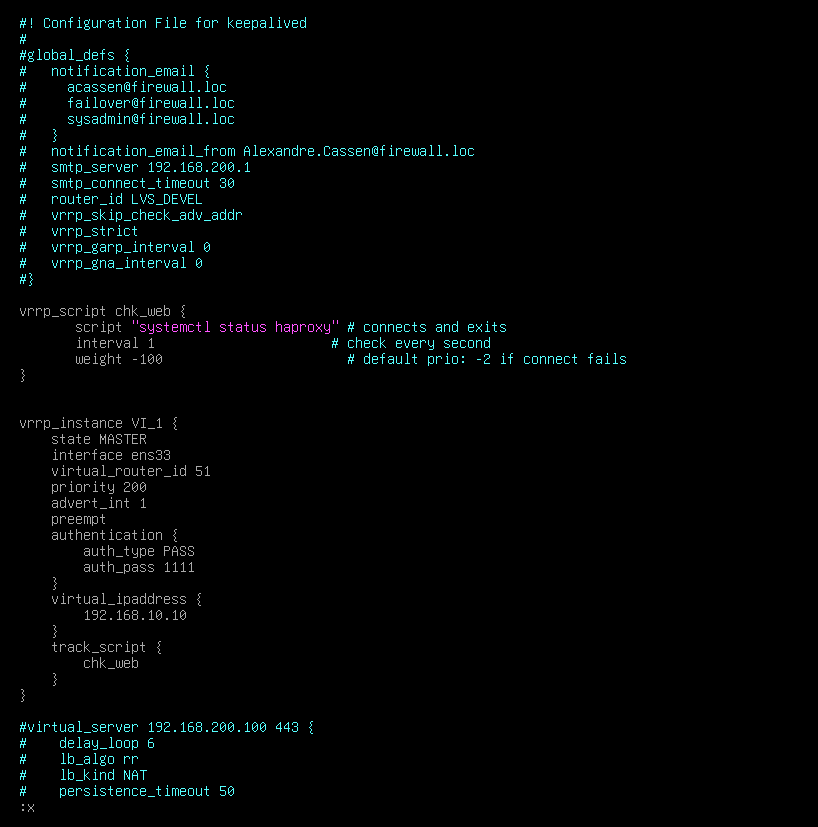
(2)Haproxy代理 or Nginx 代理:
·HAproxy:
cat /etc/ssl/ssl.crt /etc/ssl/ssl.key > haproxy.pem
vim /etc/haproxy/haproxy.cfg
# 如果是Server2机器上,头部信息就要改为 via-proxy Server2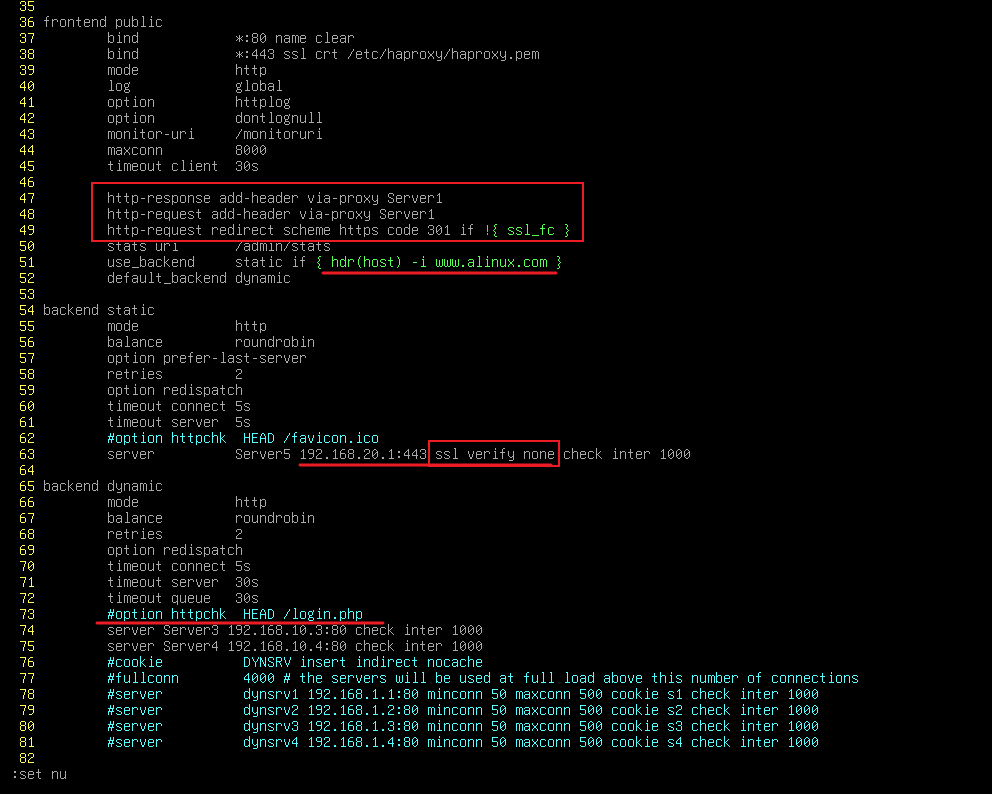
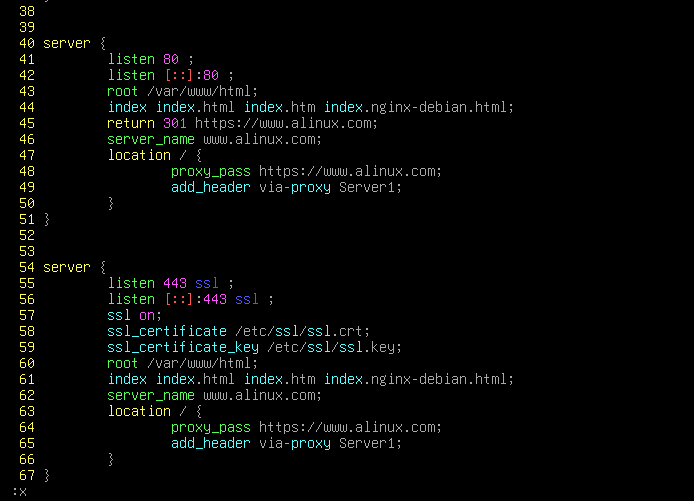
·Nginx 反向代理:
修改后要将 keepalived的检测也改为 Nginx
systemctl stop haproxy
systemctl disable haproxy
apt install -y nginx
# upstrem 名称最好写web服务器的域名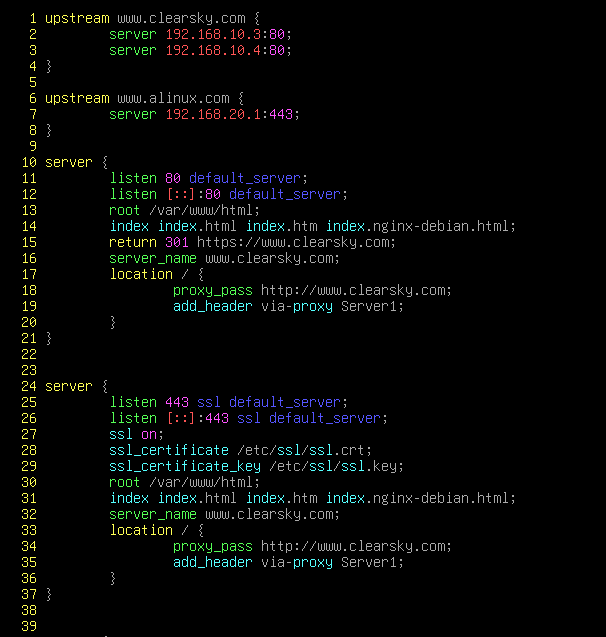
4、Squid:(Router)
(1)配置 Squid透明代理:
这里的透明代理仅代理 80端口,不代理 443端口
apt install -y squid-openssl
cd /etc/squid
cp squid.conf squid.conf.bak
egrep -v '^#|^$' squid.conf.bak > squid.conf
vim squid.conf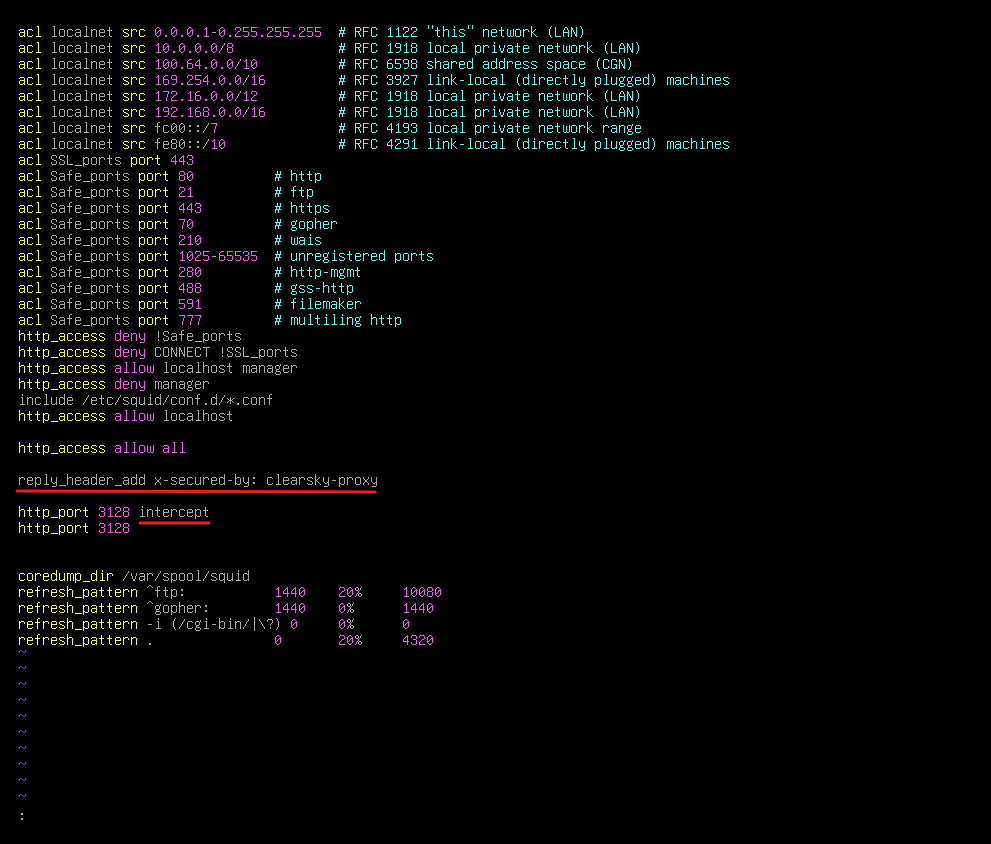
(2)配置nftables:
vim /etc/nftables.conf
# iif 也可以不写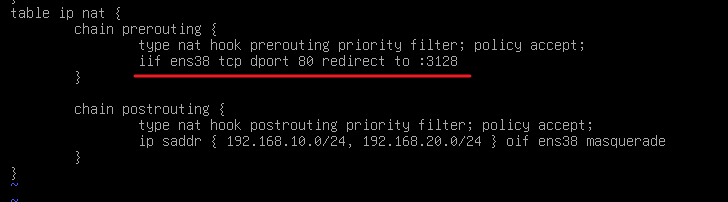
5、WebDAV配置:(使用 apache2)
(1)配置 WebDAV使用 htpasswd认证:
apt install -y apache2
mkdir /var/www/html/webdav
chmod 777 /var/www/html/webdav

a2enmod dav
a2enmod dav_fs
systemctl restart apache2
# 创建密码文件:
cd /etc/apache2
htpasswd -c .htpasswd admin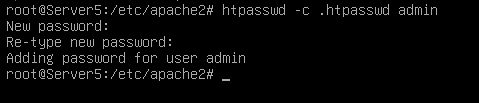
# 配置WebDAV页面:
vim /etc/apache2/sites-enabled/000-default.conf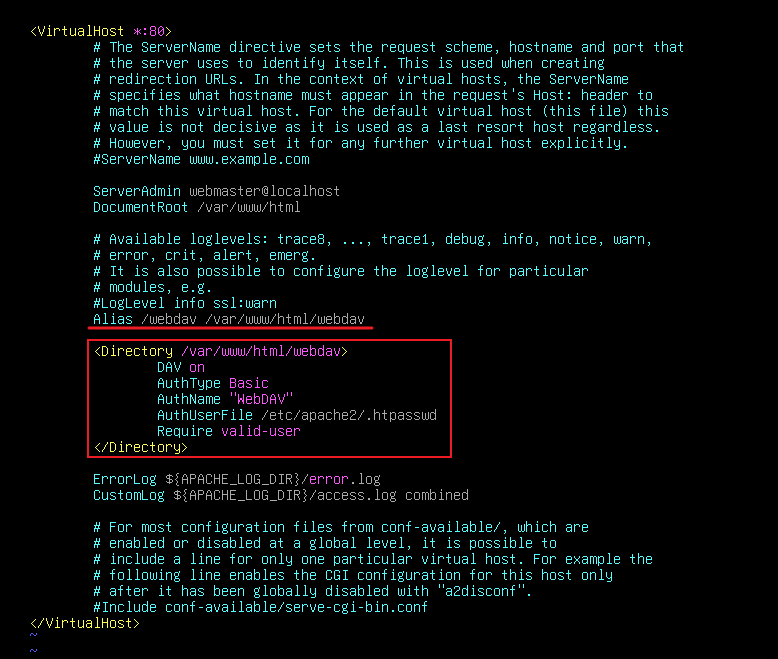
systemctl restart apache2
(2)配置 WebDAV 使用radius进行认证:
未配置成功,apache2没有连接radius的模块,尝试另外的方式,pam连接radius也没有成功
1、配置 radius服务器:
apt install -y freeradiusvim /etc/freeradius/3.0/clients.conf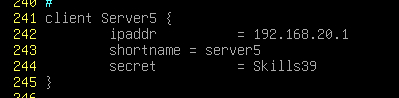
vim /etc/freeradius/3.0/users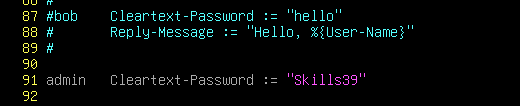
systemctl restart freeradius
测试radius服务器:
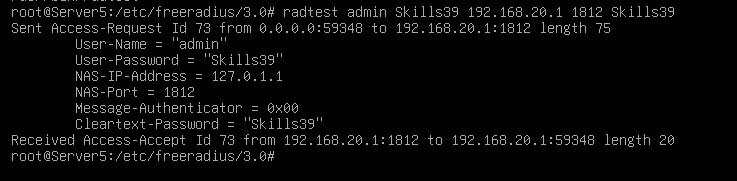
2、配置 WebDAV:
apt install libpam-radius-auth pwauth
apt install libapache2-mod-authnz-external
mkdir /var/www/html/webdav
chmod 777 /var/www/html/webdav
a2enmod dav
a2enmod dav_fs
a2enmod authnz_externalsystemctl restart apache2
vim /etc/pam.d/pwauth
# 注释旧的内容,添加account 这条 可以在 /etc/pam.d/common-account 中抄
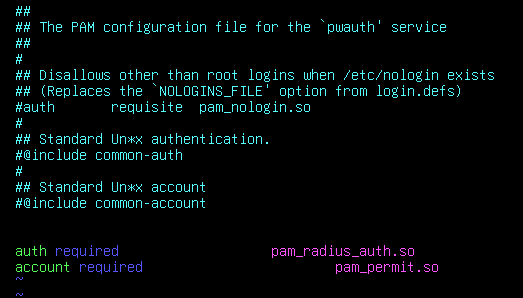
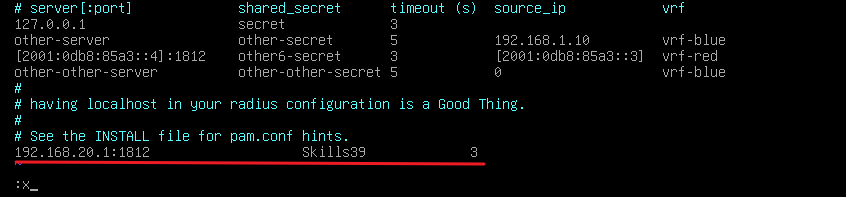
vim /etc/pam_radius_auth.conf复制一行,然后在末尾添加:
(3)客户端测试:
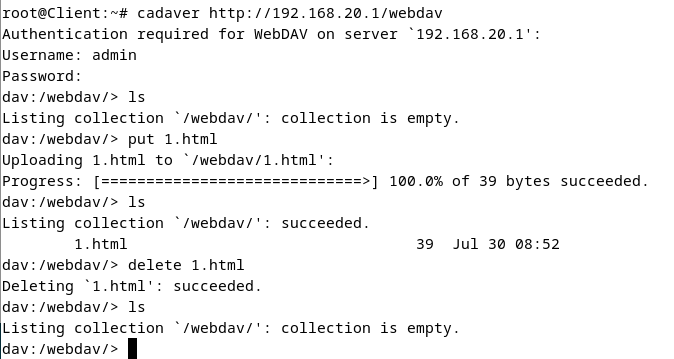
·命令行连接 webdav:
apt install -y cadaver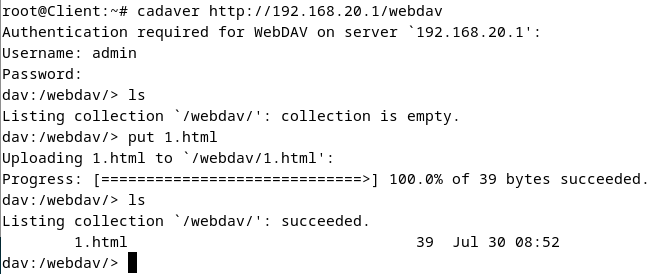
·使用 fstab 挂载webdav到目录:
apt install -y davfsvim /etc/fstab
# 这里 只能写 davfs,没有davfs2之类的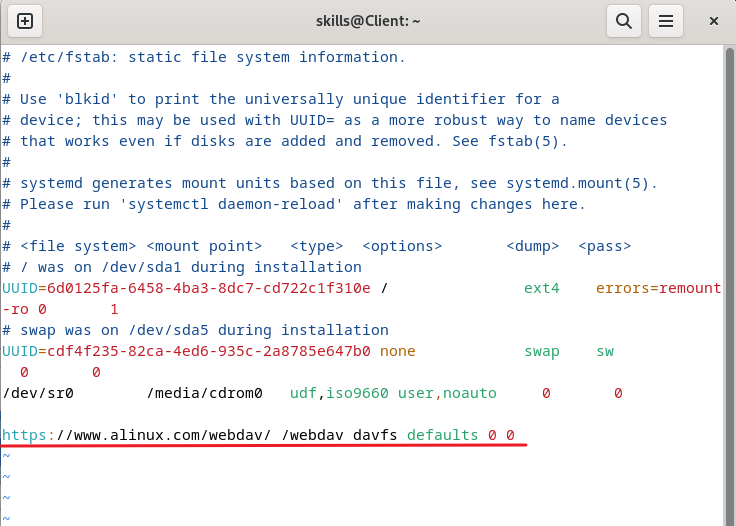
# 将用户名和密码给定:
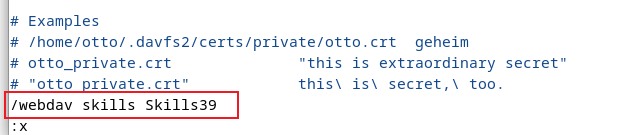
vim /etc/davfs2/secrets
在末尾添加:[本地挂载的目录] [用户名] [密码]
# 挂载:
systemctl daemon-reload
mount -a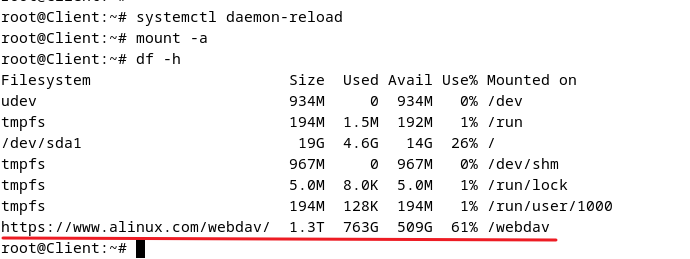
·在图形化资源管理器连接webdav:
图形化客户端打开 Files:
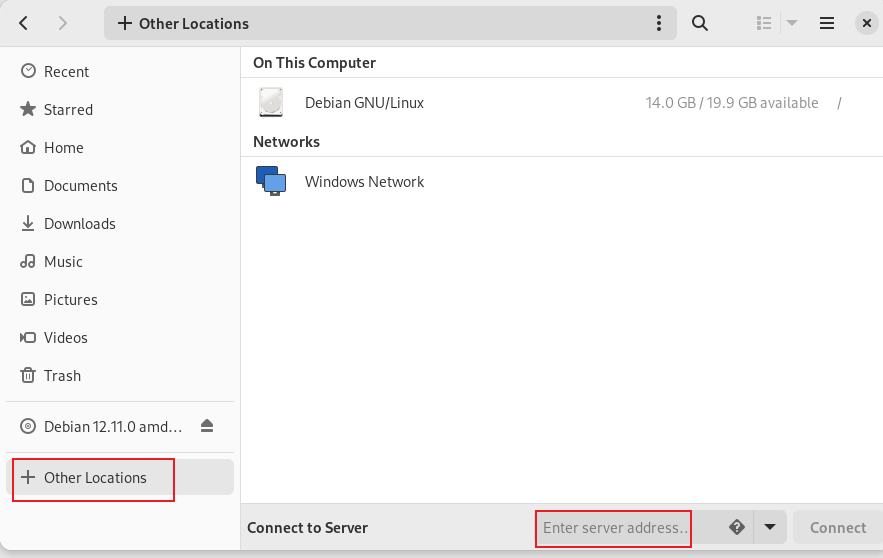
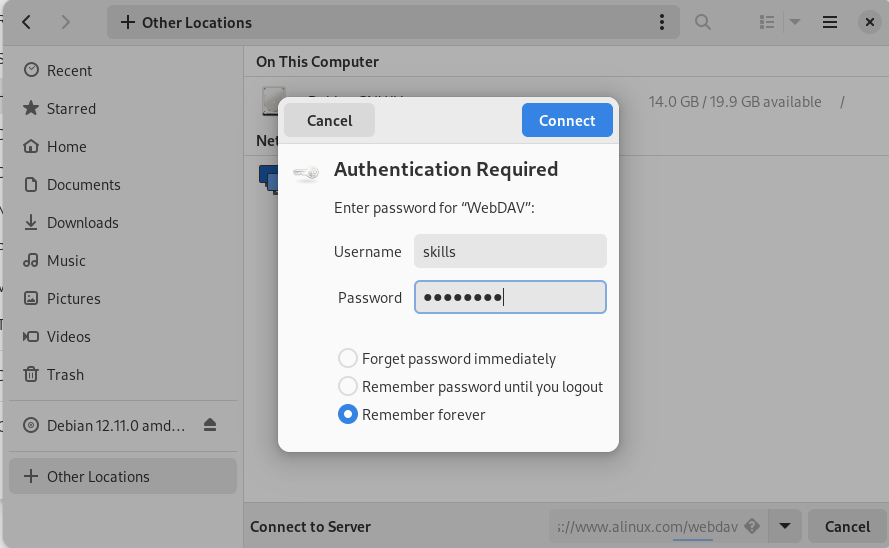
输入: davs://www.alinux.com/webdav
如果是不加密的就使用 dav://www.alinux.com/webdav
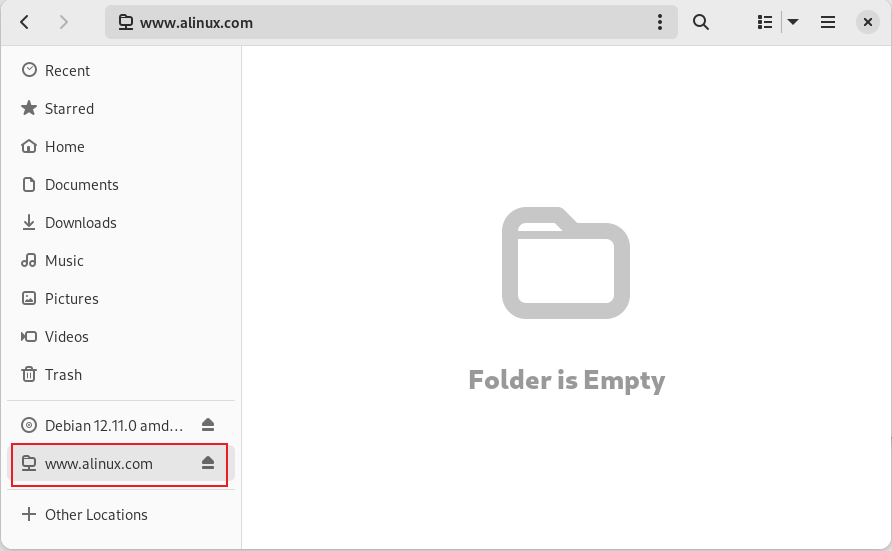
然后输入密码:
挂载成功:
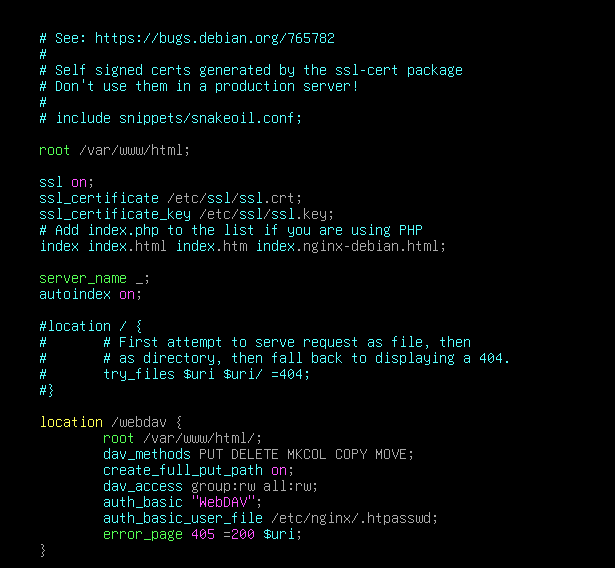
6、WebDAV配置:(使用Nginx)
没有成功,nginx webdav没有配置成功
(1)配置 WebDAV:
apt install -y nginx
mkdir /var/www/html/webdav
chmod 777 /var/www/html/webdav
# 创建密码文件:
apt install -y apache2-utils
cd /etc/nginx
htpasswd -c .htpasswd admin
#