3-27 A-Linux.note
·Web仅支持IPv6:
vim /etc/apache2/ports.conf
# 书写本地的IPv6地址即可: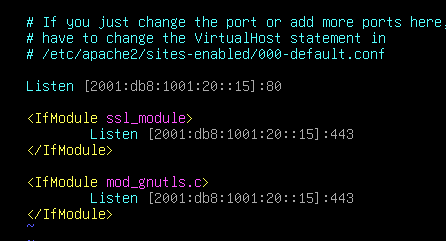
查看:

# 初始化:

apt install -y dbus net-tools man bash-completion dnsutils curl wget ftp lftp ssh ldap-utils telnet traceroute lsof mailutils smbclient systemd-timesyncd vim nfs-client
timedatectl set-timezone Asia/Shanghai

localectl set-x11-keymap us
一、Ansible:
·主控端设置:
ssh-keygen    //生成ssh密钥
ssh-copy-id skill@10.1.20.13-16    //拷贝给ansible被控端

# ansible被控端上将 ssh公钥复制到 root目录下:
cp /home/skill/.ssh/authoried_keys /root/.ssh不需要写 group_vars 凭据
vim /etc/ansible/hosts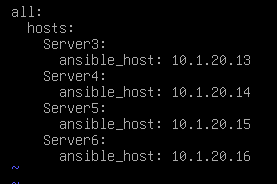
vim /etc/ansible/ansible.cfg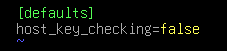
1、init.yml
vim /etc/ansible/playbooks/init.yml
---
- name: init
  hosts: all
  gather_facts: false
  tasks:
    - name: Install Packet
      raw: apt install -y vim dnsutils curl systemd-timesyncd
      changed_when: false

    - name: timezone
      timezone:
        name: Asia/Shanghai
      notify: dbus

  handlers:
    - name: dbus
      raw: systemctl restart dbus

- name: init
  hosts: all
  gather_facts: false
  tasks:
    - name: hostname
      hostname:
        name: "{{ inventory_hostname }}"
      notify: keymap

    - name: FQDN
      lineinfile:
        path: /etc/hosts
        search_string: "127.0.1.1"
        line: "127.0.1.1 {{ inventory_hostname }}.devops.com {{ inventory_hostname }} debian"
      notify: keymap

    - name: ntp
      lineinfile:
        path: /etc/systemd/timesyncd.conf
        line: "NTP=10.1.20.254"
      notify: restart ntp

    - name: dns
      lineinfile:
        path: /etc/ssh/ssh_config
        search_string: "StrictHostKeyChecking"
        line: "StrictHostKeyChecking no"
      notify: init

  handlers:
    - name: keymap
      raw: localectl set-x11-keymap us

    - name: restart ntp
      systemd:
        name: systemd-timesyncd
        state: restarted

    - name: init
      systemd:
        name: ssh
        state: restarted
      changed_when: false
2、dns.yml:
根据inventory中的顺序来决定 master主服务器
# 主服务器:
vim named.conf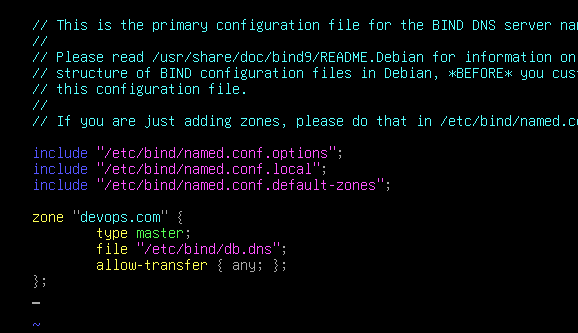
# 从属服务器:
vim named.conf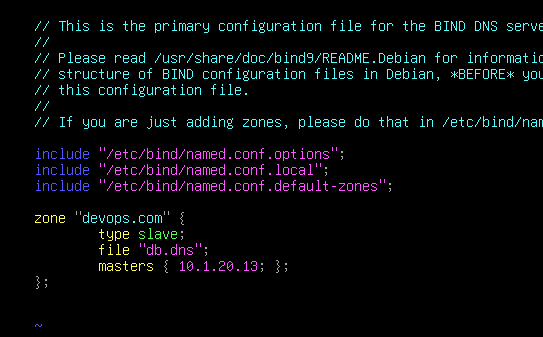
# 区域文件:
vim db.dns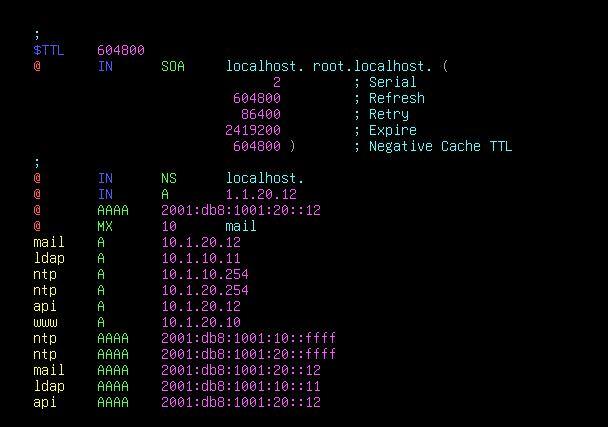
·剧本:
---
- name: dns
  hosts: Server3,Server4
  gather_facts: false
  tasks:
    - name: Install Packet
      apt:
        name:
          - bind9
          - sshpass
        update_cache: false


    - name: dns
      raw: sshpass -p Skill2024 ssh skill@10.1.20.12 cat /etc/ansible/hosts | grep -n Server3 | cut -d ':' -f 1
      register: Server3
      changed_when: false

    - name: dns
      raw: sshpass -p Skill2024 ssh skill@10.1.20.12 cat /etc/ansible/hosts | grep -n Server4 | cut -d ':' -f 1
      register: Server4
      changed_when: false

    - name: resolv
      raw: |
        echo "nameserver {{ ansible_host }}" > /etc/resolv.conf
      changed_when: false

    - name: master dns
      copy:
        src: /data/named.conf
        dest: /etc/bind
      notify: restart
      when:
        - Server3.stdout | int < Server4.stdout | int
        - inventory_hostname == "Server3"

    - name: dns
      copy:
        src: /data/named.slave
        dest: /etc/bind/named.conf
      notify: restart
      when:
        - Server3.stdout | int < Server4.stdout | int
        - inventory_hostname == "Server4"

    - name: dns
      copy:
        src: /data/db.dns
        dest: /etc/bind
      notify: restart

    - name: master dns
      copy:
        src: /data/named.conf
        dest: /etc/bind
      notify: restart
      when:
        - Server4.stdout | int < Server3.stdout | int
        - inventory_hostname == "Server4"

    - name: dns
      copy:
        src: /data/named.slave
        dest: /etc/bind/named.conf
      changed_when: false
      when:
        - Server4.stdout | int < Server3.stdout | int
        - inventory_hostname == "Server3"

    - name: dns
      lineinfile:
        path: /etc/bind/named.conf
        search_string: "masters"
        line: "masters { 10.1.20.14; };"
      changed_when: false
      when:
        - Server4.stdout | int < Server3.stdout | int
        - inventory_hostname == "Server3"


    - name: dns
      copy:
        src: /data/db.dns
        dest: /etc/bind
      notify: restart

  handlers:
    - name: restart
      systemd:
        name: bind9
        state: restarted
3、HAProxy.yml
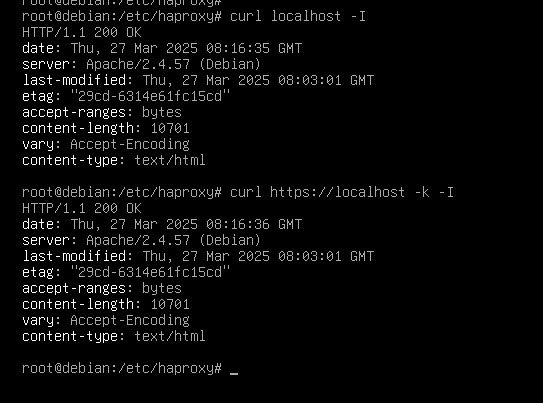
·haproxy:
复制模板:
.../conntent-sw-sample.cfg
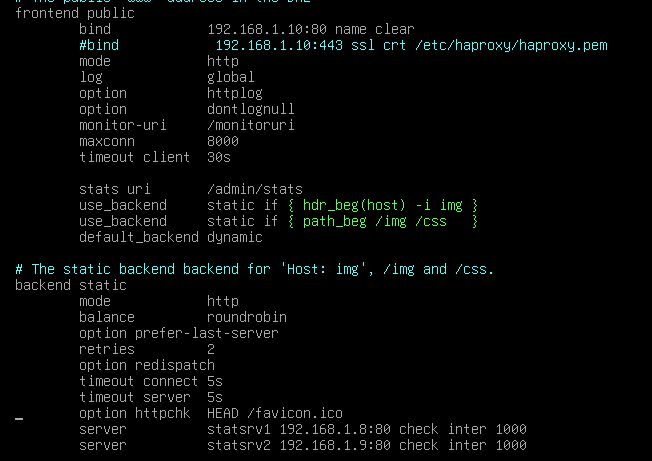
cat server.crt server.key > haproxy.pem
vim /etc/haproxy/haproxy.conf
# 删除原本的内容,修改复制的模板: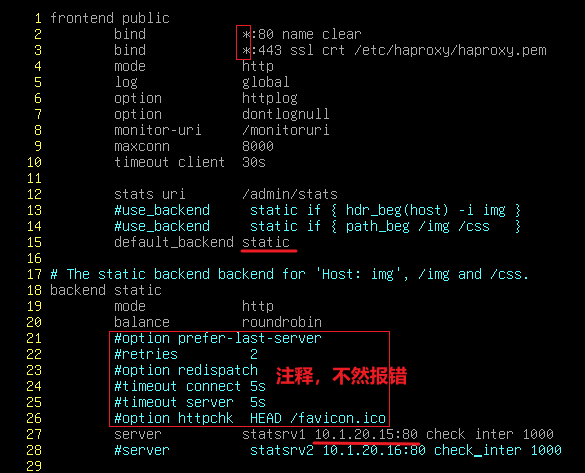

注意这里要写ipv6的地址,因为题目要求后端web仅支持ipv6
systemctl restart haproxy
同样的配置复制给另一台即可
·keepalived:
.../.....vrrp.localcheck
复制模板:
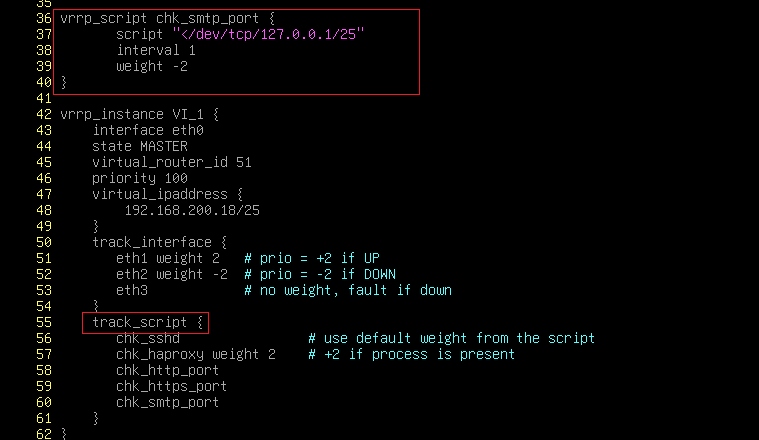
cp keepalived.conf.sample keepalived.conf
vim /etc/keepalived/keepalived.conf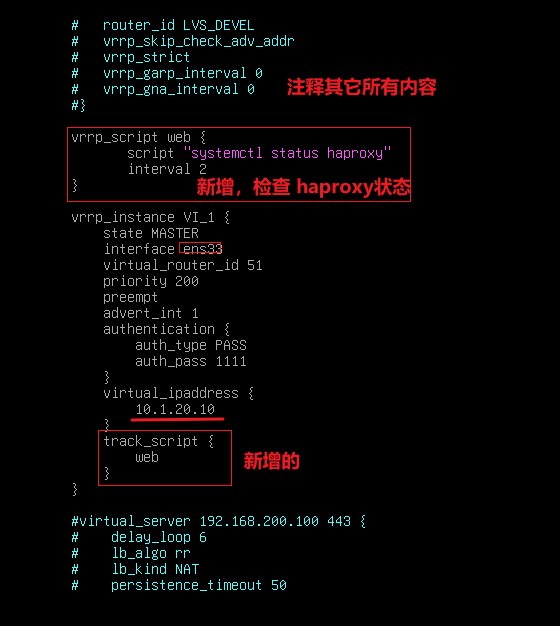
·剧本:
---
- name: ha
  hosts: Server3,Server4
  gather_facts: false
  tasks:
    - name: Install Packet
      apt:
        name:
          - haproxy
          - keepalived
        update_cache: false

    - name: Haproxy
      copy:
        src: /data/haproxy.cfg
        dest: /etc/haproxy
      notify: haproxy restart

    - name: Haproxy
      copy:
        src: /data/haproxy.pem
        dest: /etc/haproxy
      notify: haproxy restart

    - name: Keepalived
      copy:
        src: /data/keepalived.conf
        dest: /etc/keepalived/
      notify: keep restart
      changed_when: false

    - name: HA
      raw: sshpass -p Skill2024 ssh skill@10.1.20.12 cat /etc/ansible/hosts | grep -n Server3 | cut -d ':' -f 1
      changed_when: false
      register: Server3

    - name: HA
      raw: sshpass -p Skill2024 ssh skill@10.1.20.12 cat /etc/ansible/hosts | grep -n Server4 | cut -d ':' -f 1
      changed_when: false
      register: Server4

    - name: HA
      lineinfile:
        path: /etc/keepalived/keepalived.conf
        search_string: "priority"
        line: "priority 200"
      notify: keep restart
      when:
        - Server3.stdout | int < Server4.stdout | int
        - inventory_hostname == "Server3"

    - name: HA
      lineinfile:
        path: /etc/keepalived/keepalived.conf
        search_string: "priority"
        line: "priority 100"
      notify: keep restart
      when:
        - Server3.stdout | int < Server4.stdout | int
        - inventory_hostname == "Server4"

    - name: HA
      lineinfile:
        path: /etc/keepalived/keepalived.conf
        search_string: "priority"
        line: "priority 200"
      notify: keep restart
      when:
        - Server4.stdout | int < Server3.stdout | int
        - inventory_hostname == "Server4"

    - name: HA
      lineinfile:
        path: /etc/keepalived/keepalived.conf
        search_string: "priority"
        line: "priority 100"
      notify: keep restart
      when:
        - Server4.stdout | int < Server3.stdout | int
        - inventory_hostname == "Server3"

  handlers:
    - name: haproxy restart
      systemd:
        name: haproxy
        state: restarted

    - name: keep restart
      systemd:
        name: keepalived
        state: restarted
web的剧本比较简单这里就不写了
二、DNS(Router):
下面的配置有问题,无法将解析转发给 server3,需要将 Router配置为 forward 区域,将请求全部转发给server3
vim /etc/bind/named.conf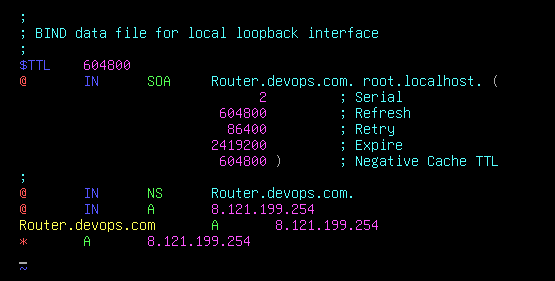
vim db.devops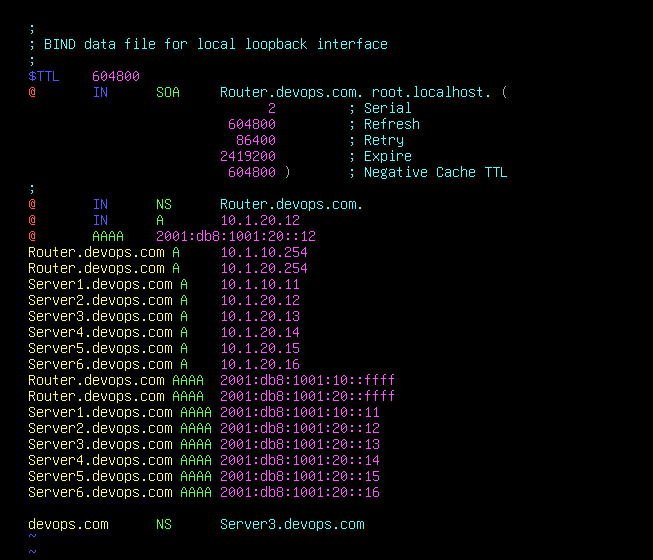
vim db.out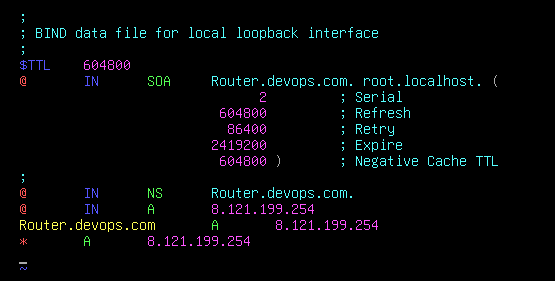
三、samba + ldap:
先正常配置ldap
samba用户的密码和 ldap用户的密码是不同的,samba用户的密码是单独定义的一个属性
1、配置 samba:
apt install -y sambamkdir -p /share/samba
vim /etc/samba/smb.conf
# 在末尾添加: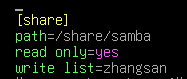
# 设置global属性:
vim /etc/samba/smb.conf
## 在 man smb.conf 中可以查询到: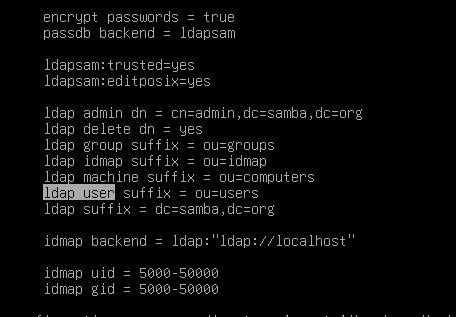
最简化需要四条
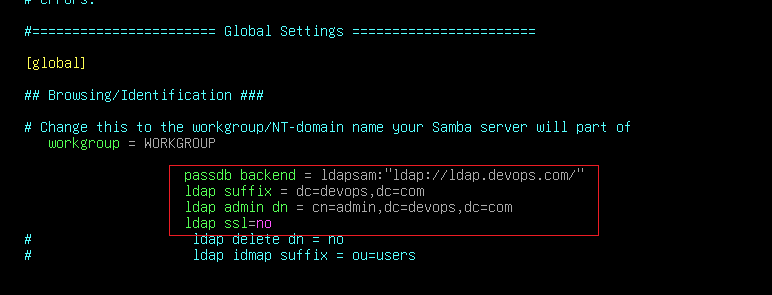
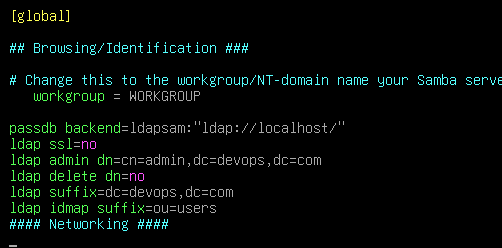
2、samba-tools 创建ldap用户:
这个类似 ldapscripts,用于创建ldap用户,它创建出来的用户,携带 objectClass: sambaSamAccount属性,只有携带这个属性的ldap用户,才能够登陆samba
apt install -y smbldap-tools # ldap 导入samba属性:
ldapadd -Q -Y EXTERNAL -H ldapi:/// -f /usr/share/doc/samba/examples/LDAP/samba.ldif# 导入管理员密码:
## 该命令依赖于 /etc/samba/smb.conf 中的 ldap admin dn 属性(添加的是这个用户的密码)。
smbpasswd -Wcd /etc/smbldap-tools
cp /usr/share/doc/smbldap-tools/examples/smbldap.conf .
# 生成sid并输出到配置文件中:
## 该命令依赖于 /etc/samba/smb.conf 中的配置。
net getlocalsid >> smbldap.conf
vim /etc/smbldap-tools/smbldap.conf
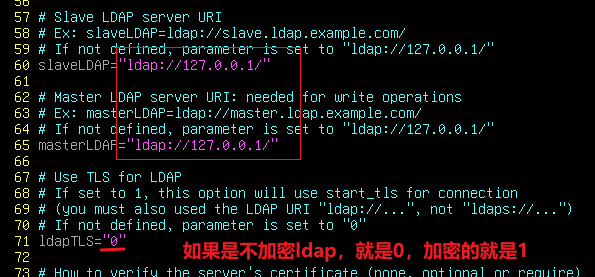
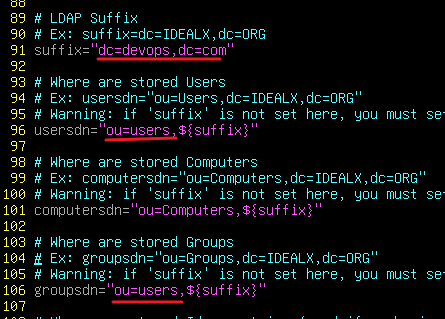
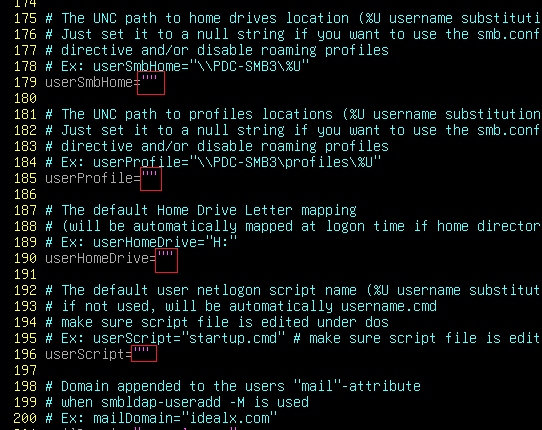
cd /etc/smbldap-tools
cp /usr/share/doc/smbldap-tools/examples/smbldap_bind.conf .

vim smbldap_bind.conf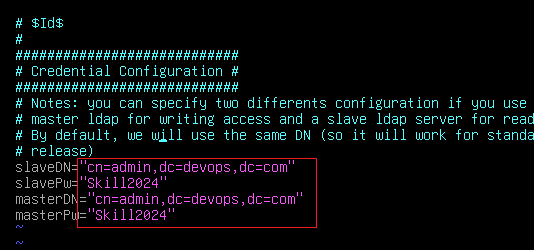
# 创建ldap对象:
smbldap-populate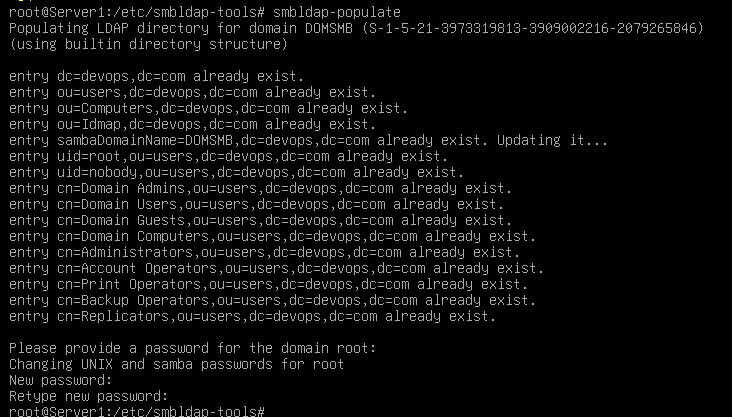
#  创建ldap用户:
smbldap-useradd -a zhangsan -P
## 输入密码
这是这个工具创建出来的用户属性:
ldapsearch -x -H ldapi:/// -D "cn=admin,dc=devops,dc=com" -w Skill2024 -b "ou=users,dc=devops,dc=com" "(objectClass=inetOrgPerson)" "*" "+"
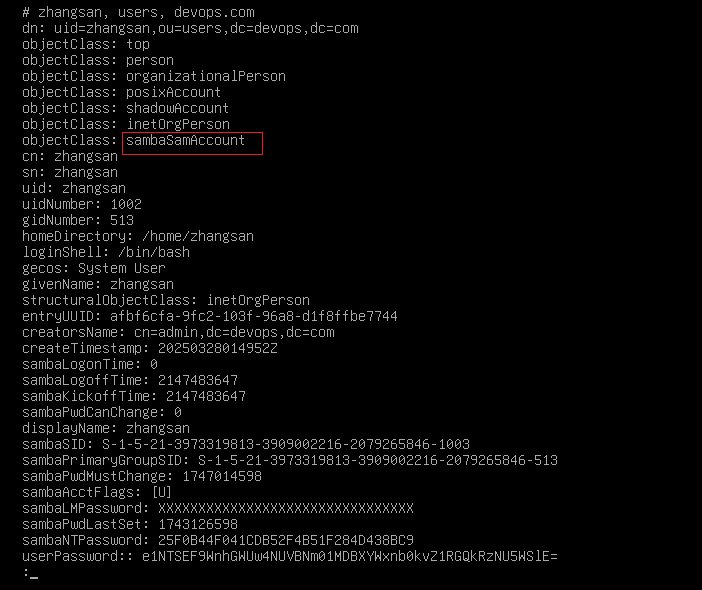
ldapsearch -x -b "dc=devops,dc=com"
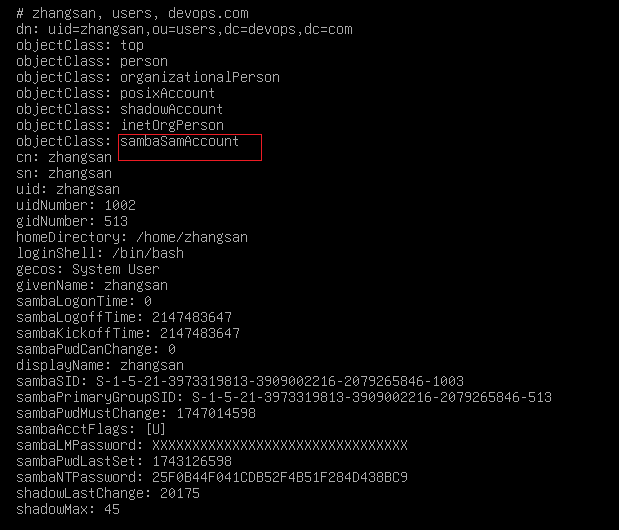
可以将这些属性复制出去稍加修改使用ldapscripts创建,但是没有必要,还不如直接使用 smbldap-useradd 创建
3、samba 连接ldap:
# samba服务器上配置:
apt install -y nslcd
systemctl restart smbd //连接 ldap 后需要重启一下 smbd
·客户端连接测试:
smbclient //10.1.20.11/share -U zhangsan
4、raid:
# 添加4块6G硬盘
## 题目要求大于10g,其实添加4块5G硬盘就足够了,但是会存在一个算法问题,实际大小是10g,但是会显示为9.8g
apt install -y mdadm
mdadm -C md0 -l5 -n3 -x1 /dev/sd[bcde]
mdadm -Ds >> /etc/mdadm/mdadm.conf
update-initramfs -u
rebootmkfx.ext4 /dev/md0
echo "/dev/md0 /share ext4 defaults 0 0" >> /etc/fstab
systemctl daemon-reload
mount -a四、openvpn:
cd /usr/share/easyrsa
vim easyrsa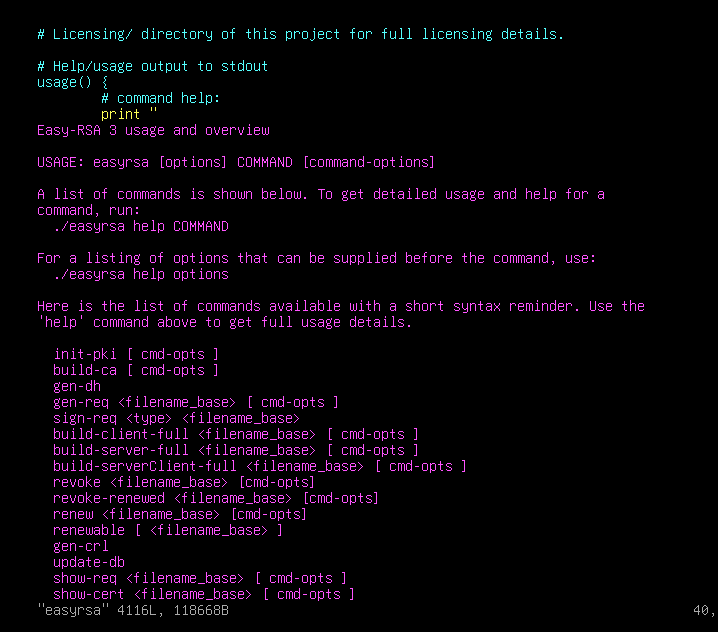
./easyrsa init-pki
./easyrsa build-ca
./easyrsa build-server-full server nopass
./easyrsa build-client-full client nopass
./easyrsa gen-dh
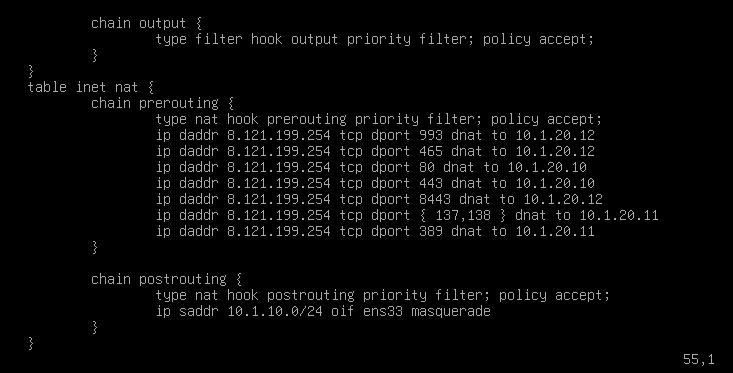
五、nftables:
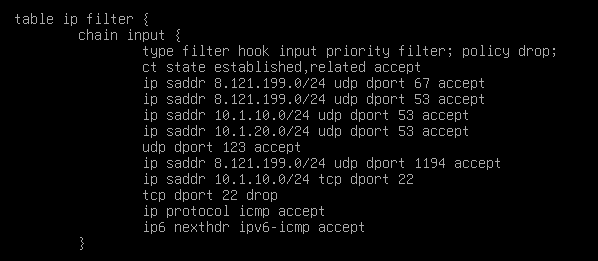
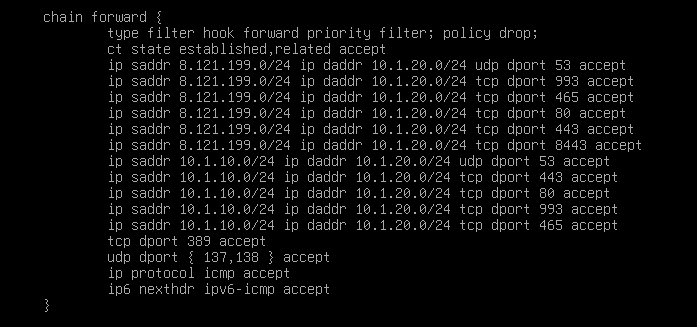
六、NAT64:
apt install -y tayga# 自定义一个nat64接口ipv4和ipv6的地址(任意)
vim /etc/default/tayga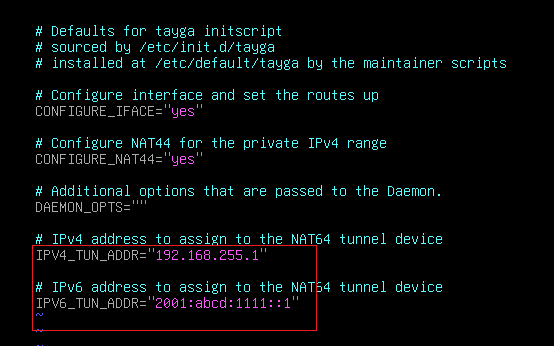
重启tayga后ip a 查看:
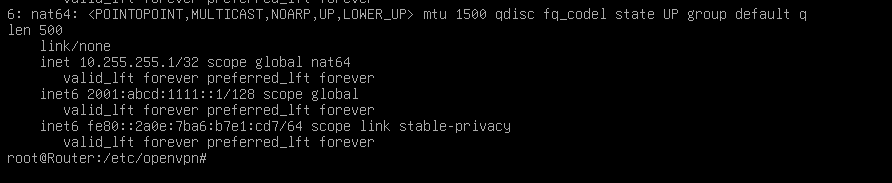
vim /etc/tayga.conf设置刚刚指定的ipv4和ipv6地址:




systemctl restart tayga