A-Mail、Web、Ftp、Ansible.note
十、mail:
1、postfix(app1):
apt install -y postfixvim /etc/postfix/main.cf
## cat main.cf.proto 中有模板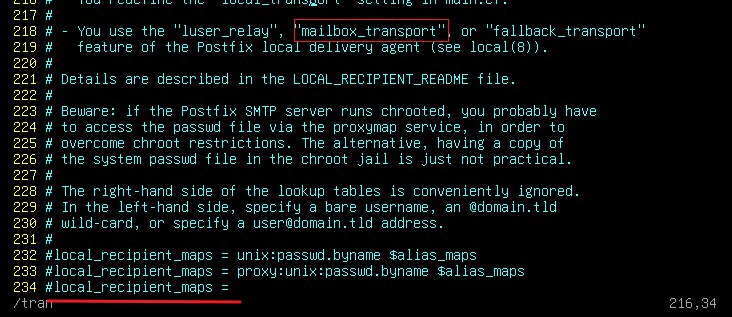
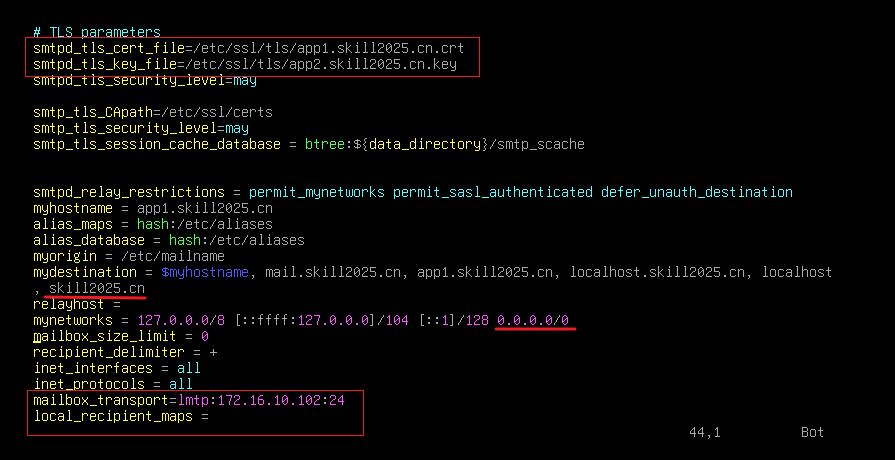
vim master.cf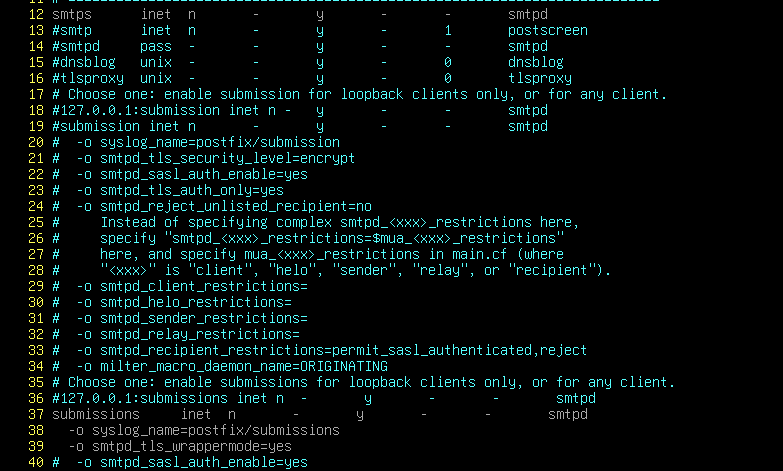
systemctl restart postfix
·邮件群发:
# 先 批量获取用户名:
vim user.sh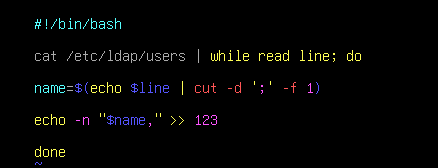
cat 123

或者:
# 单独复制 excel 中的用户名进去,然后分隔:
egrep -v '^$' 1 > name
cat name | tr '\n' ',' > user
vim /etc/aliases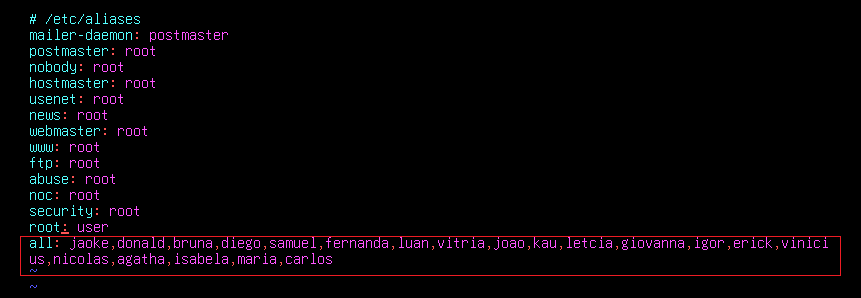
postalias /etc/aliases
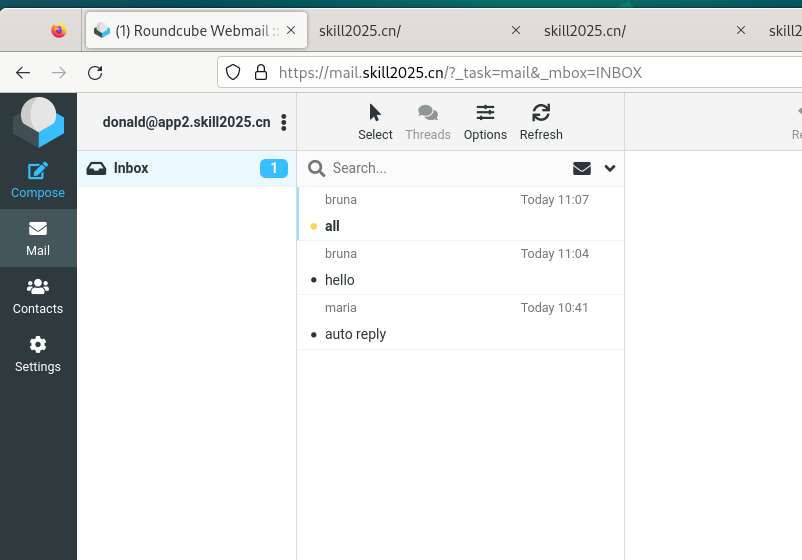
·maria用户 邮件自动回复:
# dovecot 安装软件包:
apt install -y dovecot-sieve

# postfix 配置邮件自动回复(这个要做在postfix上):
apt install -y nslcd    //连接ldap获取用户
chmod -R 777 /home

apt install -y vacation
su maria
vacation
y
y
vim ~/.vacation.msg    //编辑自动回复内容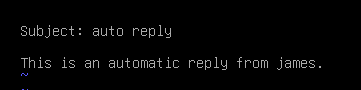
2、dovecot(app2):
apt install -y dovecot-imapd dovecot-lmtpdcd /etc/dovecot/conf.d
vim 10-auth.conf
## 将 %Lu 改为 %Ln


vim 10-ssl.conf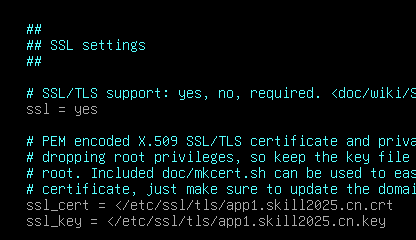
vim 10-master.conf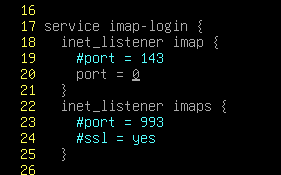
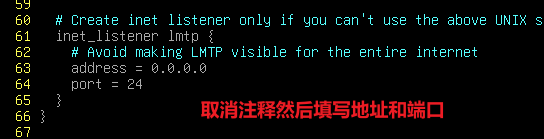
systemctl restart dovecot
apt install -y nslcd 连接ldap
3、webmail:
(1)mysql(data):
apt install -y mariadb-server
mysql
 create database roundcube;
 exit
## 导入 从roundcube拷贝过来的文件:
scp root@172.16.10.101:/usr/share/roundcube/SQL/mysql.initial.sql .
mysql roundcube < mysql.initial.sql
# 配置用户权限:
mysql
grant all privileges on *.* to 'root'@'localhost' identified by 'P@ssw0rD';
grant all privileges on roundcube.* to 'dbadmin'@'172.16.10.101' identified by 'P@ssw0rD';
grant all privileges on roundcube.* to 'dbadmin'@'172.16.10.102' identified by 'P@ssw0rD';vim /etc/mysql/mariadb.conf.d/50-server.cnf
systemctl restart mysql
(2)webmail:
apt install -y roundcube //不配置mysql数据库vim /etc/roundcube/config.inc.php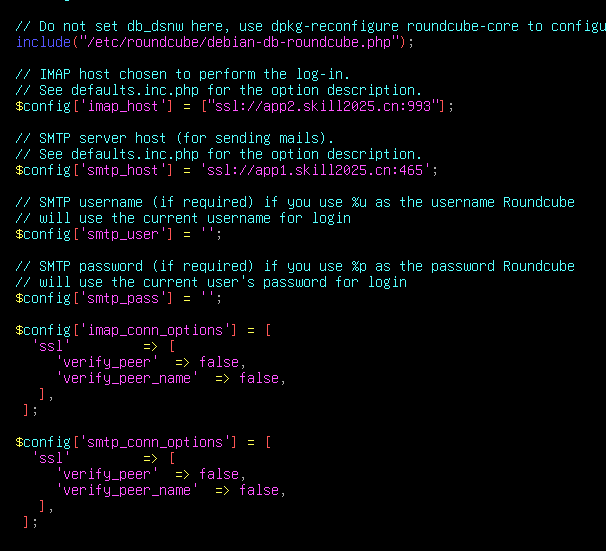
vim debian-db.php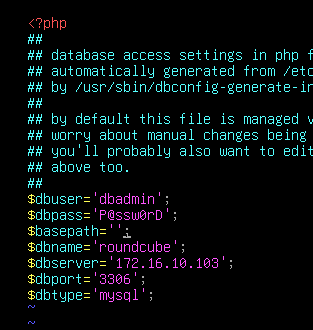
chmod -R 777 /usr/share/roundcube
chmod -R 777 /etc/roundcube
## 两条都是必要的,因为更改了apache2进程用户,roundcube无法访问文件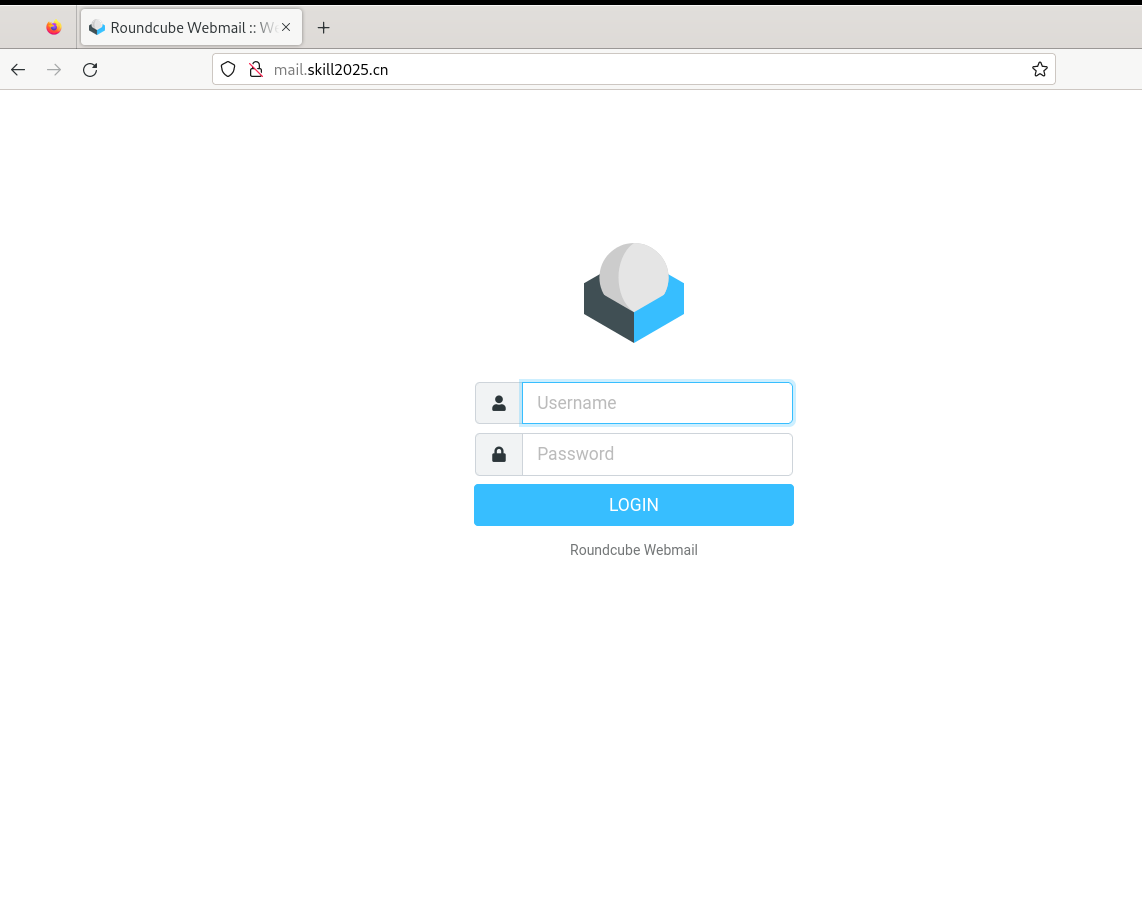
十一、Web(app1):
1、配置 站点:
apt install -y apache2 php8.2-fpm libapache2-mod-php libapache2-mod-php8.2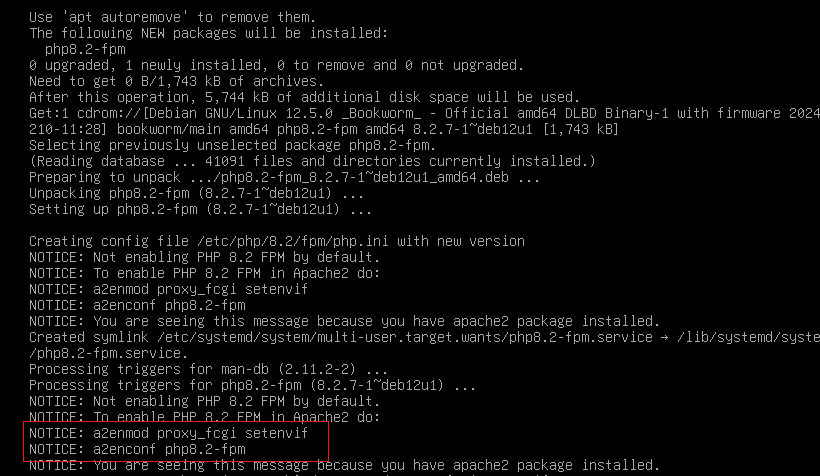
a2enmod php8.2
a2enconf php8.2-fpm
a2enmod proxy_fcgi
a2enmod ssl
vim /etc/apache2/apache2.conf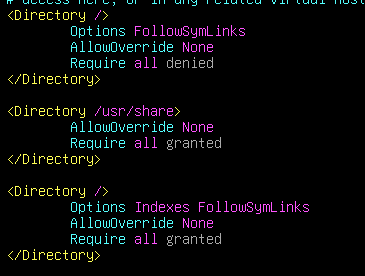
vim /etc/apache2/sites-enabled/000-default.conf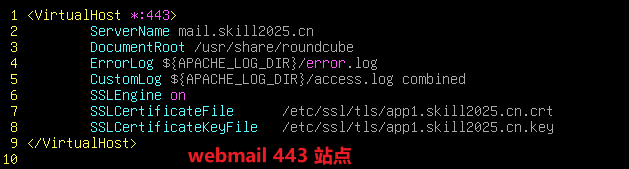
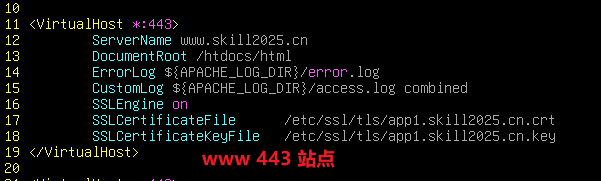
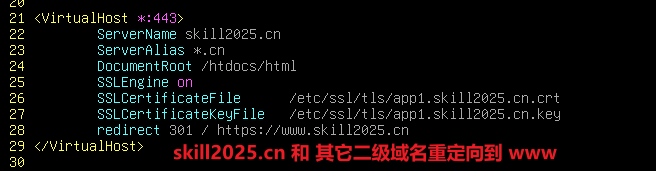
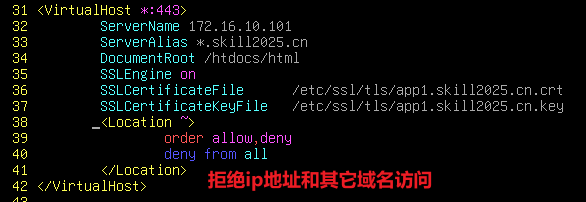
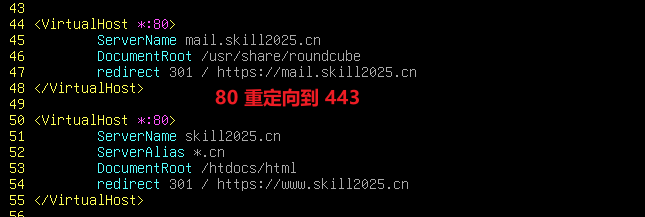
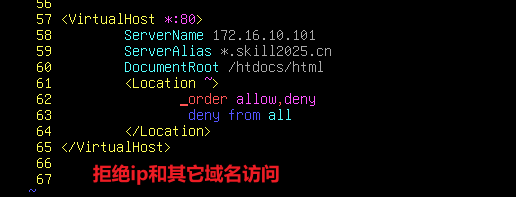
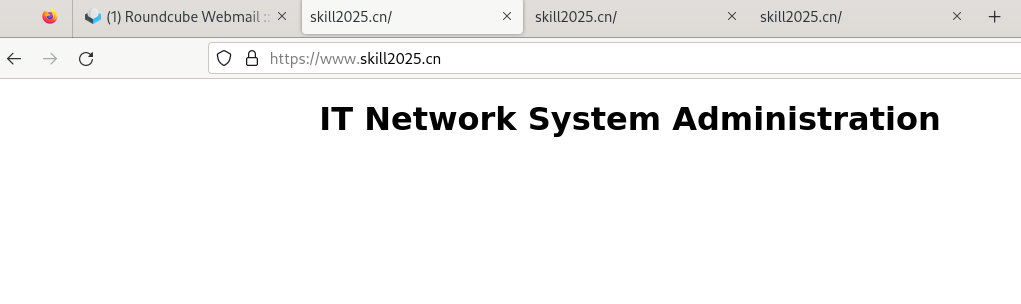
vim /htdocs/html/index.html
echo "<?php phpinfo(); ?> " > /htdocs/html/phpinfo.php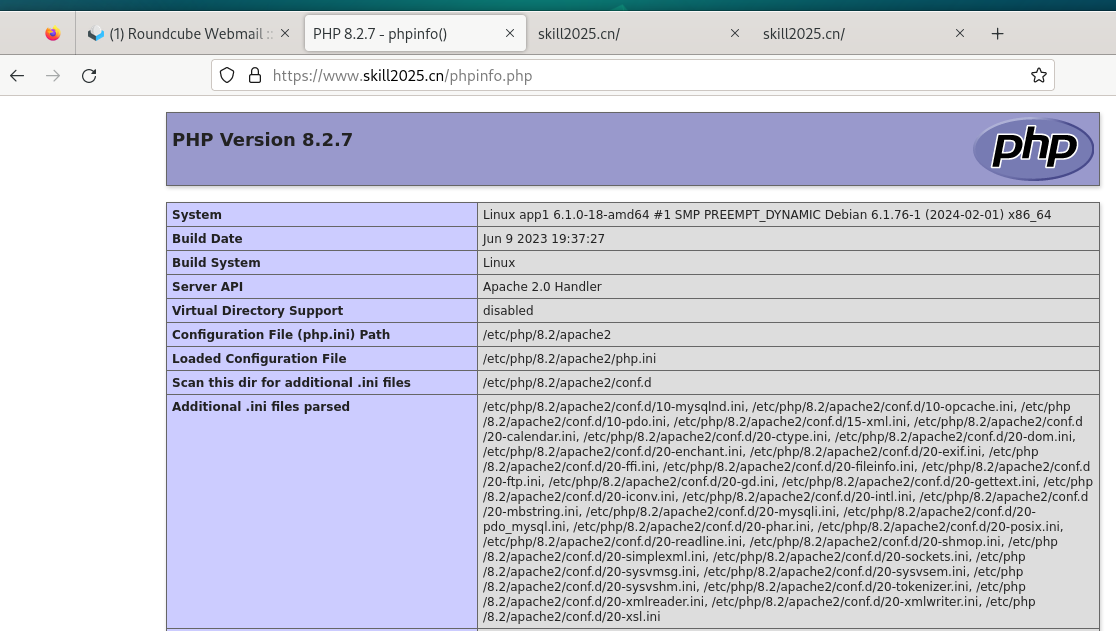
2、启用 OPCache:
vim /etc/php/8.2/php.ini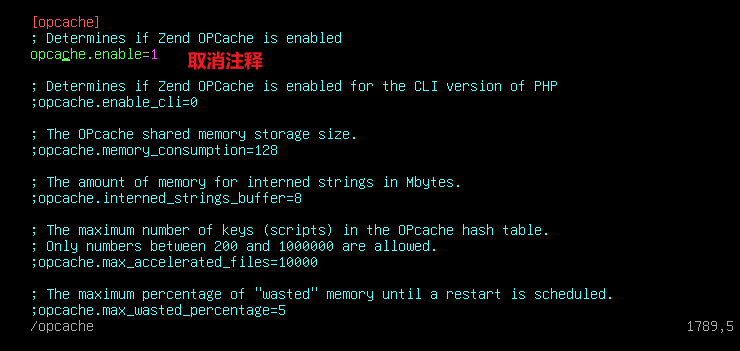
systemctl restart php8.2-fpm
3、记录访问日志:
# 自定义一个日志格式:
vim /etc/apache2/apache2.conf
## 新建一行,格式为:LogFormat "%h %t %U%q" apache2(抄上面的即可)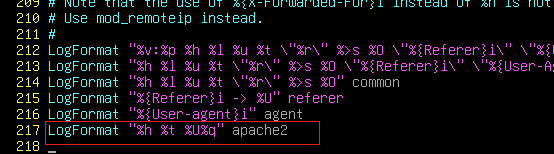
# 定义日志保存路径:
vim /etc/apache2/sites-enabled/000-default.conf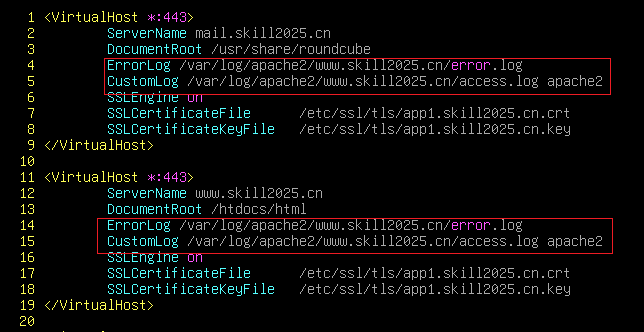
4、隐藏服务器系统和版本信息:
vim conf-enabled/security.conf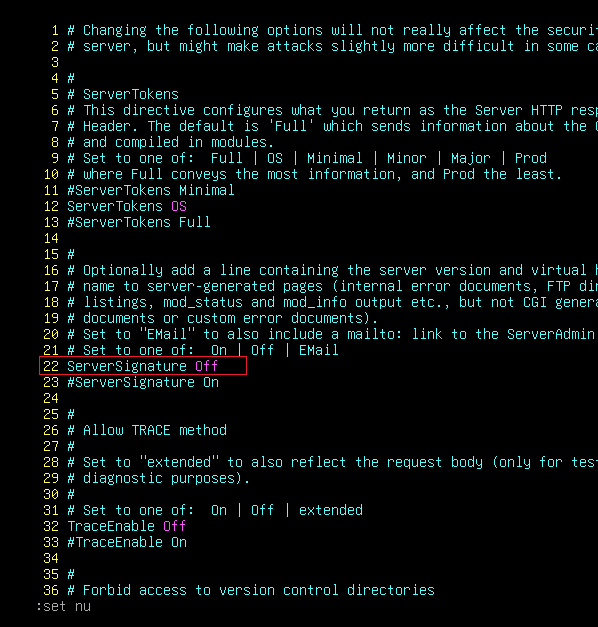
5、停机维护站点:
在 fw上配置
最好配置一个 hosts 记录在 fw上,以防 dns配置掉了
模板:/usr/share/doc/nftables/examples/nat.nft
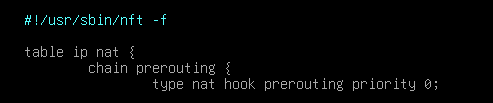

写法一:
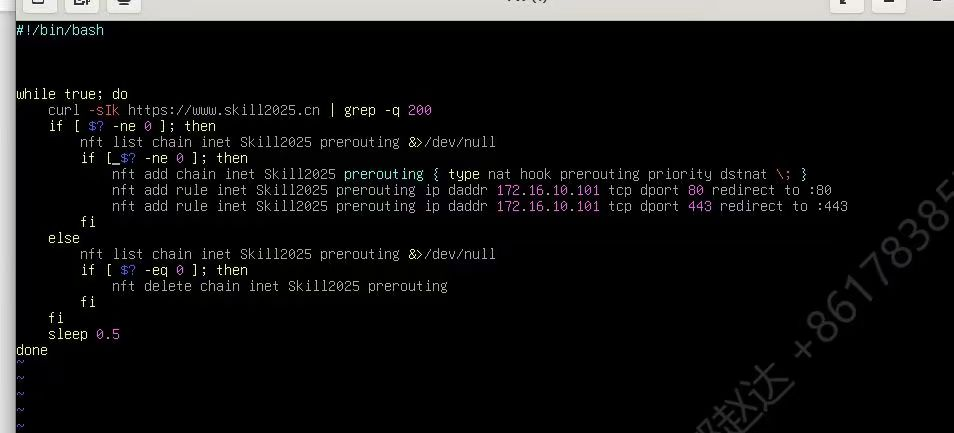
写法二:
1、配置 停机维护站点(fw):
(1)编写脚本检查web状态(在fw机器上):
一定要 sleep 2秒,否则一直重启 nftables会报错
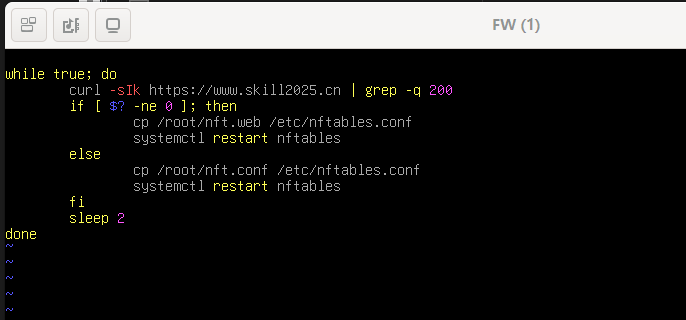
or
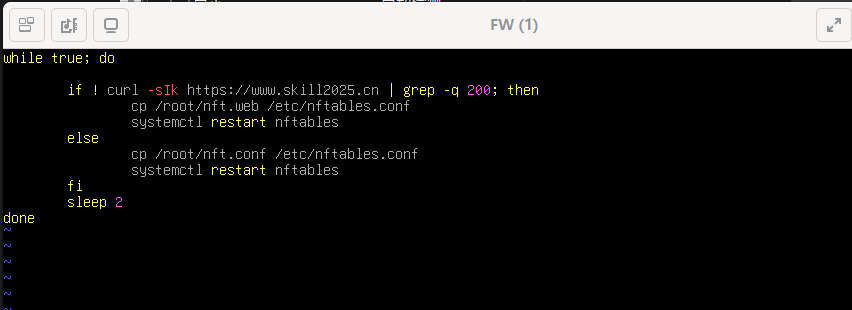
bash /root/web.sh &
# 将该命令写入 /etc/profile 中保证重启不失效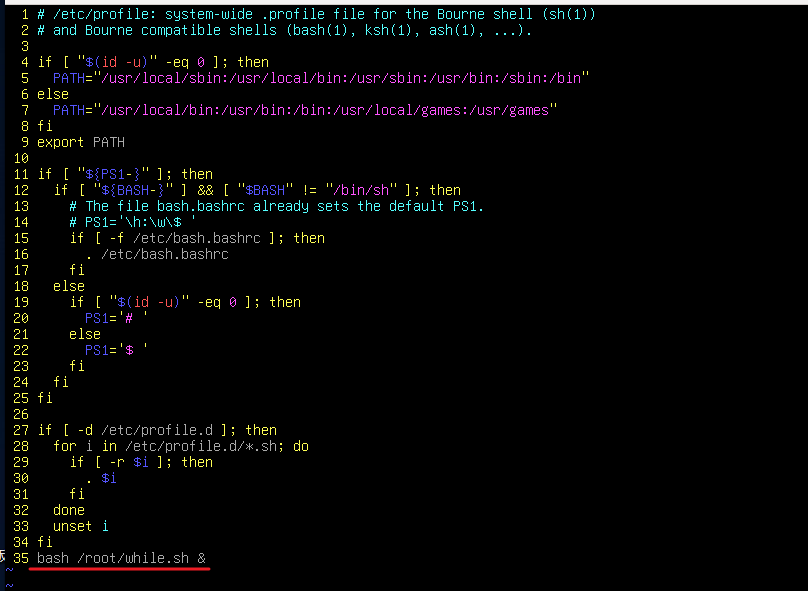
/root/nft.web
# 有重定向: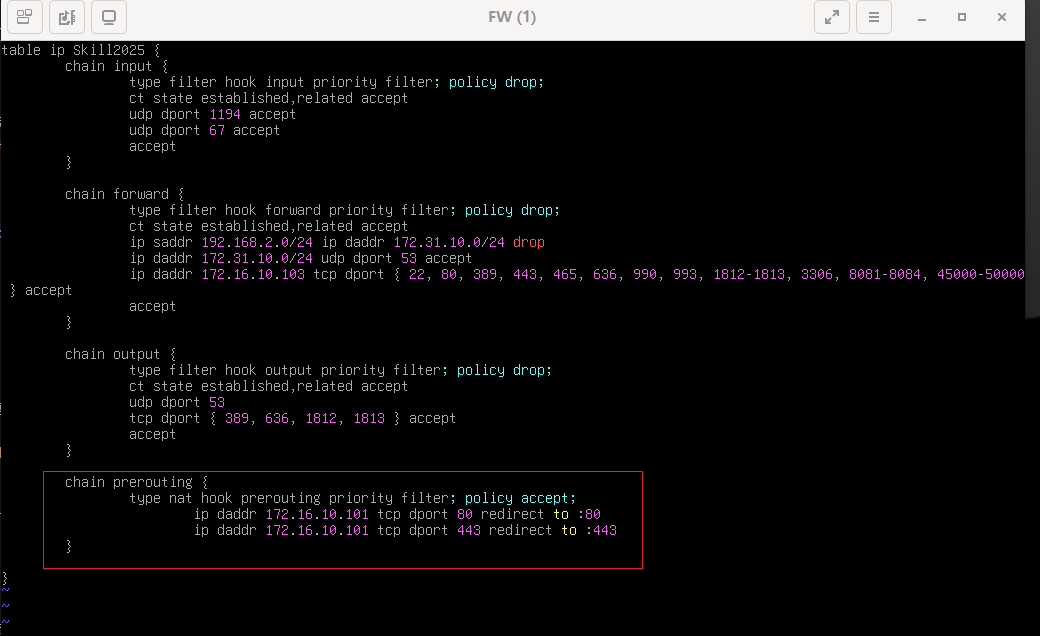
将去往172.16.10.101的80和443端口重定向到本机的80和443
不能使用 dnat,因为该数据包已经经过router机器dnat一次了,再次dnat数据包会出问题
/root/nft.conf
# 没有重定向的条目: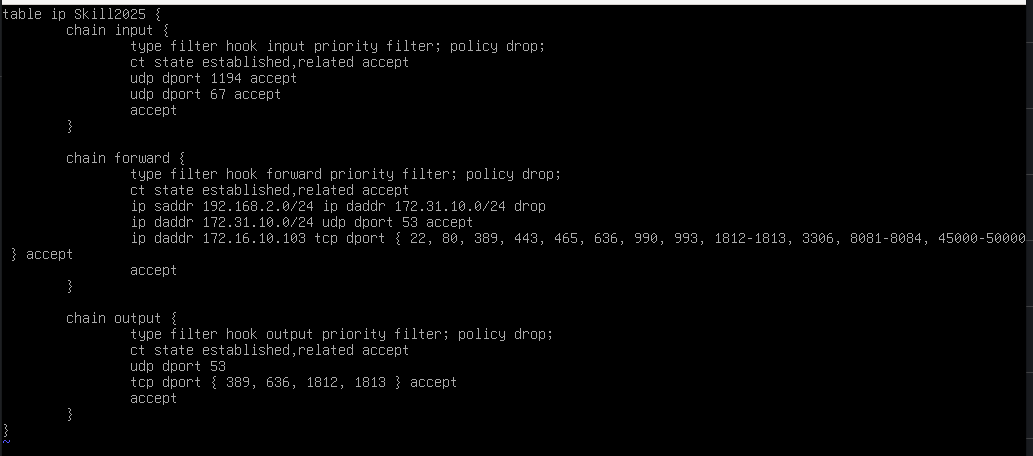
# 命令解释:
curl -sIk https://www.skill2025.cn | grep -q 200
-s    //忽略报错
-I    //显示响应头信息,不显示内容
-k    //忽略https报错

$?    //显示上一条命令执行的结果,如果执行报错则为 1,执行成功则为 0
-ne    //不等于
&>/dev/null    //将输出屏蔽
(2)配置 停机维护站点:
在fw上配置
apt install -y apache2
# 正常配置 80 和 443端口即可index.html 文件:

2、配置中文页面:
只需要在 客户端上编写中文html,然后拷贝给fw机器上的web服务器即可
apt install -y ibus-pinyin ibus-table fonts-wqy-* -y安装完成后重启
添加 中文输入法:
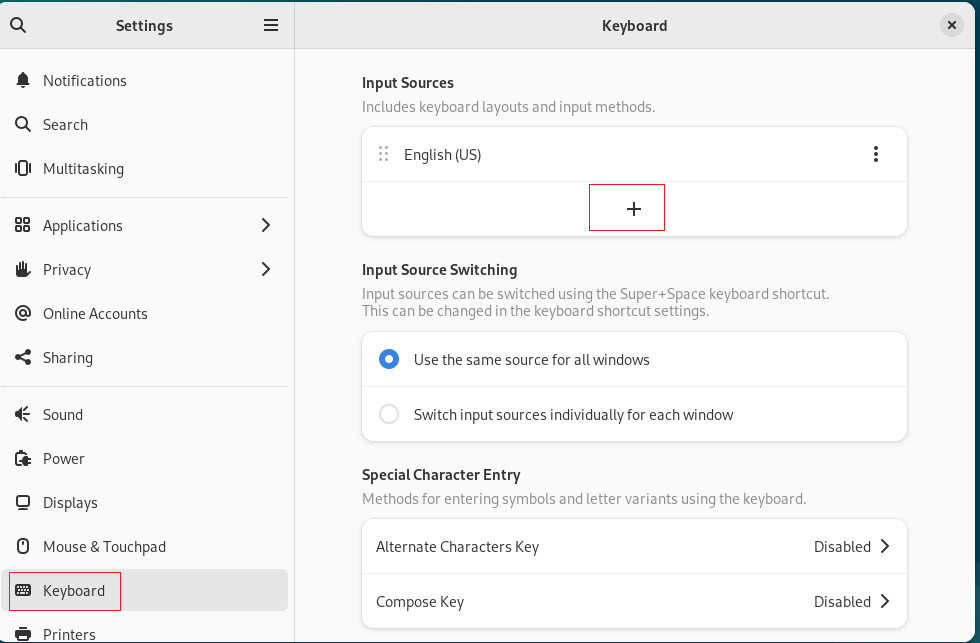
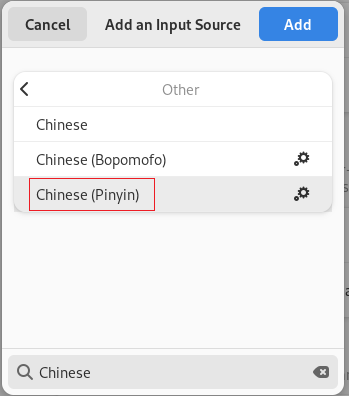
切换输入法:
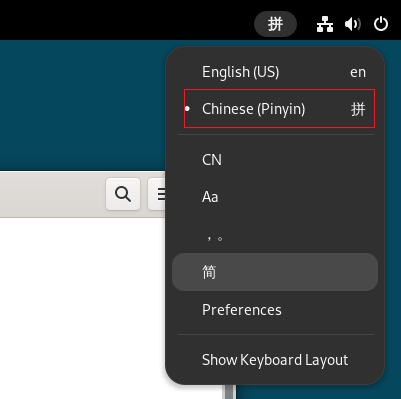
直接编写中文然后拷贝给 web即可
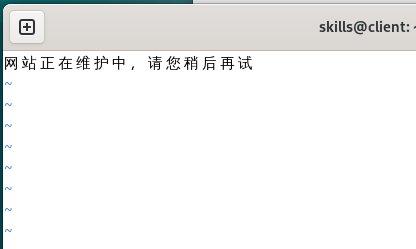
apache2 需要编写一下 index 文件,否则客户端显示是乱码:

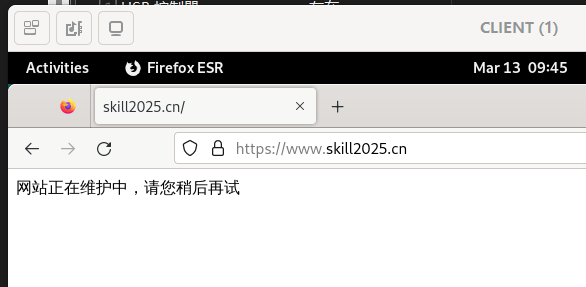
·测试:
在 app1 上停止web,客户端访问到停机维护站点:

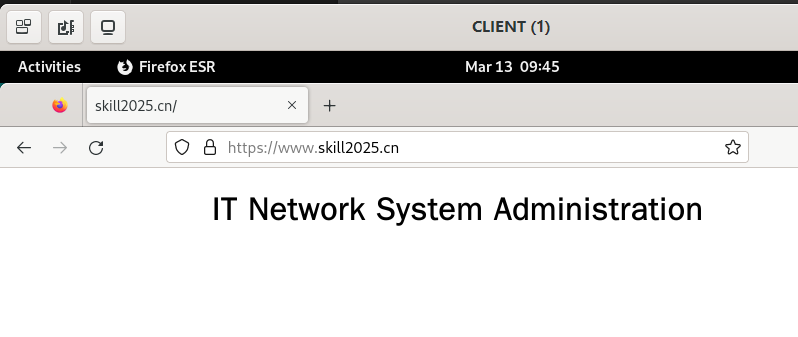
在 app1 上开启web,客户端访问到 app1:

十二、ftp:
默认就能使用 ldap用户进行登陆,只需要安装 nslcd进行连接ldap即可
1、配置 proftpd:
apt install -y proftpd proftpd-mod-crypto注意要安装 crypto 这个软件包,否则 ssl 无法起来
vim /etc/proftpd/proftpd.conf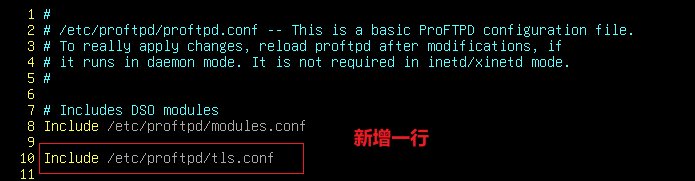
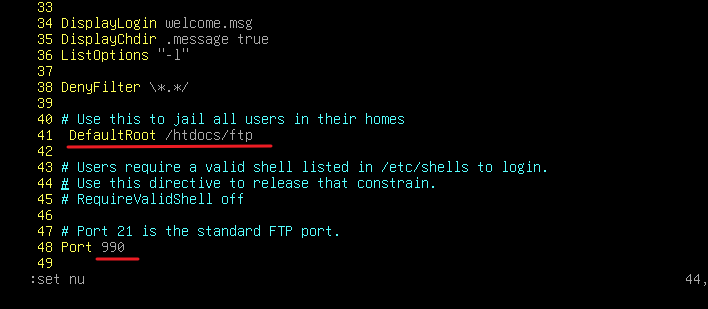
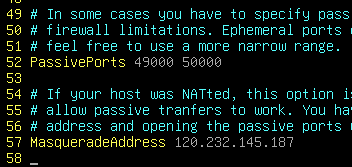
(外网客户端通过nat访问进来会有问题,所以需要配置这个)在 nat 上将 被动端口范围转发给 ftp

vim /etc/proftpd/modules.conf
vim /etc/proftpd/tls.conf
# UseImplicitSSL 需要背,没得抄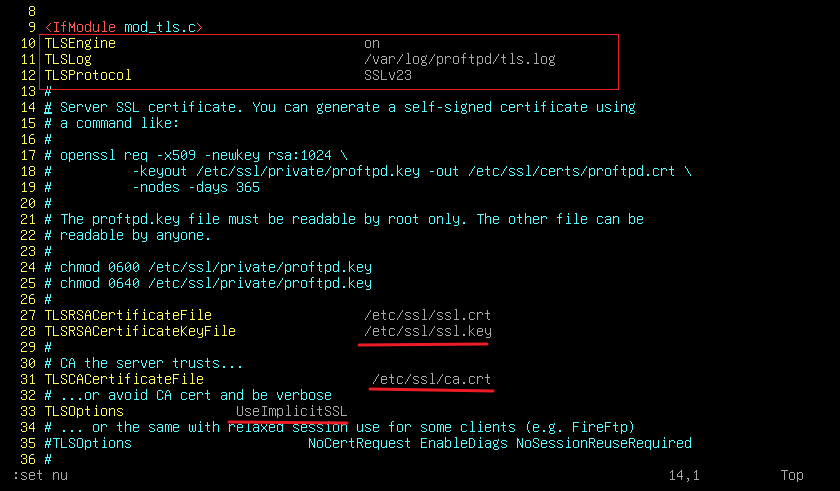
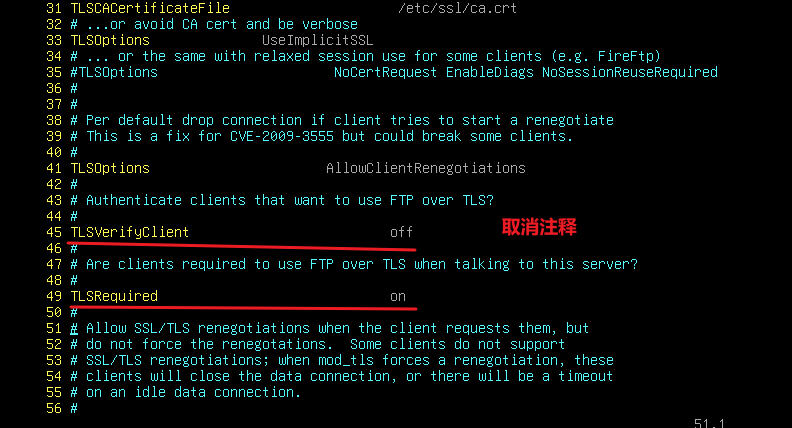
systemctl restart proftpd
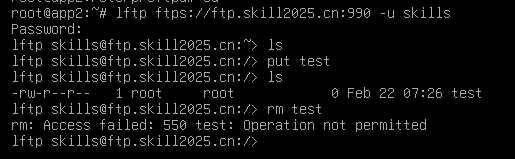
2、配置用户没有删除文件的权限(vsftpd、proftpd通用):
chmod o+t /htdocs/ftp
## o+t: 只有文件所属者和root才能够删除文件
vim /root/while.sh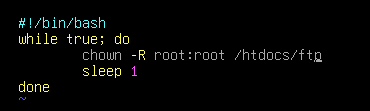
bash while.sh &
# 将该命令写入到 /etc/profile 中,重启也会生效
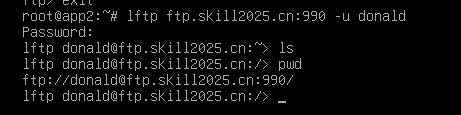
·测试:
十三、Ansible:
ansible建议尽早做
·基础配置(host):
apt install -y ansible python3 sshpass
mkdir /etc/ansible
vim /etc/ansible/ansible.cfg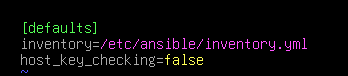
vim /etc/ansible/inventory.yml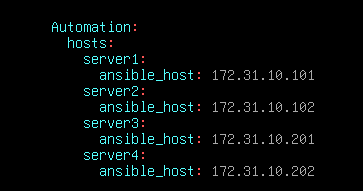
mkdir /etc/ansible/group_vars
vim group_vars/all.yml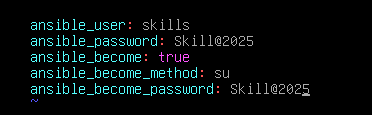
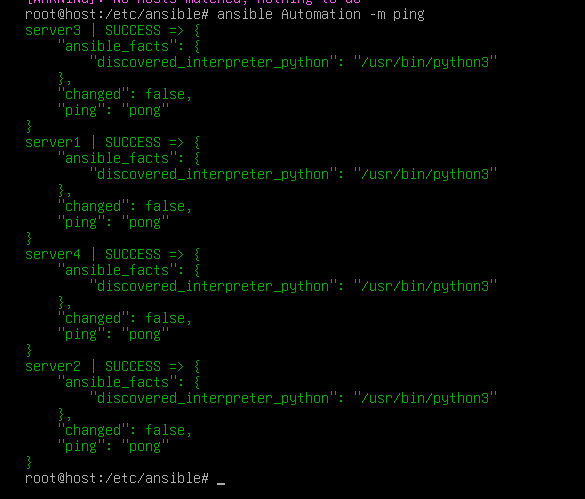
·client连接vscode:
(1)安装 deb文件:
dpkg --install code.deb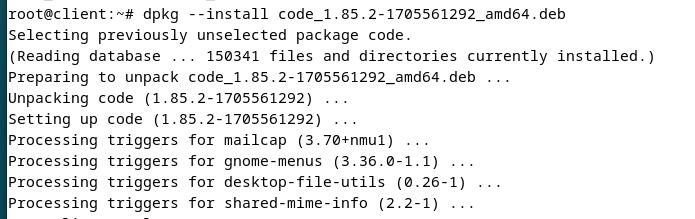
(2)vscode导入离线插件:
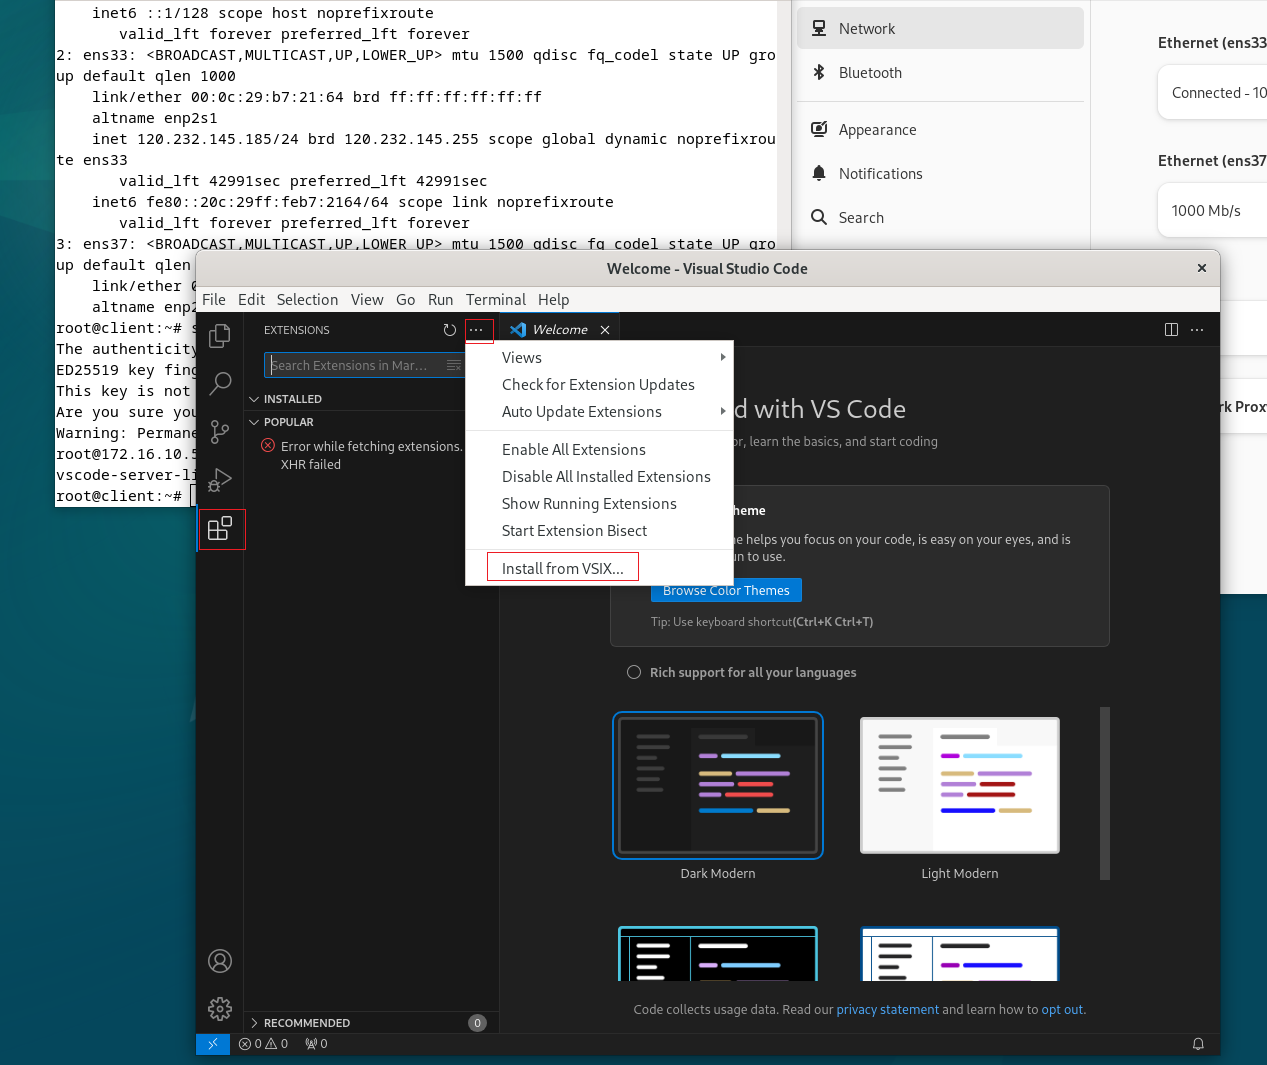
然后逐个选择离线插件即可
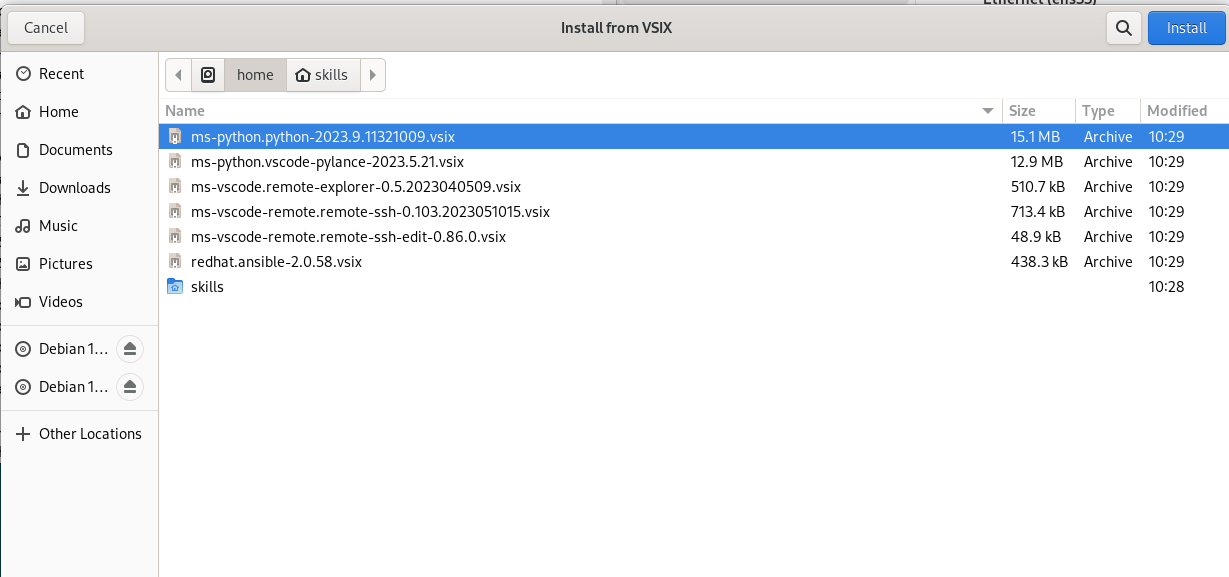
(3)将 附件拷贝给 host 并解压:
scp vscode-server-linux-x64.tar.gz root@172.16.10.50:~然后图形化连接 ansible即可
1、1-initial.yml
---
- name: initial
  hosts: all
  gather_facts: false
  tasks:
    - name: hostname
      raw: apt install -y python3 dbus bash-completion vim net-tools man systemd-timesyncd curl wget lynx dnsutils ftp lftp nfs-client smbclient ssh telnet traceroute ntpdate lsof nmap ipcalc
      changed_when: false

    - name: hostname
      raw: systemctl restart dbus
      changed_when: false

    - name: hostname
      hostname:
        name: "{{ inventory_hostname }}"

    - name: hostname
      lineinfile:
        path: /etc/hosts
        search_string: 127.0.1.1
        line: "127.0.1.1 {{ inventory_hostname }}.skill2025.cn {{ inventory_hostname }} debian"

    - name: hostname
      timezone:
        name: Asia/Shanghai
      notify: hostname

  handlers:
    - name: hostname
      raw: localectl set-x11-keymap us

- name: initial
  hosts: all
  gather_facts: false
  tasks:
    - name: timesync
      apt:
        name: systemd-timesyncd
        update_cache: false

    - name: timesync
      lineinfile:
        path: /etc/systemd/timesyncd.conf
        line: "NTP=120.232.145.186"
      notify: timesync

  handlers:
    - name: timesync
      systemd:
        state: restarted
        name: systemd-timesyncd


- name: initial
  hosts: all
  gather_facts: false
  tasks:
    - name: ssh
      raw: mkdir -p /root/.ssh
      changed_when: false

    - name: ssh
      copy:
        src: /data/authorized_keys
        dest: /root/.ssh

    - name: ssh
      lineinfile:
        path: /etc/ssh/sshd_config
        line: "permitrootlogin yes"
      notify: ssh

  handlers:
    - name: ssh
      systemd:
        state: restarted
        name: sshd


- name: initial
  hosts: all
  gather_facts: false
  tasks:
    - name: package
      ping:
·在host本地配置 ssh要求:
在 /etc/hosts 中配置 server[1,2,3,4] 的域名解析
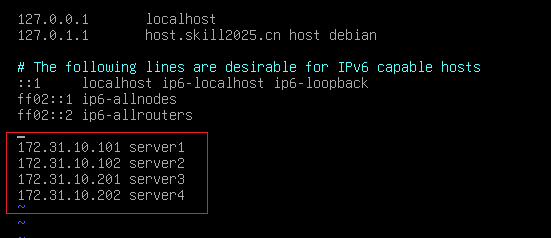
配置 默认使用 root用户进行ssh连接:
vim /etc/ssh/ssh_config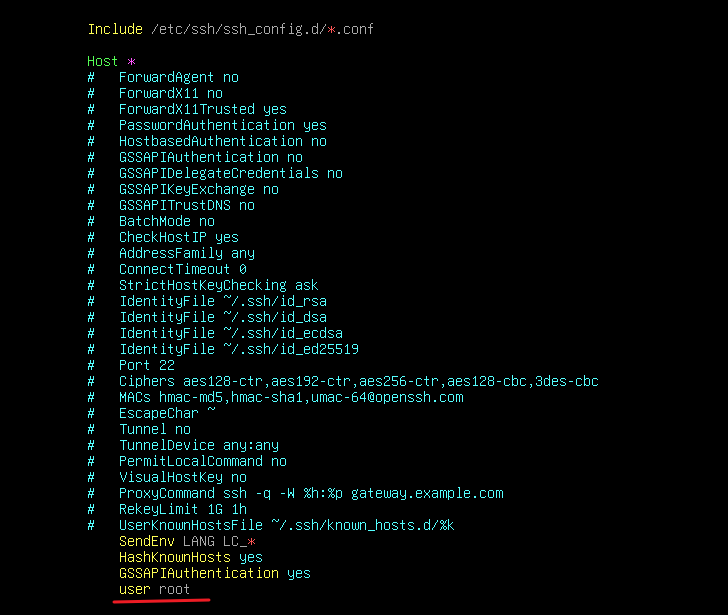
2、dns-server.yml:
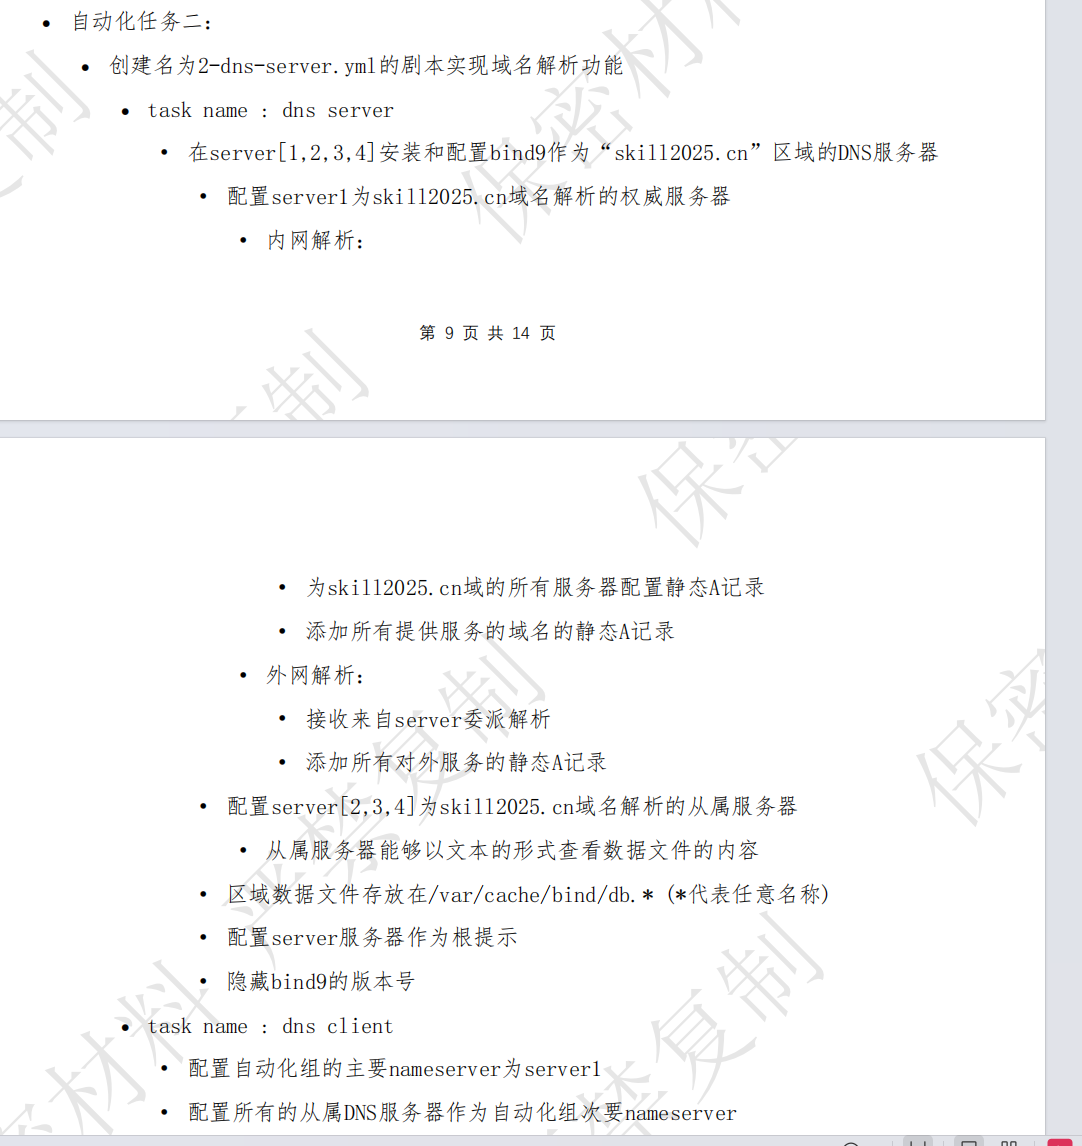
·dns 配置:
(1)dns 主服务器:
vim /etc/bind/named.conf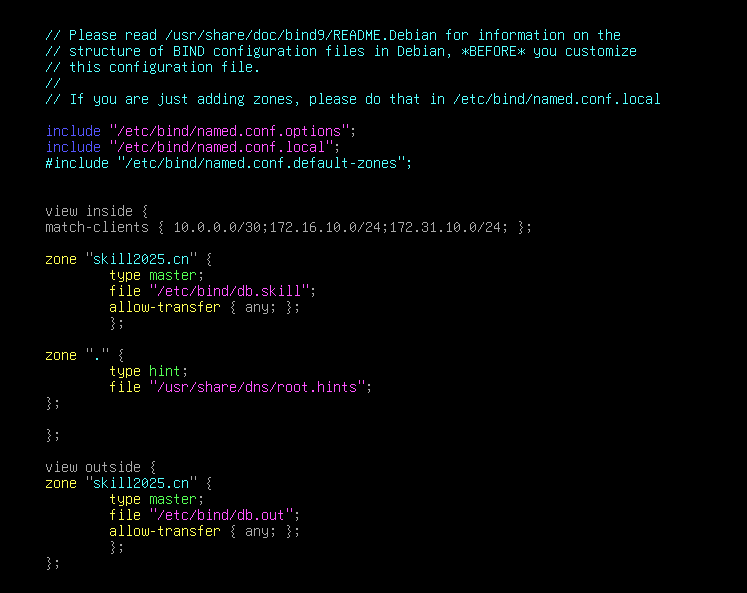
vim db.skill
# 要设置 ns为 server1,因为题目有说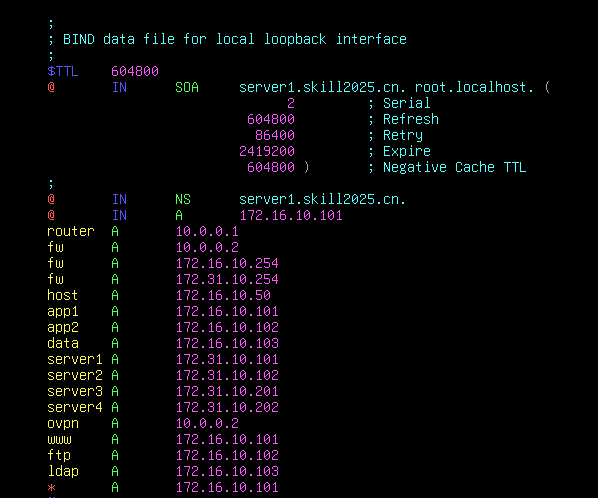
vim db.out
# 题目要求的外网解析A记录使用 * 即可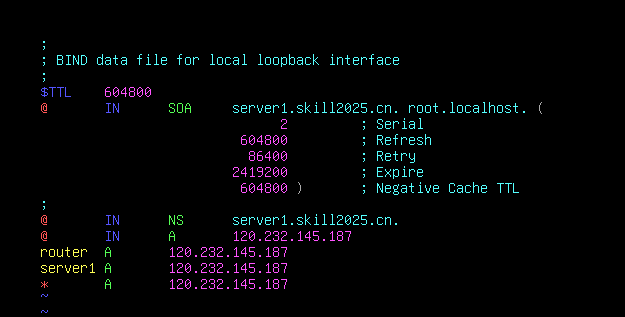
vim db.out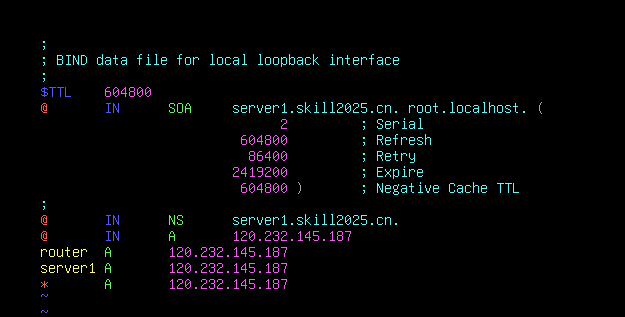
vim /usr/share/dns/root.hints
# 根据文件中默认的格式书写即可
·隐藏版本号、以文本形式查看区域文件:
vim named.conf.options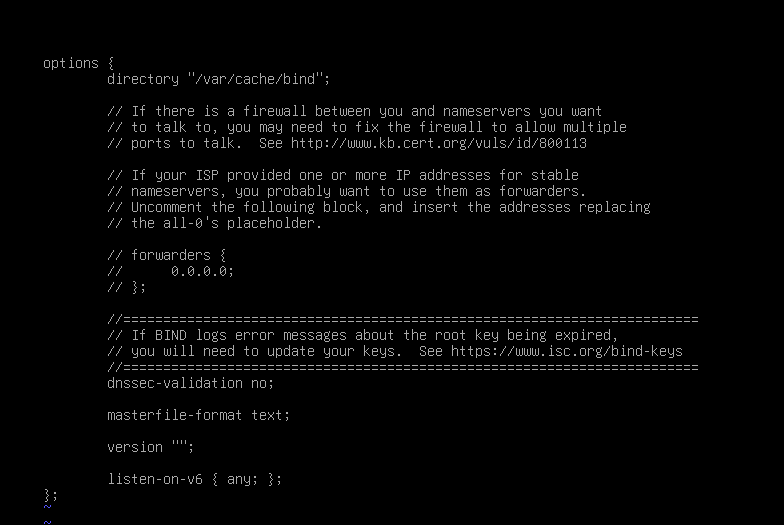
(2)dns 从属服务器:
·如果要将区域文件存到 /etc/bind 目录下:
还要给 /etc/bind/目录 777 的权限,否则客户端没有权限写入
vim /etc/apparmor.d/usr.sbin.named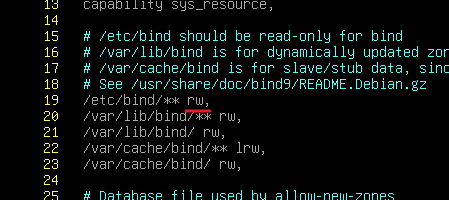
systemctl restart apparmor然后正常配置 dns从属服务器即可
vim /etc/bind/named.conf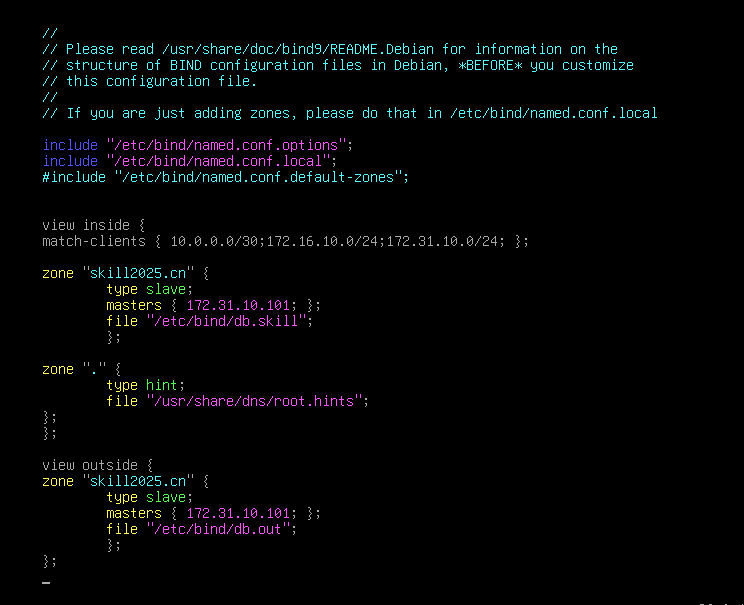
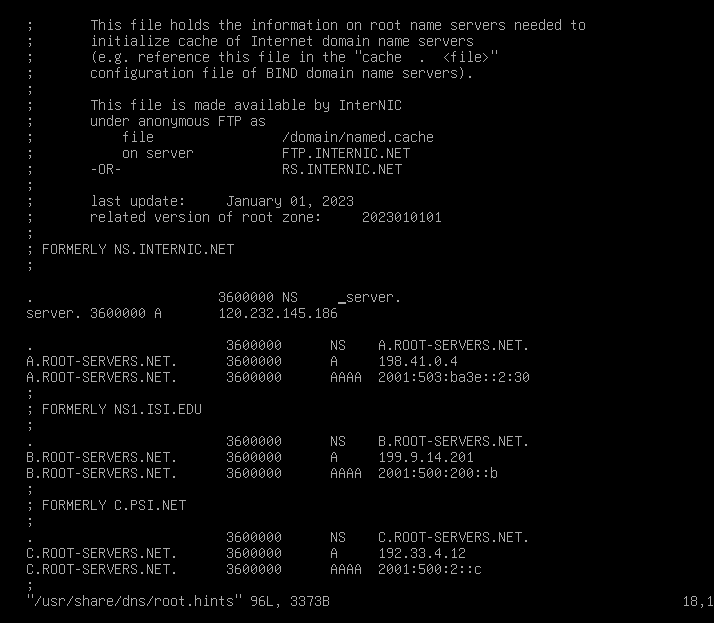
(3)根提示:
注意,如果 根提示服务器写的是 server. ,那么根提示服务器的 db文件中的 ns 就需要写 server
·ansible剧本:
将 dns文件拷贝到 host机器上
---
- name: dns server
  hosts: all
  gather_facts: false
  tasks:
    - name: dns server
      apt:
        name: bind9
        update_cache: false

    - name: dns server
      raw: |
        echo nameserver 172.31.10.101 > /etc/resolv.conf
        echo nameserver 172.31.10.102 >> /etc/resolv.conf
        echo nameserver 172.31.10.201 >> /etc/resolv.conf
        echo nameserver 172.31.10.202 >> /etc/resolv.conf
        echo domain skill2025.cn >> /etc/resolv.conf
        echo search skill2025.cn >> /etc/resolv.conf
      changed_when: false

    - name: dns server
      copy:
        src: /data/root.hints
        dest: /usr/share/dns/

- name: dns server
  hosts: server1
  gather_facts: false
  tasks:
    - name: dns server
      copy:
        src: /data/named.conf
        dest: /etc/bind
      notify: dns server

    - name: dns server
      copy:
        src: /data/db.skill
        dest: /etc/bind
      notify: dns server

    - name: dns server
      copy:
        src: /data/db.out
        dest: /etc/bind
      notify: dns server

    - name: dns server
      copy:
        src: /data/named.conf.options
        dest: /etc/bind
      notify: dns server

  handlers:
    - name: dns server
      systemd:
        state: restarted
        name: bind9


- name: dns server
  hosts: server2,server3,server4
  gather_facts: false
  tasks:
    - name: dns server
      copy:
        src: /data/named.slave
        dest: /etc/bind/named.conf
      notify: dns server

    - name: dns server
      copy:
        src: /data/usr.sbin.named
        dest: /etc/apparmor.d/
      notify: restart

    - name: dns server
      copy:
        src: /data/named.conf.options
        dest: /etc/bind
      notify: dns server

  handlers:
    - name: restart
      systemd:
        state: restarted
        name: apparmor

    - name: dns server
      systemd:
        state: restarted
        name: bind9
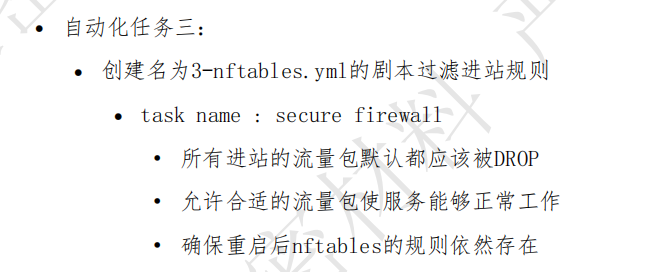
3、3-nftables.yml
·先配置 nftables:
vim /etc/nftables.conf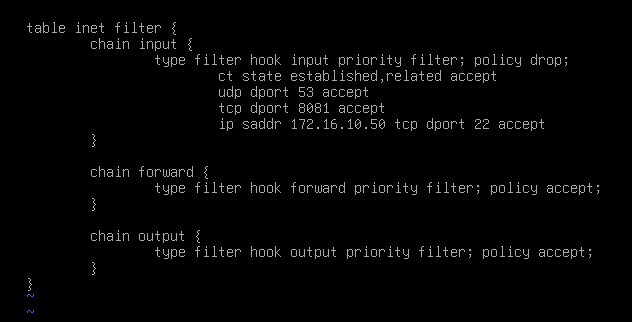
·再编写剧本:
---
- name: secure firewall
  hosts: all
  gather_facts: false
  tasks:
    - name: secure firewall
      copy:
        src: /data/nftables.conf
        dest: /etc
      changed_when: false

    - name: secure firewall
      lineinfile:
        path: /etc/nftables.conf
        search_string: "tcp dport 808"
        line: "tcp dport {{ port }} accept"
      changed_when: false

    - name: secure firewall
      raw: systemctl enable nftables
      changed_when: false

    - name: secure firewall
      systemd:
        state: restarted
        name: nftables
      changed_when: false

    - name: secure firewall

      raw: systemctl enable nftables

      changed_when: false
4、4-web-server.yml:
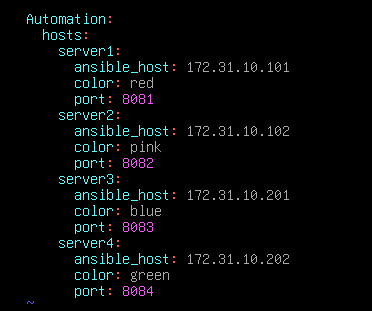
最好配置 https页面
将 网页颜色、监听端口写入 ansible组变量中:
·网页显示颜色的配置:
<body style="color: red">Hello from server1!</br>This site was served by server1.</body>
效果:
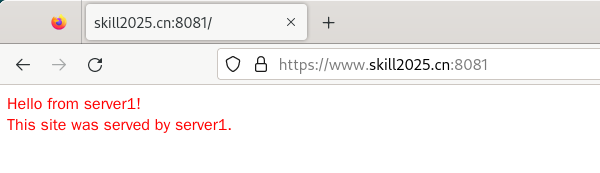
注意文本内容中有感叹号和 . 也需要加上
·编写剧本:
---
- name: web server
  hosts: all
  gather_facts: false
  tasks:
    - name: web server
      apt:
        name: apache2
        update_cache: no

    - name: web server
      raw: echo > /var/www/html/index.html
      changed_when: false

    - name: web server
      lineinfile:
        path: /var/www/html/index.html
        line: "<body style='color: {{ color }}'>Hello from {{ inventory_hostname }}!</br>This site was served by {{ inventory_hostname }}.</body>"
      changed_when: false

    - name: web server
      lineinfile:
        path: /etc/apache2/ports.conf
        search_string: "Listen 80"
        line: "Listen {{ port }}"
      notify: web server

  handlers:
    - name: web server
      systemd:
        state: restarted
        name: apache2