A模块.note
样题:
需要注意的点:
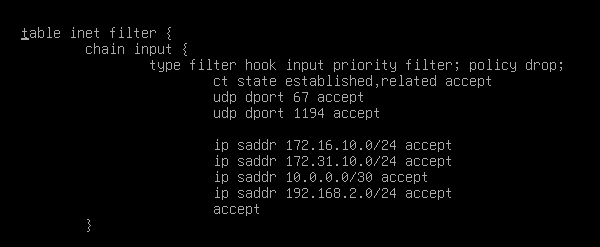
1、ansible部分,需要配置nftables和dns主从,而dns从属服务器需要向dns主服务器同步区域数据库文件(使用TCP 53端口传输的),因此需要在 server1上INPUT链放行 TCP 53端口。
·初始化:
apt install -y dbus bash-completion vim net-tools man systemd-timesyncd curl wget lynx dnsutils ftp lftp nfs-client smbclient ssh telnet traceroute ntpdate lsof nmap ipcalc


systemctl restart dbus

timedatectl set-timezone Asia/Shanghai

localectl set-x11-keymap us

echo -e "Skill@2025\nSkill@2025" | passwd root


echo -e "Skill@2025\nSkill@2025" | passwd skills


echo "NTP=120.232.145.186" >> /etc/systemd/timesyncd.conf

systemctl restart systemd-timesyncd


echo "nameserver 120.232.145.186" > /etc/resolv.conf


echo "permitrootlogin yes" >> /etc/ssh/sshd_config

systemctl restart sshd
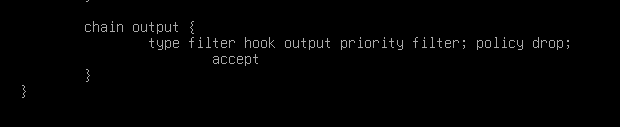
·nftables:
router:
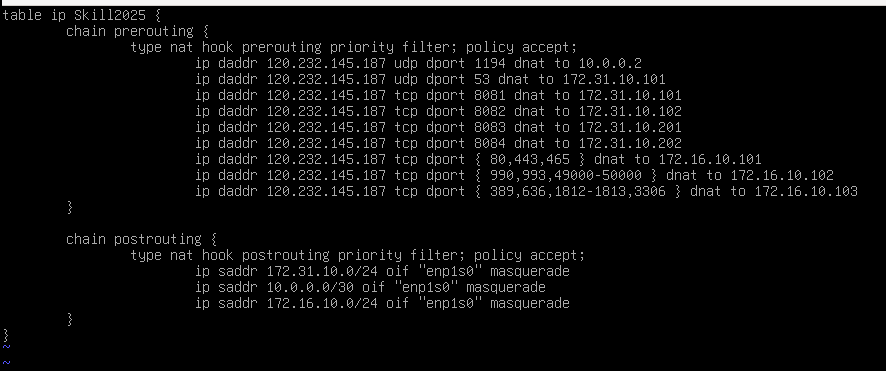
fw:

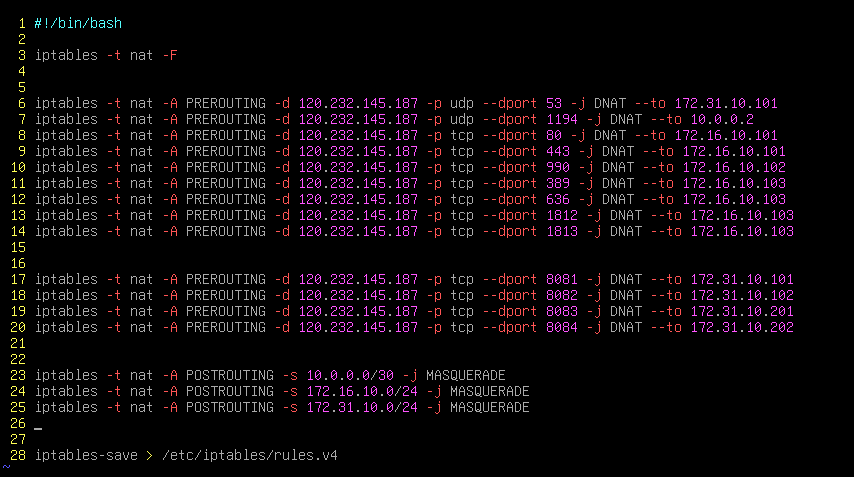
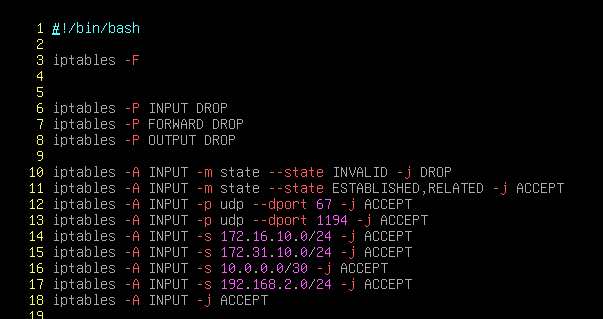
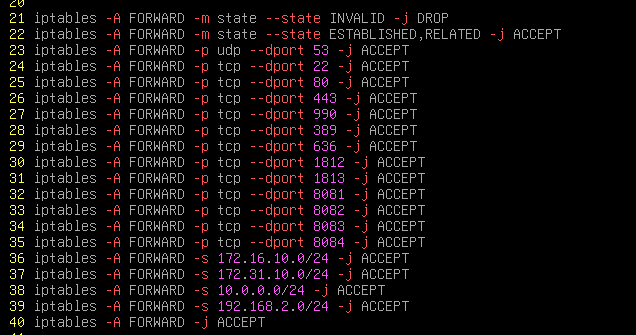
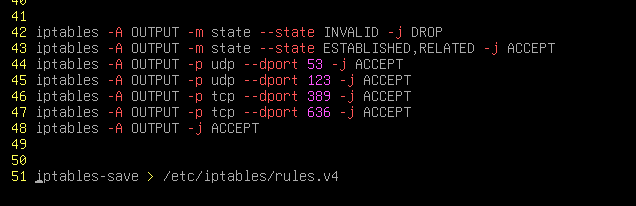
·iptables:
apt install -y iptables iptables-persistentrouter:
router 上不大可能改成 iptables,因为它需要改表名、链名,iptables 不容易更改
fw:
这个大概率改为 iptables
一、ntpsec(server):
apt install -y ntp
vim /etc/ntpsec/ntp.conf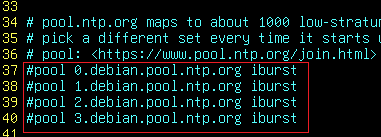
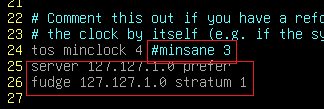
systemctl restart ntpsec
·客户端连接:
apt install -y systemd-timesyncd
echo "NTP=120.232.145.186" >> /etc/systemd/timesyncd.conf
systemctl restart systemd-timesyncd
·如果客户端是ntpsec:
apt install -y ntpsec
vim /etc/ntpsec/ntp.conf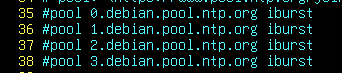

二、CA:
1、创建 根CA,并配置证书吊销列表(host):
(1)先配置 证书吊销列表:
题目中证书吊销列表的网页是:crl.internet.com
vim /etc/ssl/openssl.cnf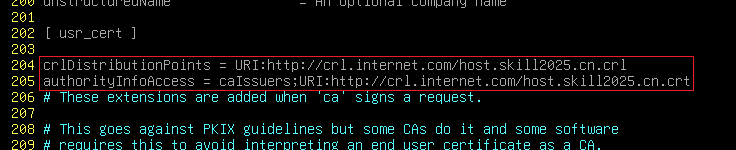
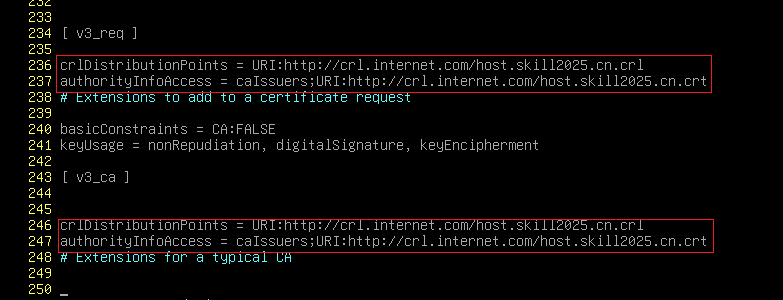
在 [user_cert]、[v3_req]、[v3_ca] 下添加证书吊销列表路径
这两行是严格区分大小写的
crlDistributionPoints = URI:http://
authorityInfoAccess = caIssuers;URI:http://
## 这两条可以在 man x509v3_config 中查询到
然后接下来正常创建ca,正常创建证书即可
(2)创建 CRL 文件:
openssl ca -gencrl -out ca.crl然后拿这 crl 文件和 crt 文件放到crl证书吊销列表的web服务器上即可
(3)创建CA:
vim /etc/ssl/openssl.cnf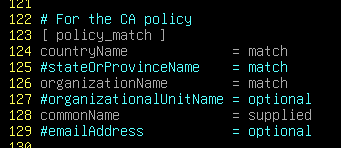
2、颁发 VPN证书、Web证书:
(1)VPN证书:
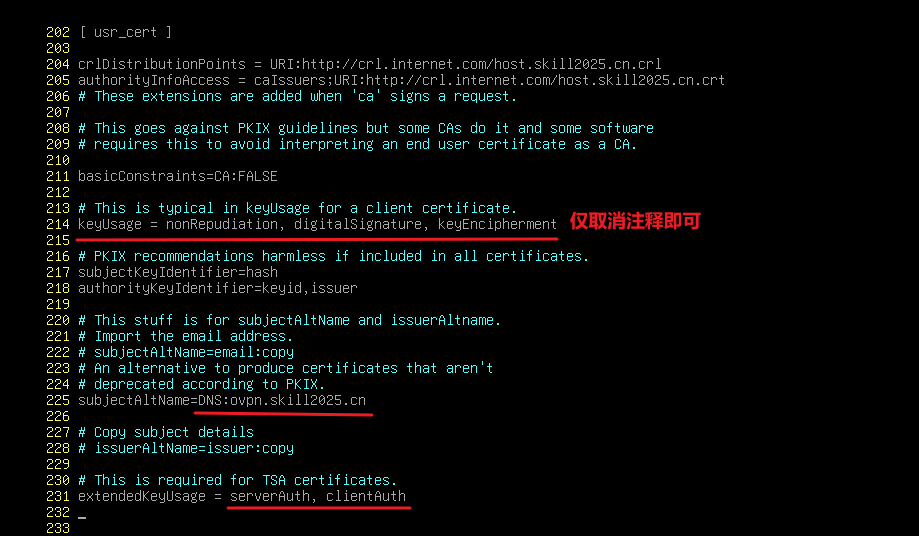
vpn证书的 C、O 字段和 Web证书一致即可
·生成 dh文件:
openssl dhparam -out dh2048.pem 2048(2)Web 证书:
app1:

app2:

三、DHCP:
题目没有说明dhcp配置哪个,这里仅记录dnsmasq的配置方式
1、dhcp server(fw):
apt install -y dnsmasq
vim /etc/dnsmasq.conf
## 使用 dhcp-range 指定地址池范围
## 使用 dhcp-host 绑定客户端MAC地址分配固定IP
## 使用 dhcp-option 6 指定客户端dns地址
## 地址范围是 120.232.145.184 - 120.232.145.190


systemctl restart dnsmasq
注意:因为有dhcp代理,所以这里需要 dhcp 服务器能够 ping 通客户端网段,才能够分配IP
(我这里是配置 fw的网关指向 router)
2、dhcp relay(router):
apt install -y isc-dhcp-relay
# 安装时默认会弹出配置页面,安装时配置了后面就无需修改下面的文件
vim /etc/default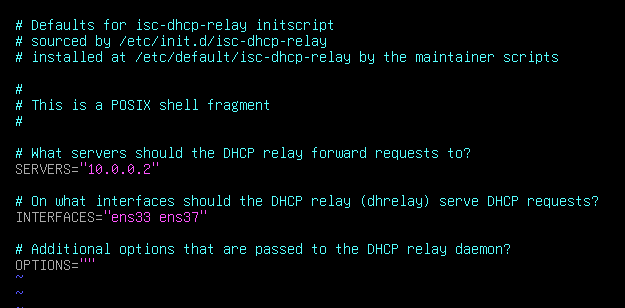
systemctl restart isc-dhcp-relay
四、openvpn:
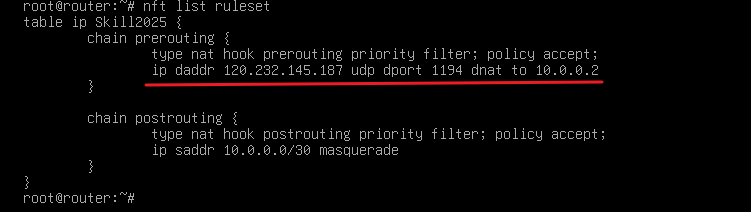
client 和 fw 建立 openvpn连接,而 fw是内网机器,因此需要在 router 上配置 DNAT 将 udp 1194端口转发给 fw
vpn证书申请 和 dh文件生成在 二、CA
注意,需要使用防火墙禁止 VPN客户端访问 LAN2的流量,但是push路由时 LAN1、LAN2 都要push
1、DNAT(router):
2、openvpn服务器(fw):
apt install -y openvpn
cp /usr/share/doc/openvpn/examples/sample-config-files/server.conf .
ls /etc/openvpn
vim server.conf
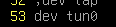
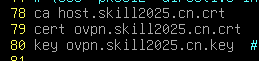




注释算法是为了图形化连接,否则图形化无法连接
systemctl restart openvpn@server
systemctl enable openvpn@server
3、openvpn客户端(client):
apt install -y openvpn
cp /usr/share/doc/openvpn/examples/sample-config-files/client.conf .
ls /etc/openvpn
echo "120.232.145.187 ovpn.skill2025.cn" >> /etc/hosts
vim client.conf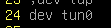

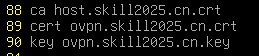

注释算法是为了图形化连接,否则图形化无法连接
systemctl disable openvpn@client
systemctl restart openvpn@client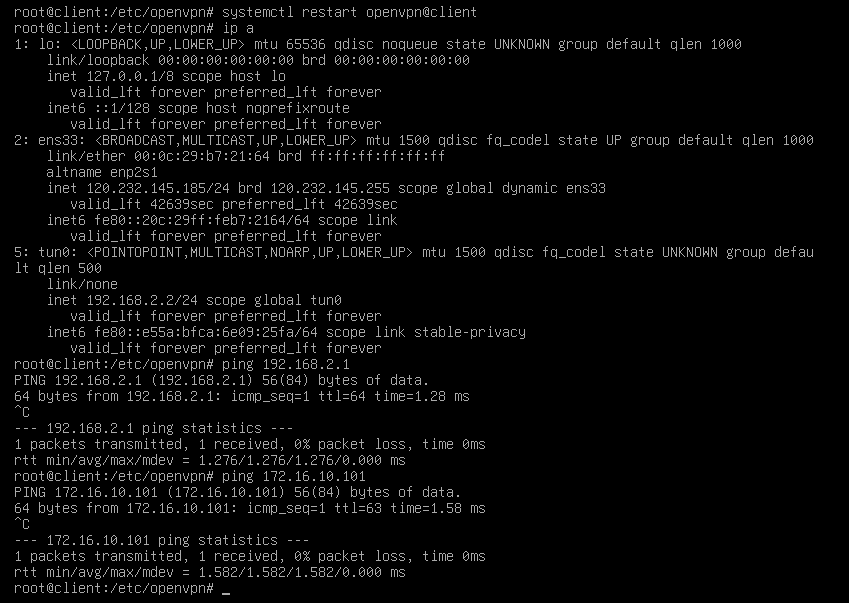
4、openvpn 调用 ldap用户:
(1)服务器配置:
apt install -y libpam0g    //默认是安装的
vim /etc/openvpn/server.conf
# plugin 这个路径可以直接补全来看到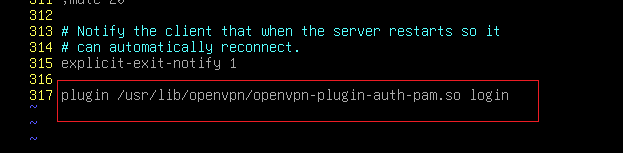
systemctl restart openvpn@server
(2)客户端配置:
vim /etc/openvpn/client.conf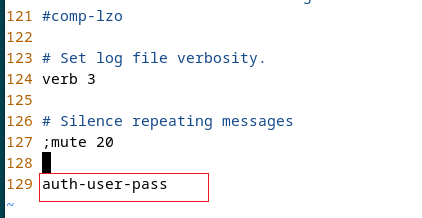
·测试:

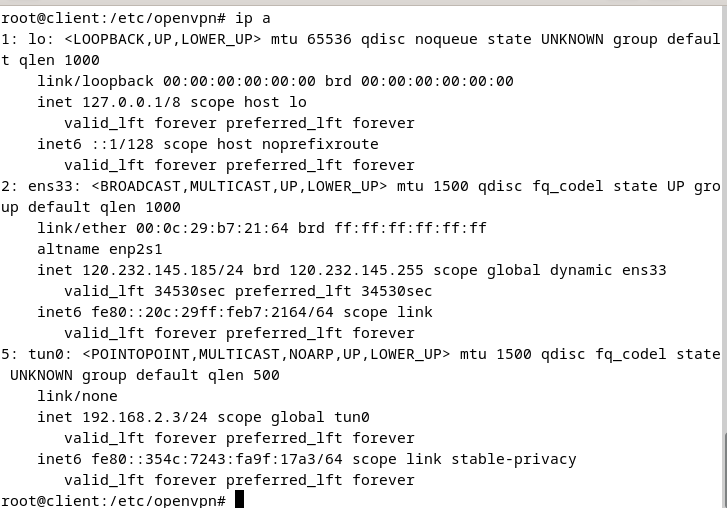
接下来在 服务器上安装 nslcd就能够使用 ldap用户登陆了
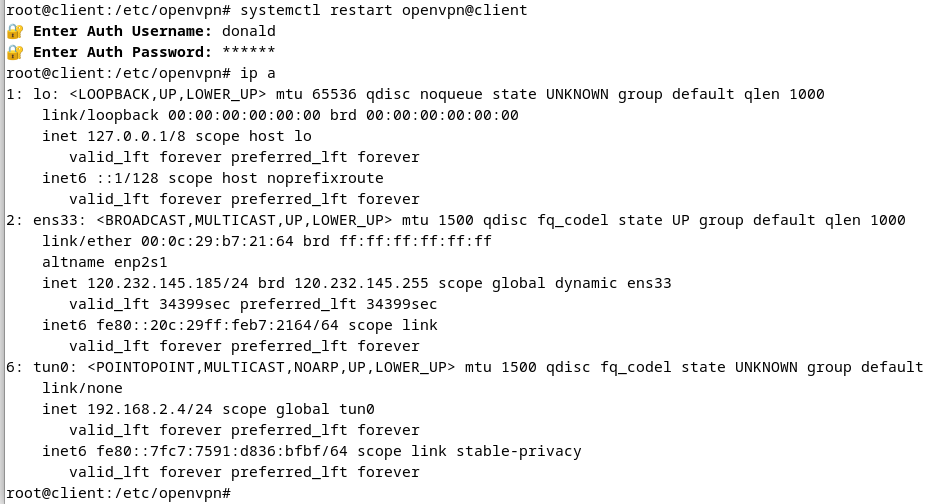
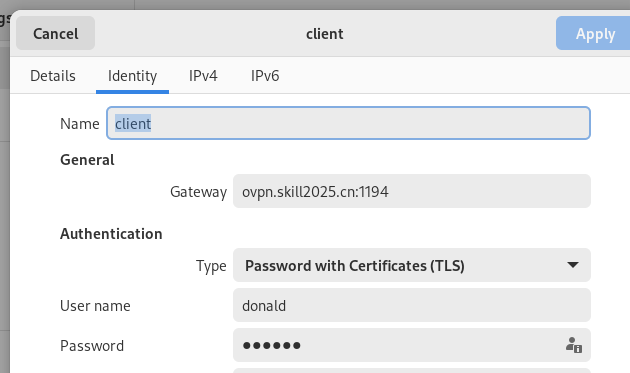
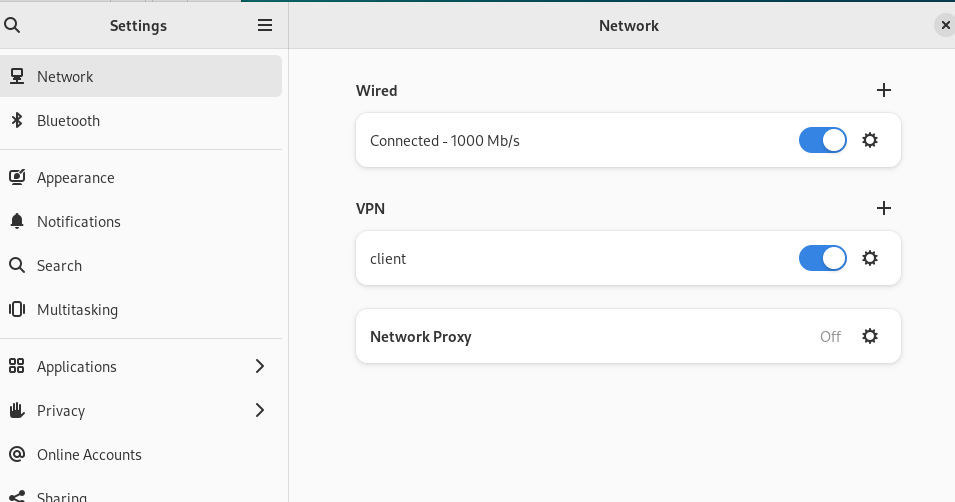
5、图形化连接 openvpn:
apt install -y network-manager-openvpn
# 或者安装 network-manager-openvpn-gnome 也是一样的
echo > /etc/network/interfaces
reboot
# 然后先使用图形化获取到 IP地址,或者设置一个静态IP地址(一般重启就获取到了)
systemctl disable openvpn@client
systemctl stop openvpn@client
nmcli connection import type openvpn file /etc/openvpn/client.conf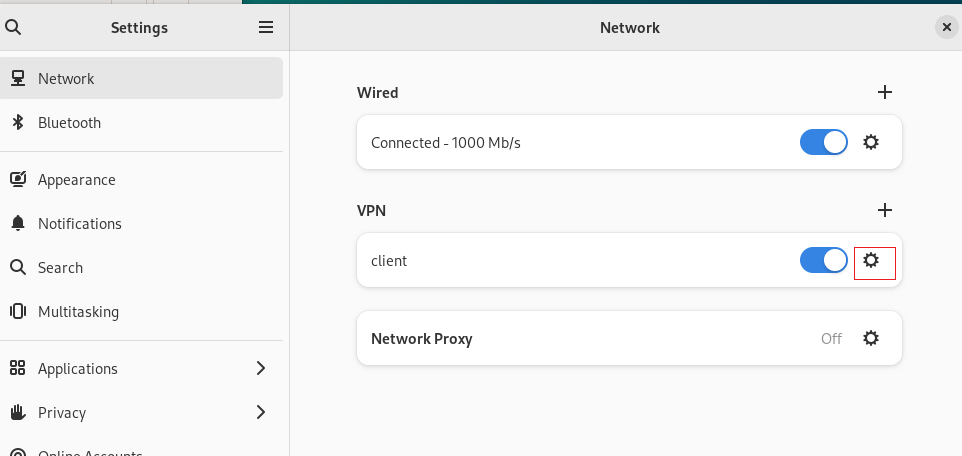
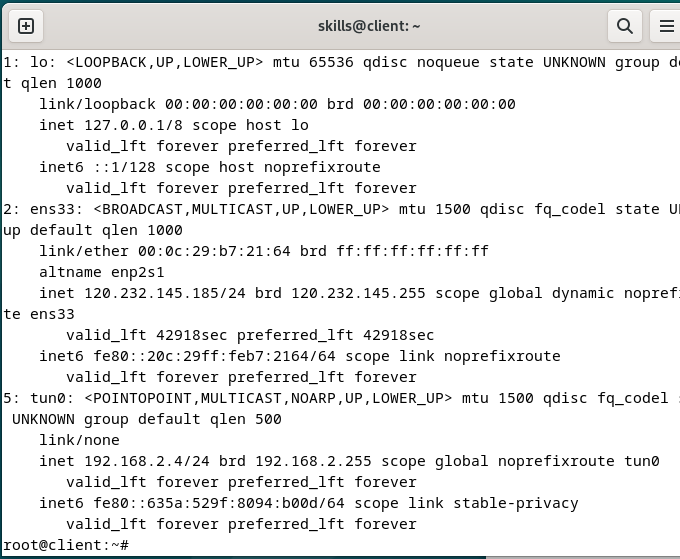
五、RAID、LVM、NFS(data):
如果题目需要为磁盘创建分区:
1、RAID:
apt install -y mdadm
mdadm -C /dev/md1 -l10 -n4 -x1 /dev/sd[bcdef]
mdadm -Ds >> /etc/mdadm/mdadm.conf
update-initramfs -u
2、LVM:
pvcreate /dev/md1
vgcreate vg0 /dev/md1
lvcreate -L 1.99g -n lv0 vg0
lsblk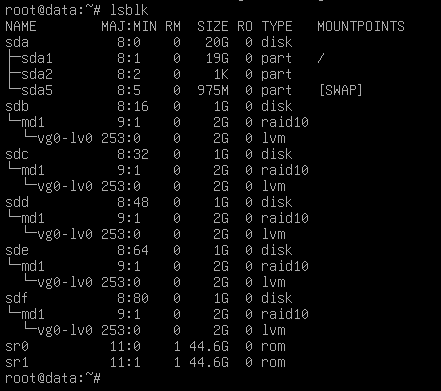
# 如果要格式化为xfs格式,就需要安装 xfsdump,然后使用 mkfs.xfs 来格式化
mkfs.ext4 /dev/vg0/lv0
mkdir /data
vim /etc/fstab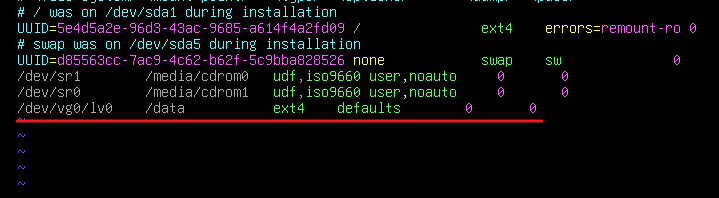
mount -a
3、nfs:
mkdir /data/web /data/ftp
apt install -y nfs-kernel-server
vim /etc/exports
exportfs -av·客户挂载:
app1:
mkdir -p /htdocs/html
vim /etc/fstab
mount -a
app2:
mkdir -p /htdocs/ftp
vim /etc/fstab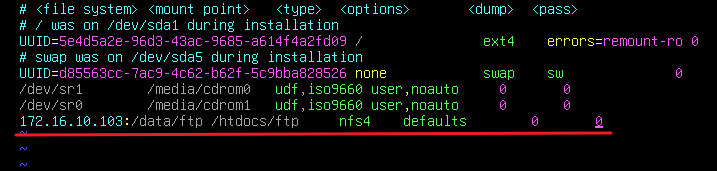
mount -a
六、LDAP(data):
配置 ldap之前最好先配置 ansible将 dns配置出来
1、创建 OU:
vim ou.ldif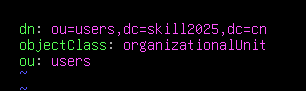
ldapadd -x -D "cn=admin,dc=skill2025,dc=cn" -w Skill@2025 -f ou.ldif2、导入用户:
(1)配置 ldapscripts:
cd /etc/ldapscripts
vim ldapscripts.conf


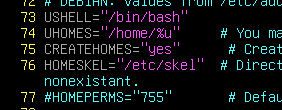
echo -n Skill@2025 > ldapscripts.passwd(2)配置 用户模板,并在 ldapscripts 中调用:
# 复制用户模板进行修改:
vim /usr/sbin/ldapadduser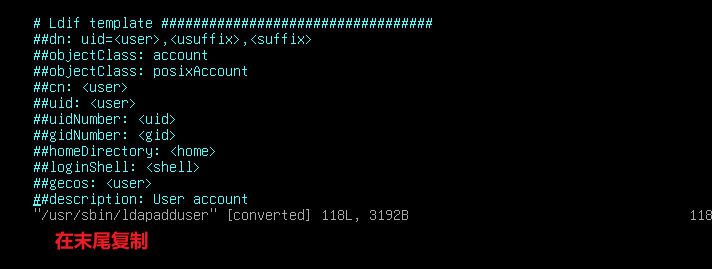
vim /etc/ldap/usertemp注意 inetorgperson 和 默认的 account 属性是冲突的
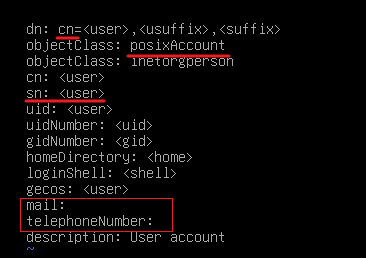
mail 和 phone 字段留空即可,后续使用 sed进行修改
# ldapscripts 调用模板:
vim ldapscripts.conf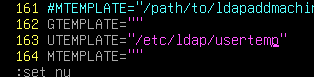
(3)导入用户:
# 将用户复制进来
vim user

# 删除空行:
egrep -v '^$' user > users
# 编写导入用户脚本:
vim add.sh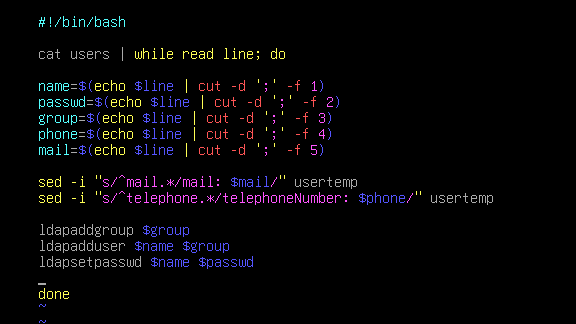
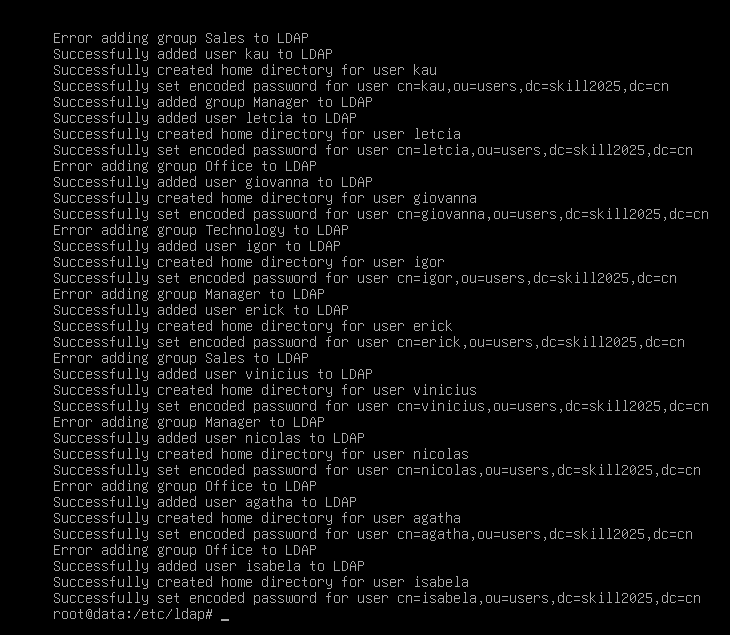
bash add.sh
3、配置 ldaps:
mkdir ~/ldap_back
mv /etc/ldap/slapd.d/* ~/ldap_back
cp /usr/share/doc/slapd/examples/slapd.conf .

# 生成加密密码:
slappasswd >> slapd.conf
# Skill@2025
# Skill@2025

# 编辑文件:
vim slapd.conf
# :%s/dc=example,dc=com/dc=skill2025,dc=cn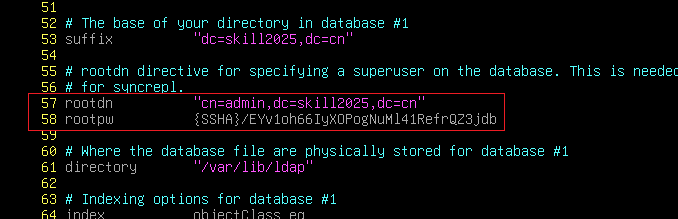
在最开头添加:
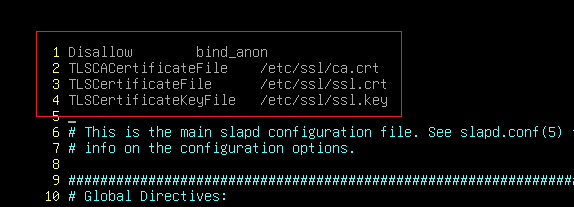
slaptest -f slapd.conf -F slapd.d/
chown -R openldap:openldap slapd.d/
chown openldap:openldap /etc/ssl/*
systemctl restart slapd
使用命令验证:
ldapsearch -x -D "cn=admin,dc=skill2025,dc=cn" -w Skill@2025
ldapsearch -x -b "dc=skill2025,dc=cn" -D "cn=admin,dc=skill2025,dc=cn" -w Skill@2025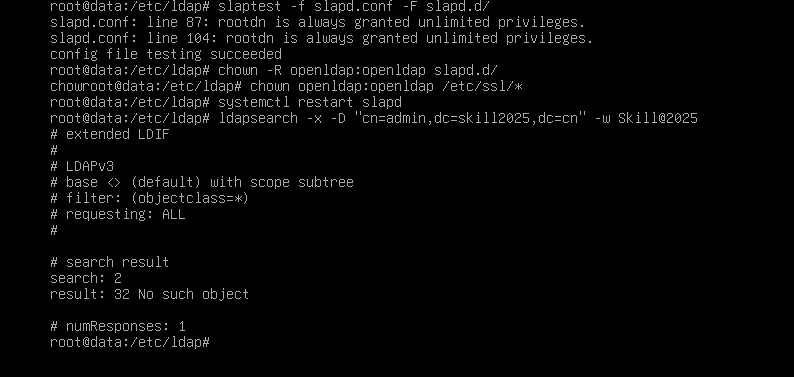
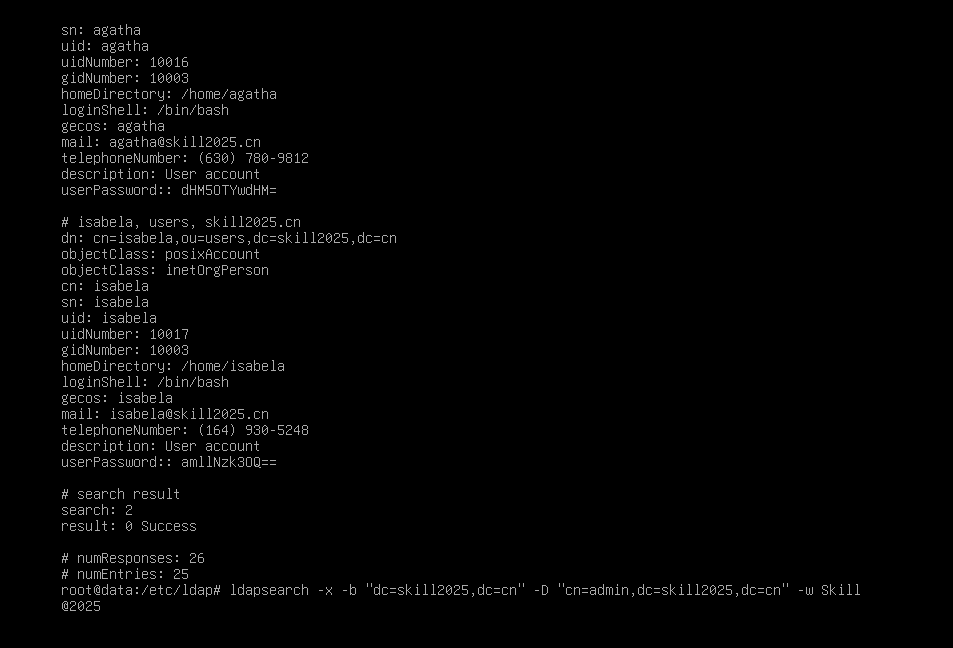
·配置 仅允许加密端口:
vim /etc/default/slapd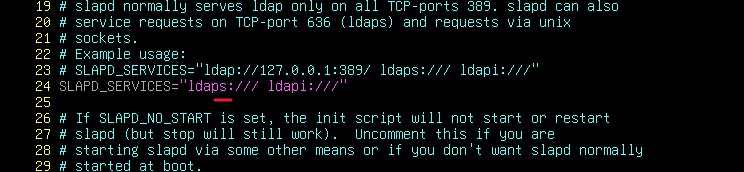

七、radius:
1、配置 radius使用 LDAP用户:
apt install -y freeradius freeradius-ldap
vim /etc/freeradius/3.0/sites-enabled/default
# 取消注释:(这行在 authenticate 字段下)
cd /etc/freeradius/3.0/
cp mods-available/ldap mods-enabled/
chown freerad. mods-enabled/ldap
vim mods-enabled/ldap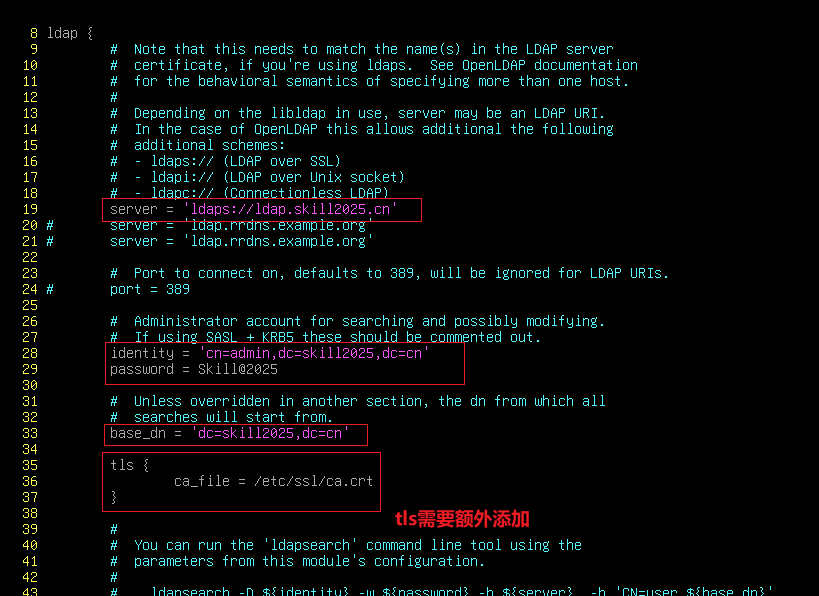
vim /etc/freeradius/3.0/clients.conf
# 设置预共享密钥:
·测试:
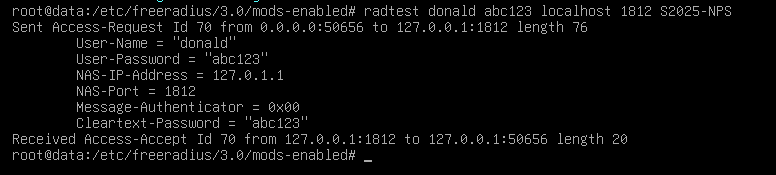
八、Web:
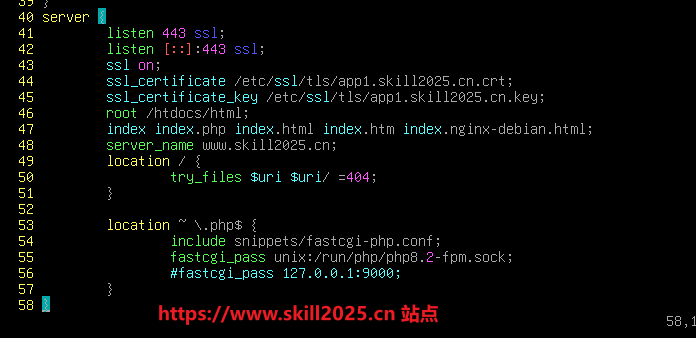
1、网页配置:
php 测试页面:
echo "<?php phpinfo(); ?>" > /htdocs/html/phpinfo.php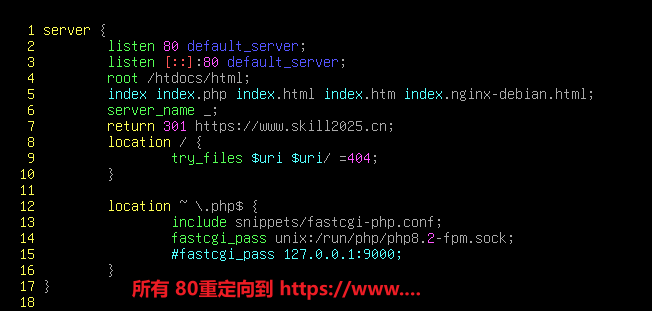
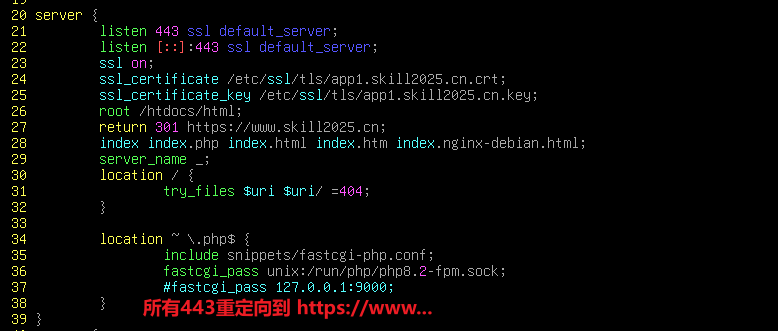
2、进程用户和组:
adduser webdata
vim /etc/nginx/nginx.conf
3、OPCache缓存:
vim /etc/php/8.2/fpm/php.ini
# 使用 /opcache 搜索
取消注释即可:

4、居中显示:
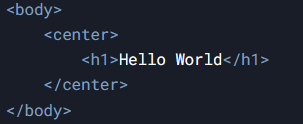
5、停机维护站点:
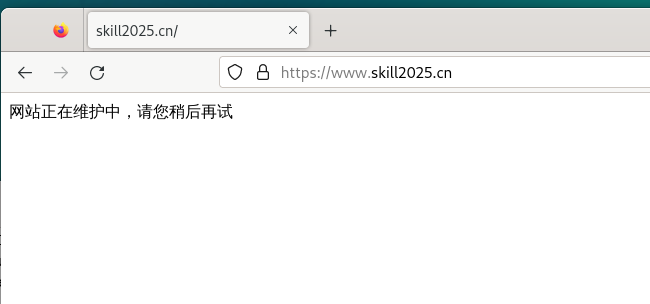
思路:如果题目要求配置 nginx 为 Web,那么我们就使用 apache2作为停机维护的站点,当nginx停止时启动 apache2(注意也要配置 ssl)
注意要将 apache2 设置为 disable,不允许开机自启动
(1)编写脚本检测Web状态来启动站点:
# 编写脚本检测 Web服务器状态:
vim web.sh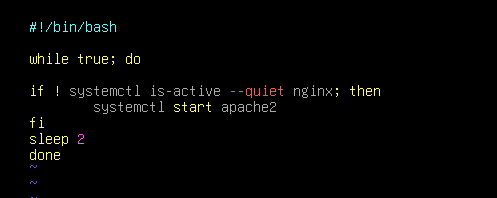
bash web.sh &
# 将命令写入 /etc/profile 中,就能够开机自启动
## 先配置好 apache再启动脚本。
# 配置 apache2:
apt install -y apache2
systemctl disable apache2vim /etc/apache2/sites-enabled/000-default.conf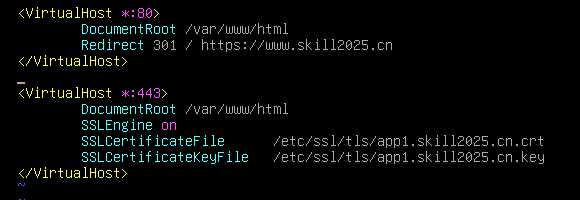
vim /var/www/html/index.html
(2)配置 中文页面:
只需要在 客户端上编写中文html,然后拷贝给web服务器即可
apt install -y ibus-pinyin ibus-table fonts-wqy-* -y安装完成后重启
添加 中文输入法:
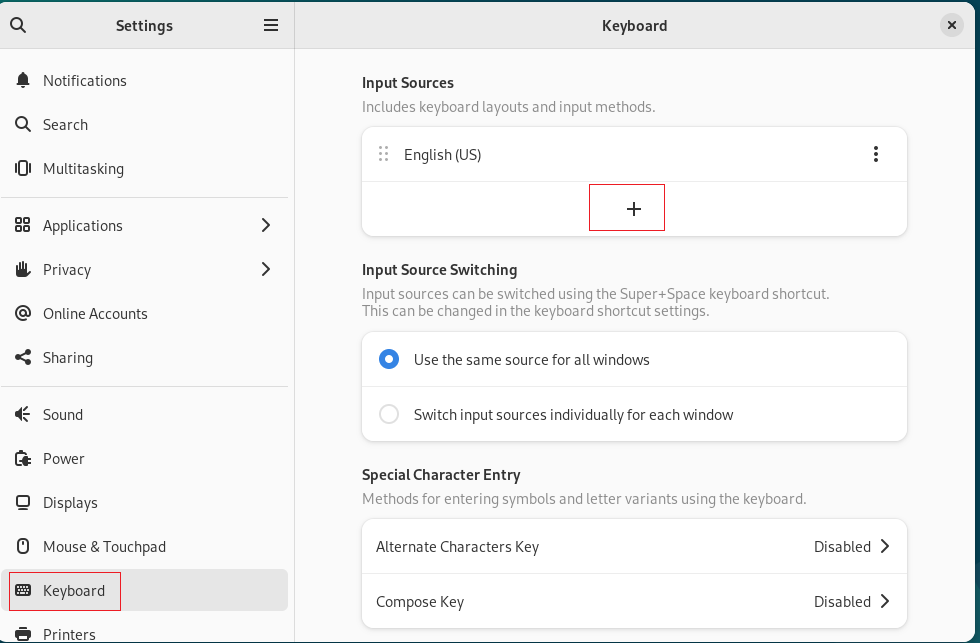
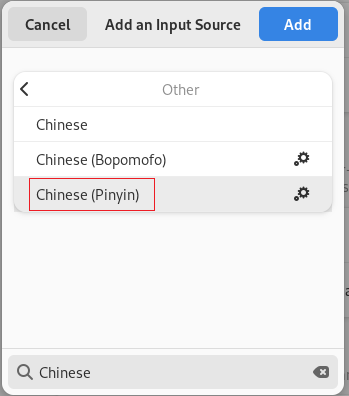
切换输入法:
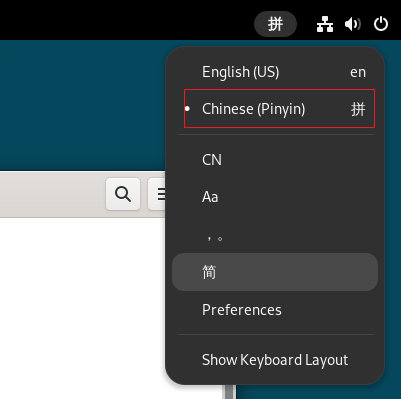
直接编写中文然后拷贝给 web即可
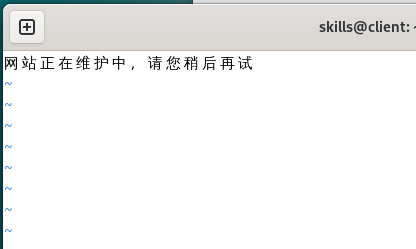
apache2 需要编写一下 index 文件,否则客户端显示是乱码:

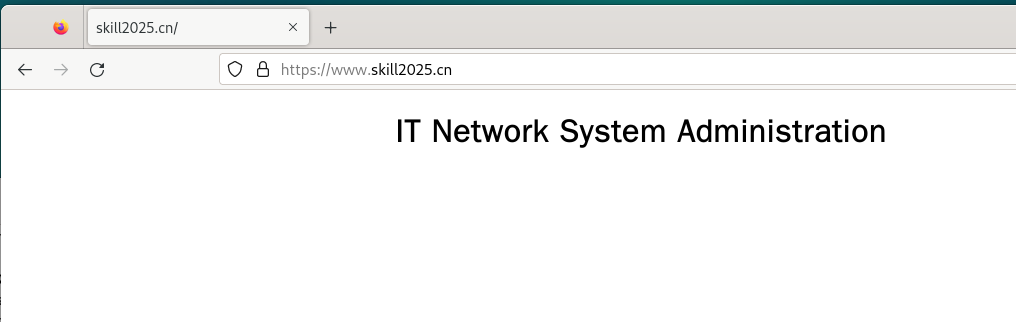
·测试:
访问nginx成功:
关闭nginx,然后再次访问:
九、ftp:
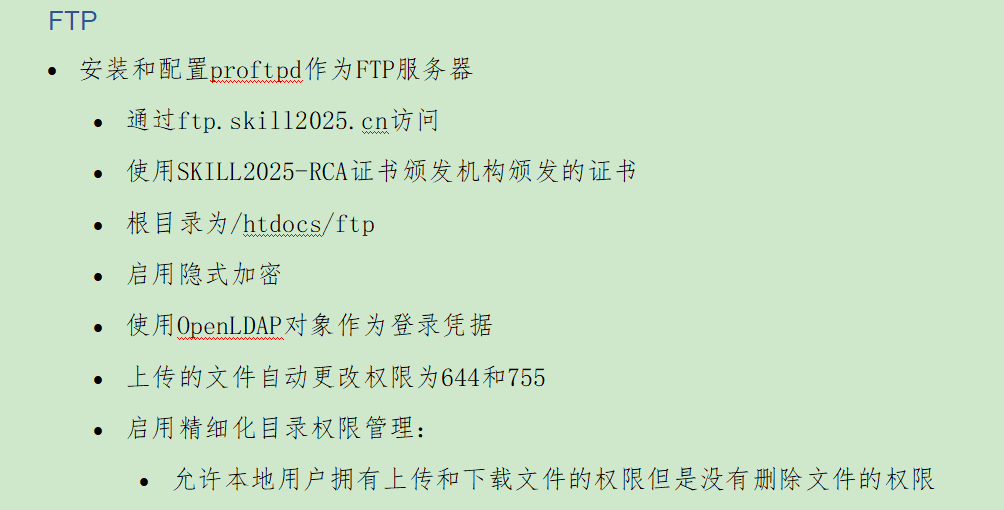
默认就能使用 ldap用户进行登陆,只需要安装 nslcd进行连接ldap即可
1、配置 proftpd:
apt install -y proftpd proftpd-mod-crypto注意要安装 crypto 这个软件包,否则 ssl 无法起来
vim /etc/proftpd/proftpd.conf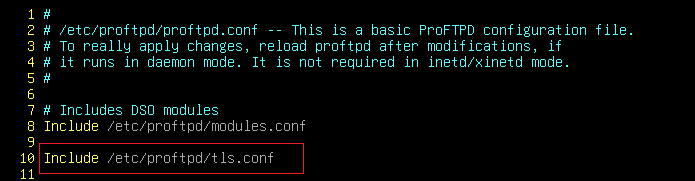
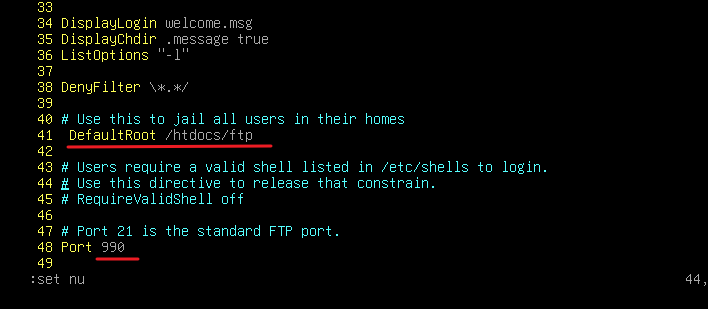
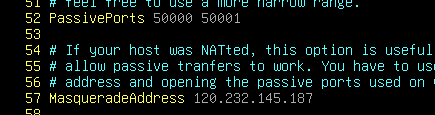
(外网客户端通过nat访问进来会有问题,所以需要配置这个)在 nat 上将 被动端口范围转发给 ftp

vim /etc/proftpd/modules.conf
vim /etc/proftpd/tls.conf
# UseImplicitSSL 需要背,没得抄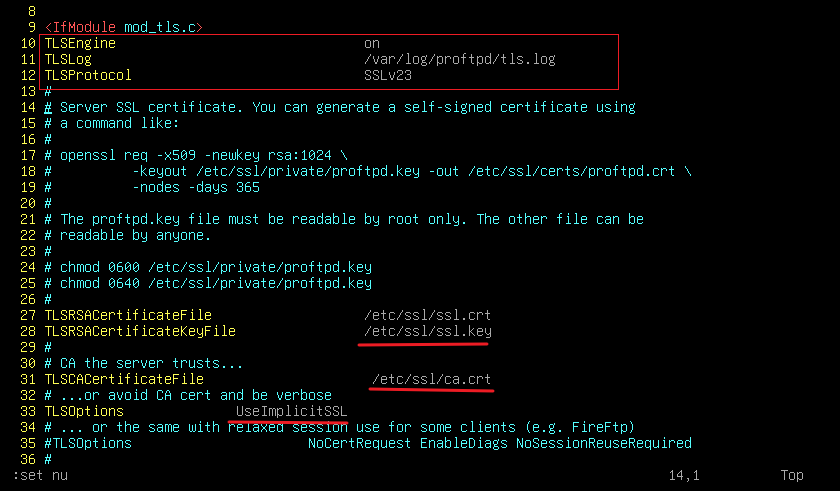
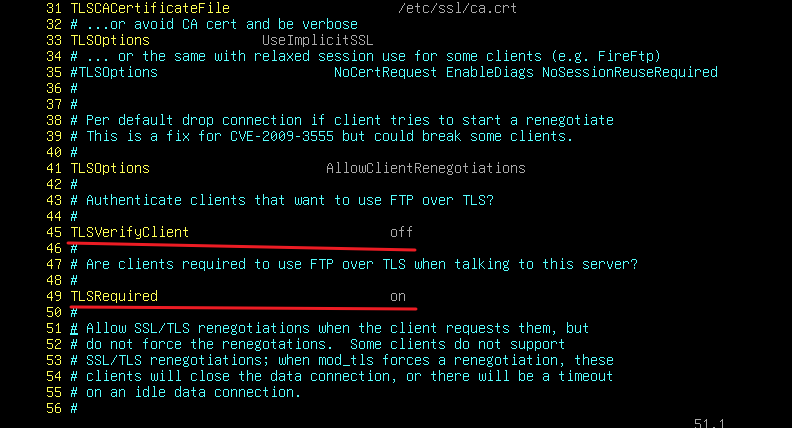
systemctl restart proftpd
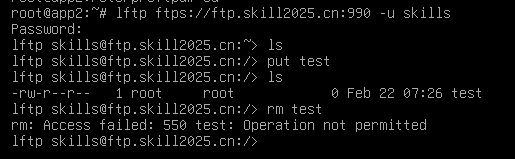
2、配置用户没有删除文件的权限(vsftpd、proftpd通用):
chmod o+t /htdocs/ftp
vim /root/while.sh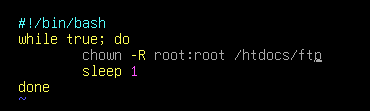
bash while.sh &
# 将该命令写入到 /etc/profile 中,重启也会生效
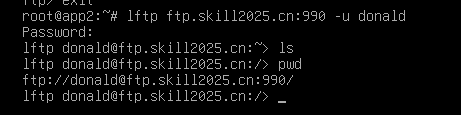
·测试:
十、Ansible:
ansible建议尽早做
·基础配置(host):
apt install -y ansible python3 sshpass
mkdir /etc/ansible
vim /etc/ansible/ansible.cfg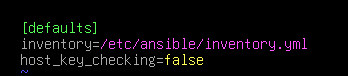
vim /etc/ansible/inventory.yml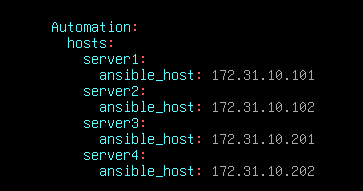
mkdir /etc/ansible/group_vars
vim group_vars/all.yml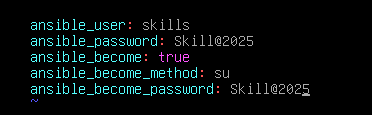
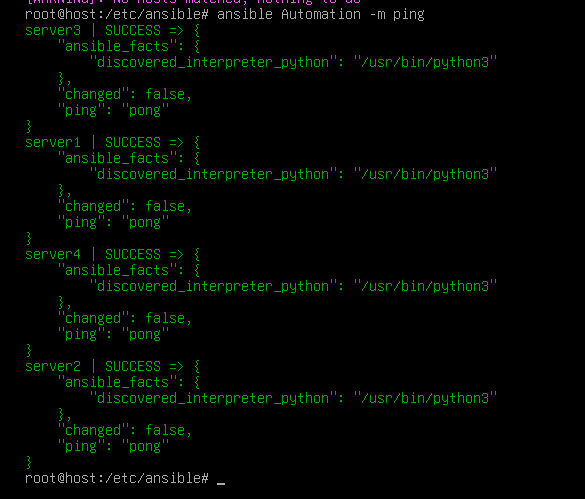
·client连接vscode:
(1)安装 deb文件:
dpkg --install code.deb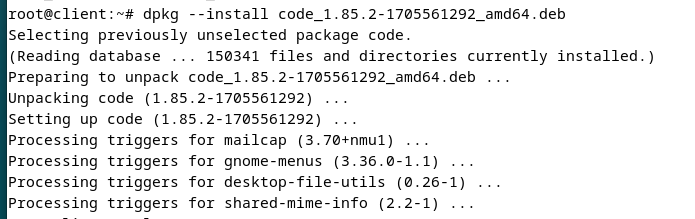
(2)vscode导入离线插件:
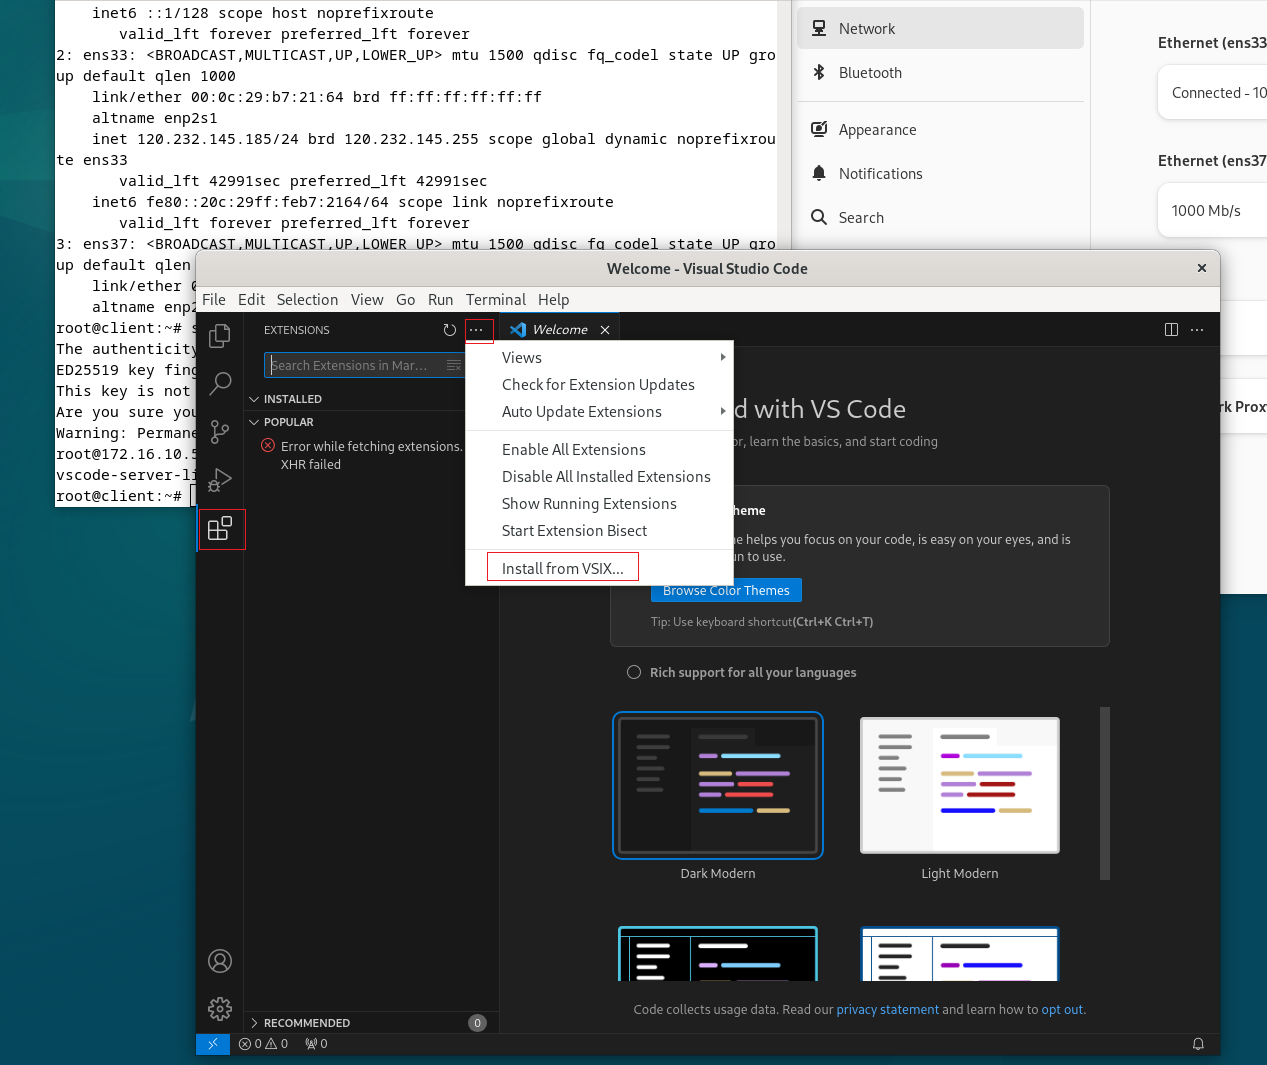
然后逐个选择离线插件即可
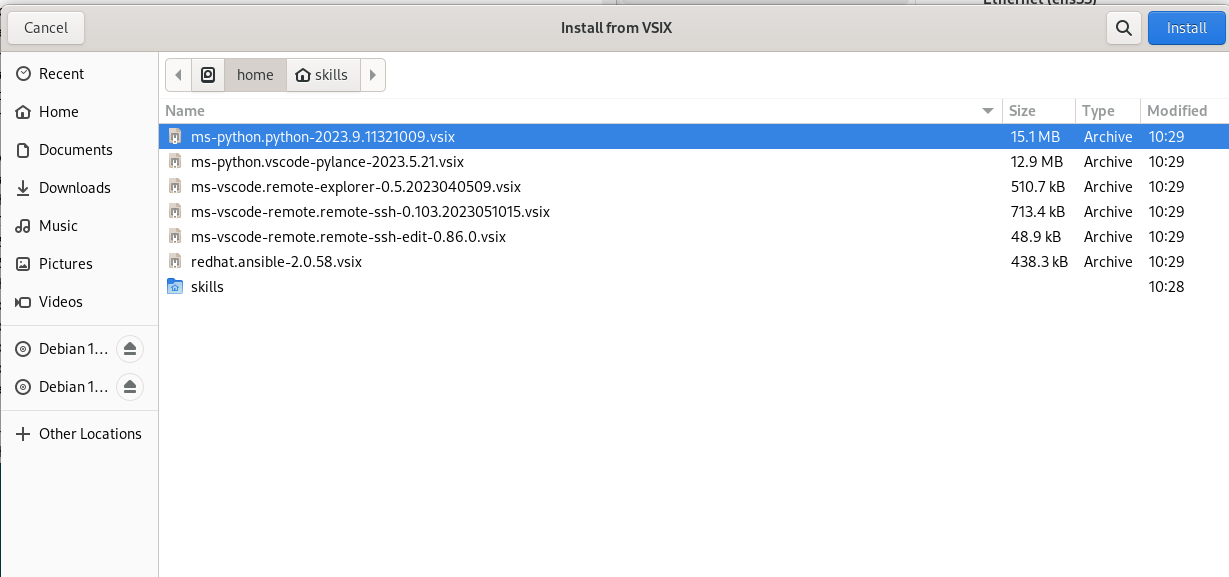
(3)将 附件拷贝给 host 并解压:
scp vscode-server-linux-x64.tar.gz root@172.16.10.50:~然后图形化连接 ansible即可
1、1-initial.yml
---
- name: initial
  hosts: all
  gather_facts: false
  tasks:
    - name: hostname
      raw: apt install -y python3 dbus bash-completion vim net-tools man systemd-timesyncd curl wget lynx dnsutils ftp lftp nfs-client smbclient ssh telnet traceroute ntpdate lsof nmap ipcalc
      changed_when: false

    - name: hostname
      raw: systemctl restart dbus
      changed_when: false

    - name: hostname
      hostname:
        name: "{{ inventory_hostname }}"

    - name: hostname
      lineinfile:
        path: /etc/hosts
        search_string: 127.0.1.1
        line: "127.0.1.1 {{ inventory_hostname }}.skill2025.cn {{ inventory_hostname }} debian"

    - name: hostname
      timezone:
        name: Asia/Shanghai
      notify: hostname

  handlers:
    - name: hostname
      raw: localectl set-x11-keymap us

- name: initial
  hosts: all
  gather_facts: false
  tasks:
    - name: timesync
      apt:
        name: systemd-timesyncd
        update_cache: false

    - name: timesync
      lineinfile:
        path: /etc/systemd/timesyncd.conf
        line: "NTP=120.232.145.186"
      notify: timesync

  handlers:
    - name: timesync
      systemd:
        state: restarted
        name: systemd-timesyncd


- name: initial
  hosts: all
  gather_facts: false
  tasks:
    - name: ssh
      raw: mkdir -p /root/.ssh
      changed_when: false

    - name: ssh
      copy:
        src: /data/authorized_keys
        dest: /root/.ssh

    - name: ssh
      lineinfile:
        path: /etc/ssh/sshd_config
        line: "permitrootlogin yes"
      notify: ssh

  handlers:
    - name: ssh
      systemd:
        state: restarted
        name: sshd


- name: initial
  hosts: all
  gather_facts: false
  tasks:
    - name: package
      ping:
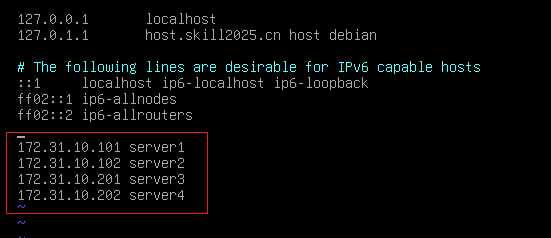
·在host本地配置 ssh要求:
在 /etc/hosts 中配置 server[1,2,3,4] 的域名解析
配置 默认使用 root用户进行ssh连接:
vim /etc/ssh/ssh_config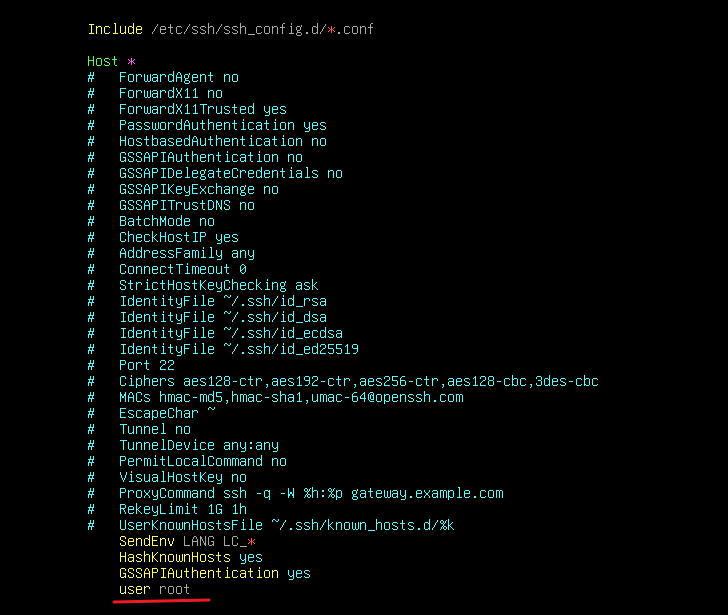
2、dns-server.yml:
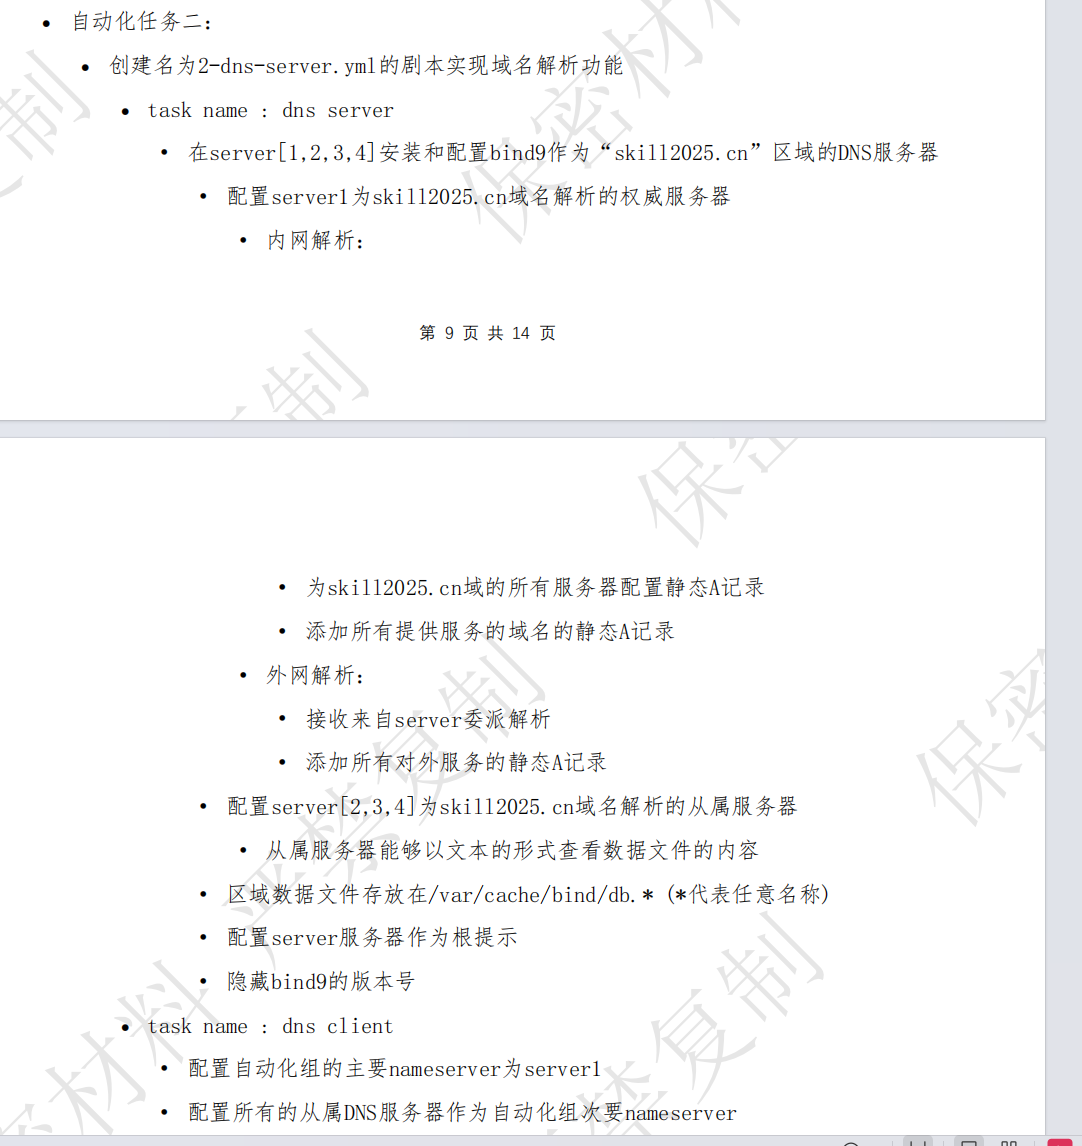
·dns 配置:
(1)dns 主服务器:
vim /etc/bind/named.conf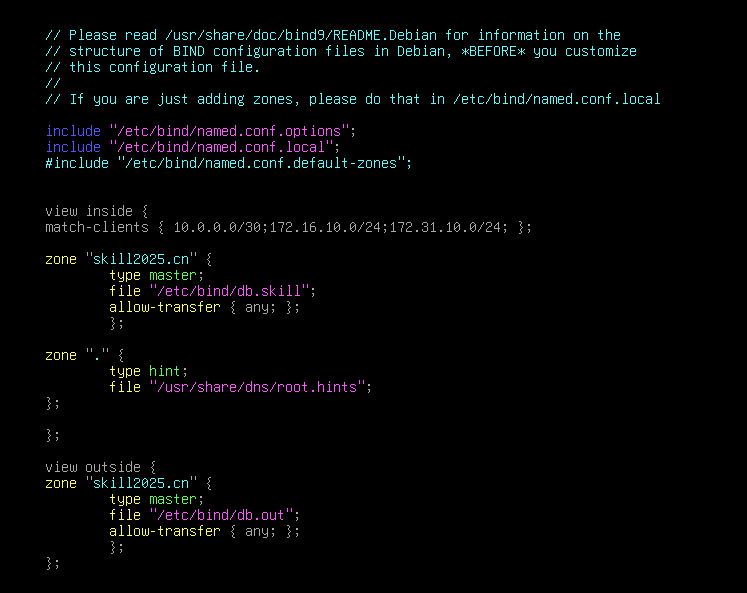
vim db.skill
# 要设置 ns为 server1,因为题目有说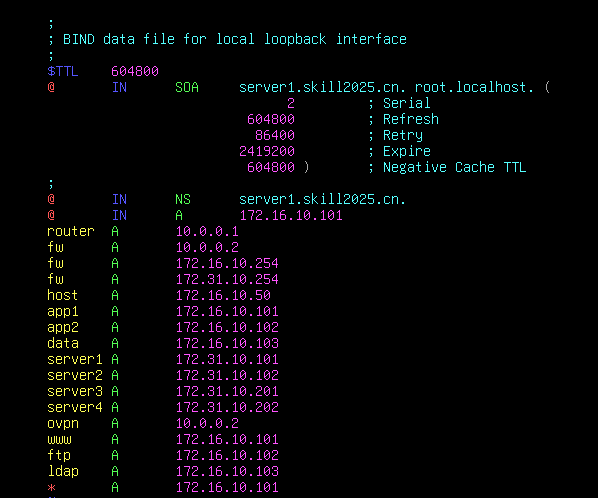
vim db.out
# 题目要求的外网解析A记录使用 * 即可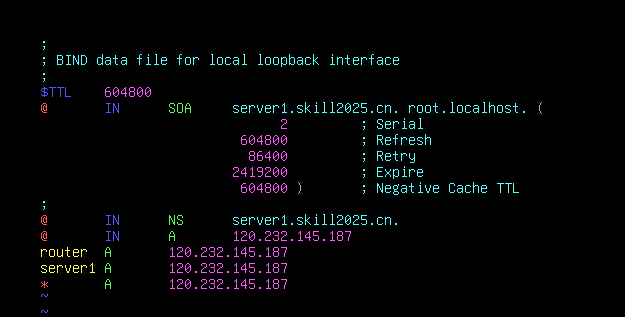
vim db.out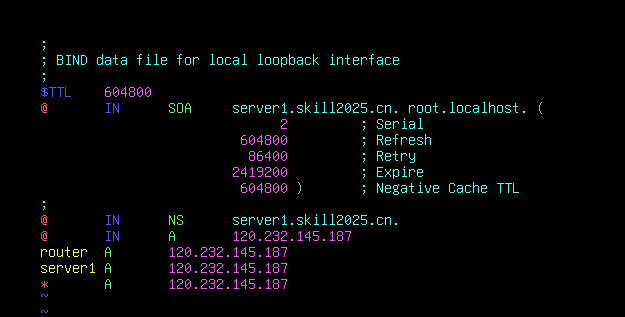
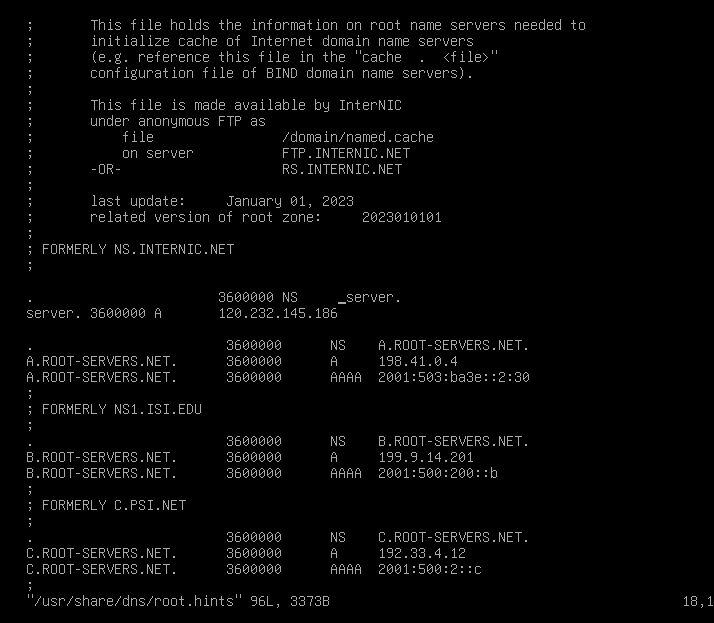
vim /usr/share/dns/root.hints
# 根据文件中默认的格式书写即可
·隐藏版本号、以文本形式查看区域文件:
vim named.conf.options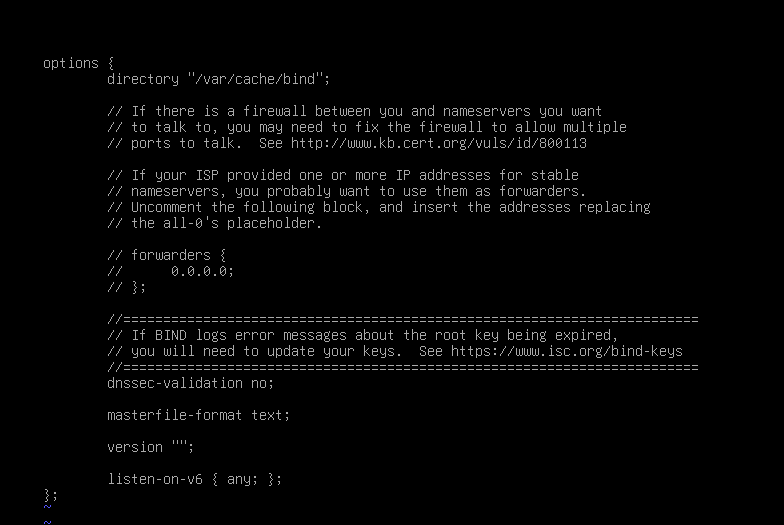
(2)dns 从属服务器:
·如果要将区域文件存到 /etc/bind 目录下:
还要给 /etc/bind/目录 777 的权限,否则客户端没有权限写入
vim /etc/apparmor.d/usr.sbin.named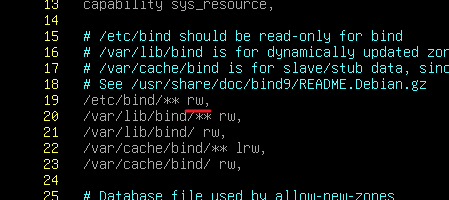
systemctl restart apparmor然后正常配置 dns从属服务器即可
vim /etc/bind/named.conf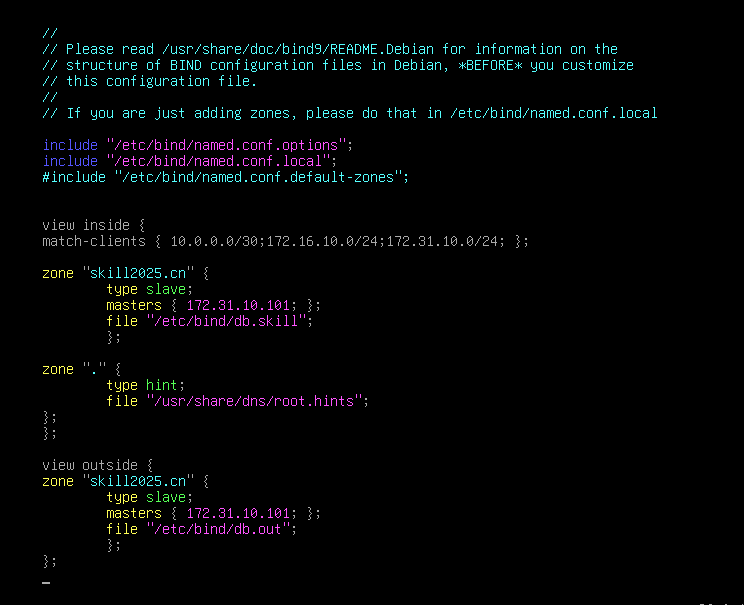
(3)根提示:
注意,如果 根提示服务器写的是 server. ,那么根提示服务器的 db文件中的 ns 就需要写 server
·ansible剧本:
将 dns文件拷贝到 host机器上
---
- name: dns server
  hosts: all
  gather_facts: false
  tasks:
    - name: dns server
      apt:
        name: bind9
        update_cache: false

    - name: dns server
      raw: |
        echo nameserver 172.31.10.101 > /etc/resolv.conf
        echo nameserver 172.31.10.102 >> /etc/resolv.conf
        echo nameserver 172.31.10.201 >> /etc/resolv.conf
        echo nameserver 172.31.10.202 >> /etc/resolv.conf
        echo domain skill2025.cn >> /etc/resolv.conf
        echo search skill2025.cn >> /etc/resolv.conf
      changed_when: false

    - name: dns server
      copy:
        src: /data/root.hints
        dest: /usr/share/dns/

- name: dns server
  hosts: server1
  gather_facts: false
  tasks:
    - name: dns server
      copy:
        src: /data/named.conf
        dest: /etc/bind
      notify: dns server

    - name: dns server
      copy:
        src: /data/db.skill
        dest: /etc/bind
      notify: dns server

    - name: dns server
      copy:
        src: /data/db.out
        dest: /etc/bind
      notify: dns server

    - name: dns server
      copy:
        src: /data/named.conf.options
        dest: /etc/bind
      notify: dns server

  handlers:
    - name: dns server
      systemd:
        state: restarted
        name: bind9


- name: dns server
  hosts: server2,server3,server4
  gather_facts: false
  tasks:
    - name: dns server
      copy:
        src: /data/named.slave
        dest: /etc/bind/named.conf
      notify: dns server

    - name: dns server
      copy:
        src: /data/usr.sbin.named
        dest: /etc/apparmor.d/
      notify: restart

    - name: dns server
      copy:
        src: /data/named.conf.options
        dest: /etc/bind
      notify: dns server

  handlers:
    - name: restart
      systemd:
        state: restarted
        name: apparmor

    - name: dns server
      systemd:
        state: restarted
        name: bind9
3、3-nftables.yml
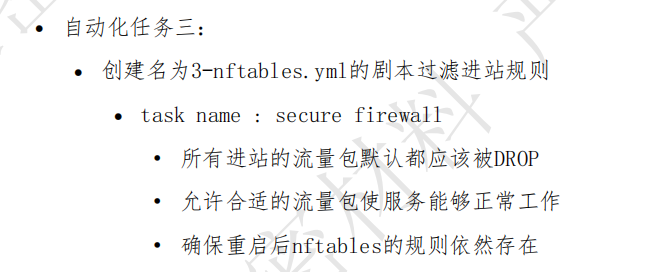
·先配置 nftables:
vim /etc/nftables.conf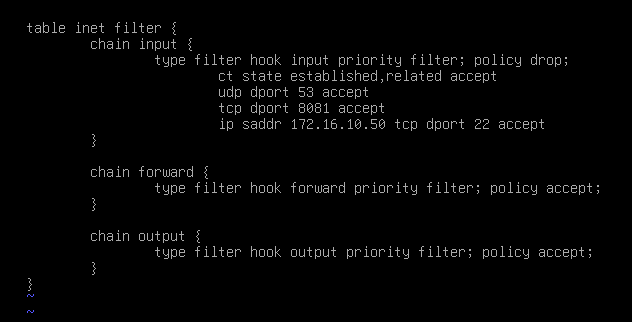
·再编写剧本:
---
- name: secure firewall
  hosts: all
  gather_facts: false
  tasks:
    - name: secure firewall
      copy:
        src: /data/nftables.conf
        dest: /etc
      changed_when: false

    - name: secure firewall
      lineinfile:
        path: /etc/nftables.conf
        search_string: "tcp dport 808"
        line: "tcp dport {{ port }} accept"
      changed_when: false

    - name: secure firewall
      raw: systemctl enable nftables
      changed_when: false

    - name: secure firewall
      systemd:
        state: restarted
        name: nftables
      changed_when: false

    - name: secure firewall

      raw: systemctl enable nftables

      changed_when: false
4、4-web-server.yml:
最好配置 https页面
将 网页颜色、监听端口写入 ansible组变量中:
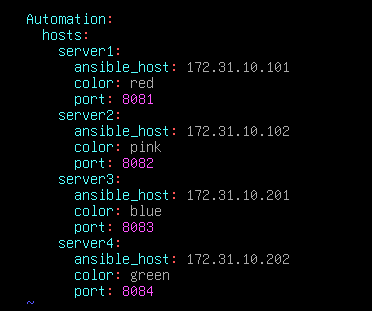
·网页显示颜色的配置:
<body style="color: red">Hello from server1!</br>This site was served by server1.</body>
效果:
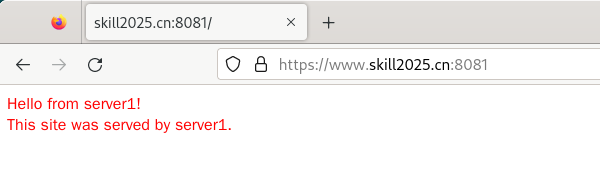
注意文本内容中有感叹号和 . 也需要加上
·编写剧本:
---
- name: web server
  hosts: all
  gather_facts: false
  tasks:
    - name: web server
      apt:
        name: apache2
        update_cache: no

    - name: web server
      raw: echo > /var/www/html/index.html
      changed_when: false

    - name: web server
      lineinfile:
        path: /var/www/html/index.html
        line: "<body style='color: {{ color }}'>Hello from {{ inventory_hostname }}!</br>This site was served by {{ inventory_hostname }}.</body>"
      changed_when: false

    - name: web server
      lineinfile:
        path: /etc/apache2/ports.conf
        search_string: "Listen 80"
        line: "Listen {{ port }}"
      notify: web server

  handlers:
    - name: web server
      systemd:
        state: restarted
        name: apache2