综合实践.note
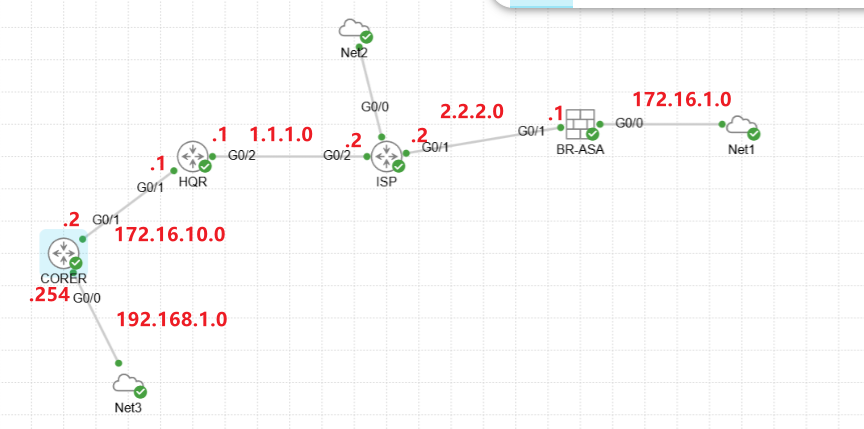
HQR 与 BR-ASA 建立 IKEv2 证书VPN
Net2 与 BR-ASA 建立 anyconnect VPN
Net2 连接 anyconnect 后要求能够访问到 Net3和Net1
CORER 与 BR-ASA 建立 IKEv2 证书VPN

HQR、ISP、BR-ASA 建立 公网OSPF
HQR、CORER 建立内网EIGRP
HQR 与 BR-ASA 之间的隧道建立 BGP
1、建立 公网 OSPF、内网EIGRP:
# OSPF
## ISP
ip route 0.0.0.0 0.0.0.0 Null0
router ospf 1

 network 1.1.1.0 0.0.0.255 area 0

 network 2.2.2.0 0.0.0.255 area 0

 network 8.8.8.8 0.0.0.0 area 0

 network 10.10.10.0 0.0.0.255 area 0

 default-information originate

## HQR:
router ospf 1

 router-id 1.1.1.1

 network 1.1.1.0 0.0.0.255 area 0

 network 23.23.23.23 0.0.0.0 area 0

## ASA:
router ospf 1

 router-id 2.2.2.1

 network 2.2.2.0 255.255.255.0 area 0


# EIGRP
## HQR:
access-list 1 permit 0.0.0.0

route-map DEF permit 10

 match ip address 1

router eigrp 1

 network 172.16.0.0

 redistribute ospf 1 metric 1000000 10 255 1 1500 route-map DEF

## CORER
router eigrp 1

 network 172.16.0.0

 network 192.168.1.0
2、HQR 与 BR-ASA 建立 IKEv2 证书VPN:
(1)配置 根证书颁发机构:
ntp master
ntp master 1

# 配置 根CA:
ip http server       //开启http功能
crypto key generate rsa modulus 4096 label ROOTCA

crypto pki trustpoint ROOTCA

 rsakeypair ROOTCA     // 关联证书私钥

crypto pki server ROOTCA

 grant auto

 hash sha256

 lifetime ca-certificate 3650

 no shutdown   // 关联好证书私钥后,再配置;

show crypto pki server     //查看CA状态
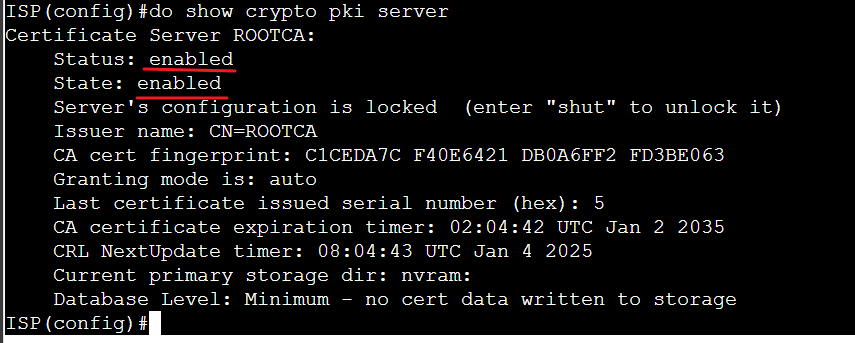
(2)申请证书:
  # ASA:
ntp server 8.8.8.8    //与CA同步时间
crypto key generate rsa label VPN modulus 2048    //ASA一定需要本地生成一个密钥,才能够进行申请

crypto ca trustpoint VPN

 enrollment protocol scep url http://8.8.8.8:80


 subject-name cn=2.2.2.1

 ip-address 2.2.2.1
 fqdn none
 revocation-check none
 keypair VPN    //关联刚刚生成的私钥

crypto ca authenticate VPN
crypto ca enroll VPN
# 输入密码
# 是否包含设备名 no
# 是否申请证书 yes

# HQR:
ntp server 8.8.8.8
crypto key generate rsa label VPN modulus 2048

crypto pki trustpoint VPN

 enrollment url http://8.8.8.8


 ip-address 1.1.1.1

 subject-name cn=1.1.1.1
 fqdn none

 revocation-check none
 rsakeypair VPN    //关联刚刚生成的私钥

crypto pki authenticate VPN

crypto pki enroll VPN
(3)配置 IKEv2:
# ASA:
same-security-traffic permit inter-interface
access-list ALLOW extended permit ip any any
access-group ALLOW global

crypto ikev2 enable Outside
# 设置使用地址进行协商:
crypto isakmp identity address    //如果不配置,默认会使用 主机名+域名(FQDN)进行协商
# 配置一阶段加密:
crypto ikev2 policy 1

 encryption aes-256

 integrity sha256

 group 14
 prf sha256    //ASA需要配置 prf sha256 因为在路由器上 prf是默认配置为 sha256 的

# 配置 第二阶段加密:
crypto ipsec ikev2 ipsec-proposal PROPOSAL

 protocol esp encryption aes

 protocol esp integrity sha-256

# 配置 tunnel-group:
## tunnel-group 指定对端地址
tunnel-group 1.1.1.1 type ipsec-l2l
tunnel-group 1.1.1.1 ipsec-attributes


 peer-id-validate nocheck

 ikev2 remote-authentication certificate

 ikev2 local-authentication certificate VPN    //指定本地证书的 trustpoint 名称

# 设置 ipsec profile:
crypto ipsec profile PRO

 set ikev2 ipsec-proposal PROPOSAL

 set trustpoint VPN

#配置 tunnel 接口,并应用ipsec profile:
interface Tunnel0

 nameif Tunnel

 ip address 10.0.0.2 255.255.255.252

 tunnel source interface Outside

 tunnel destination 1.1.1.1

 tunnel mode ipsec ipv4
 tunnel protection ipsec profile PRO


# HQR:
# 配置第一阶段加密:
crypto ikev2 proposal PROPOSAL

 encryption aes-cbc-256

 integrity sha256

 group 14
 prf sha256

# 配置policy关联proposal:
crypto ikev2 policy POLICY
 proposal PROPOSAL

# 配置第二阶段加密(transform-set)
crypto ipsec transform-set IPSEC esp-aes esp-sha256-hmac

 mode transport

# 配置 ikev2 profile(等同于ASA的tunnel-group)
crypto ikev2 profile PROFILE

 match identity remote any
 identity local address 1.1.1.1

 authentication remote rsa-sig

 authentication local rsa-sig

 pki trustpoint VPN

# 配置 ipsec profile:
crypto ipsec profile PRO

 set transform-set IPSEC

 set ikev2-profile PROFILE

# 关闭吊销列表:
no crypto ikev2 http-url cert

# 配置 tunnel 接口,并应用 ipsec profile:
interface Tunnel100

 ip address 10.0.0.1 255.255.255.252

 tunnel source GigabitEthernet0/2

 tunnel mode ipsec ipv4

 tunnel destination 2.2.2.1
 tunnel protection ipsec profile PRO
·查看 IKEv2 状态:
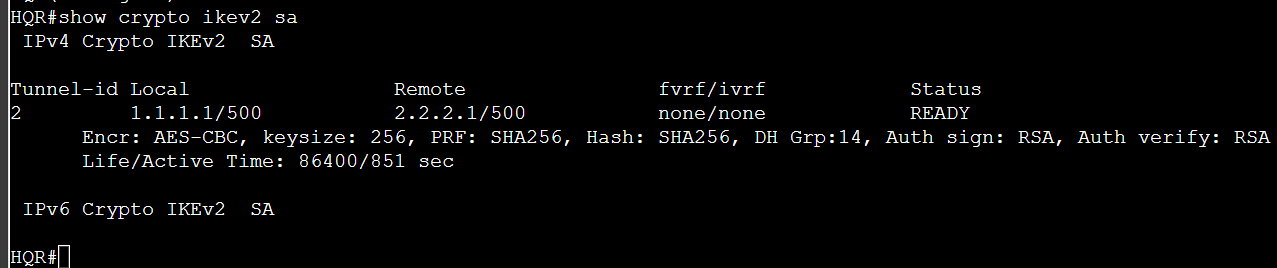

(4)根据tunnel 建立 BGP动态路由:
# ASA:
router bgp 2025


 address-family ipv4 unicast

  neighbor 10.0.0.1 remote-as 2024

  neighbor 10.0.0.1 activate

  network 172.16.1.0 mask 255.255.255.0


# HQR:
router bgp 2024


 network 172.16.10.0 mask 255.255.255.0

 network 192.168.1.0

 neighbor 10.0.0.2 remote-as 2025
3、WEBVPN:
(1)客户端上配置 tftp服务器:
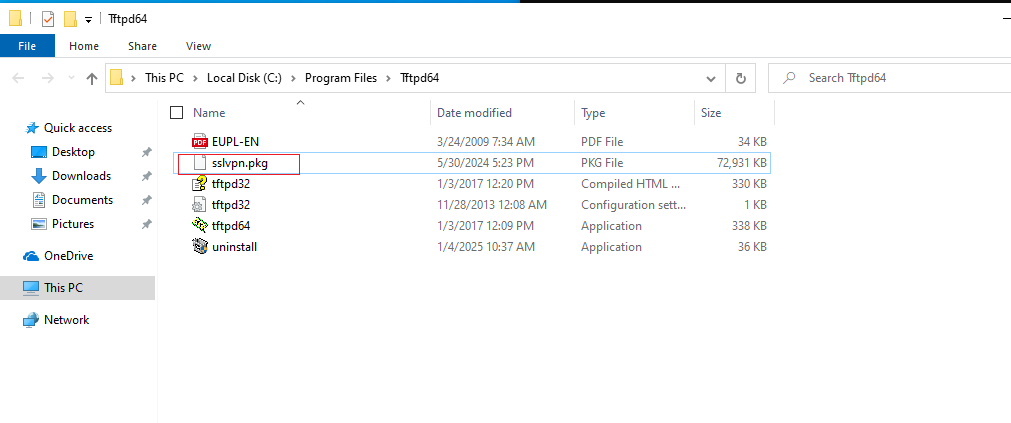
安装tftp软件包
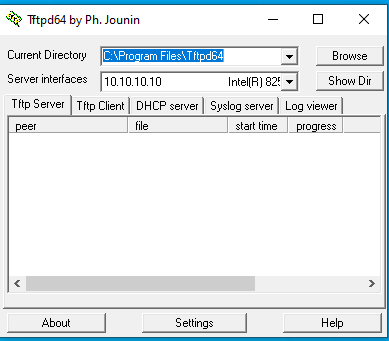
并将 sslvpn 附近拷贝到 tftp根目录下
(2)WEBVPN:
# ASA:
## 将 附件拷贝到 ASA本地:
end
copy tftp: flash:
# 输入tftp服务器的地址
# 输入文件名

# 启用webvpn:
webvpn    //启用 webvpn
enable outside    //将SSL VPN应用到outside接口
anyconnect image flash:/sslvpn.pkg    //加载上传的客户端配置文件
anyconnect enable    //启用 客户端配置文件
tunnel-group-list enable    //启用 组策略编辑
username cisco password Skills39    //创建一个用户,用户 SSL VPN进行远程登陆
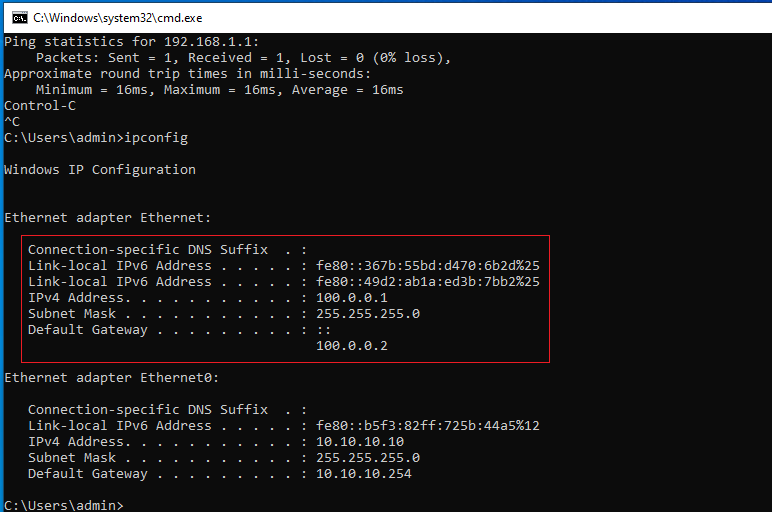
ip local pool SSL_POOL 100.0.0.1-100.0.0.10 mask 255.255.255.0    //定义一个 地址池
group-policy SSL_VPN internal    //创建一个组策略
group-policy SSL_VPN attributes     //设置组的属性
vpn-tunnel-protocol ssl-client    //定义 VPN隧道 使用的协议
address-pools value SSL_POOL    //关联 使用前面的配置的地址池进行地址划分
exit

tunnel-group SSL_Login type remote-access    //设置一个登陆组,类型为 远程拨号
tunnel-group SSL_Login general-attributes    //设置常规属性
default-group-policy SSL_VPN    //关联默认组策略(就是前面 第8行 定义的组策略)
exit

tunnel-group SSL_Login webvpn-attributes    //进入 webvpn的属性
group-alias WEBVPN enable    //定义组名称
exit
·客户端连接:
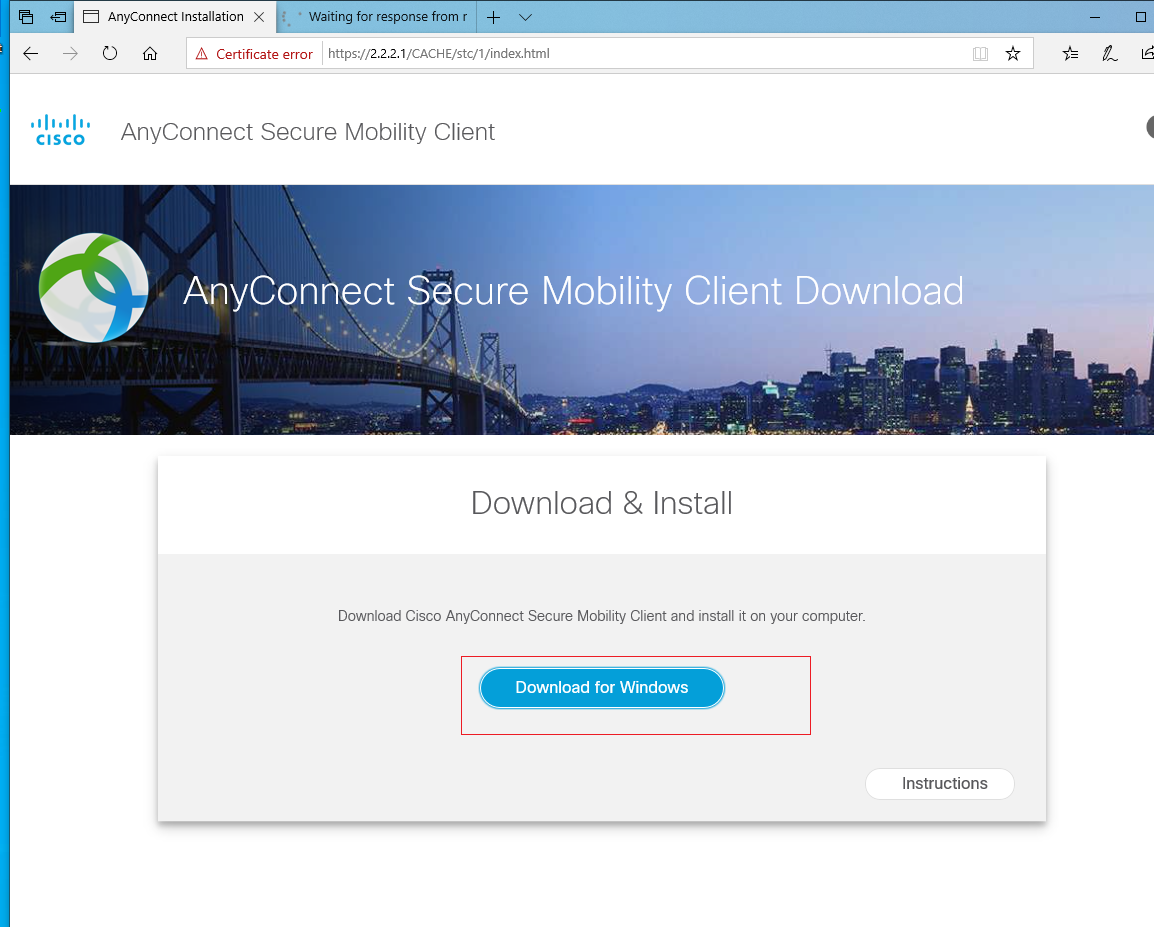
客户端先 web访问 https://2.2.2.1(ASA公网地址)下载 webvpn客户端:
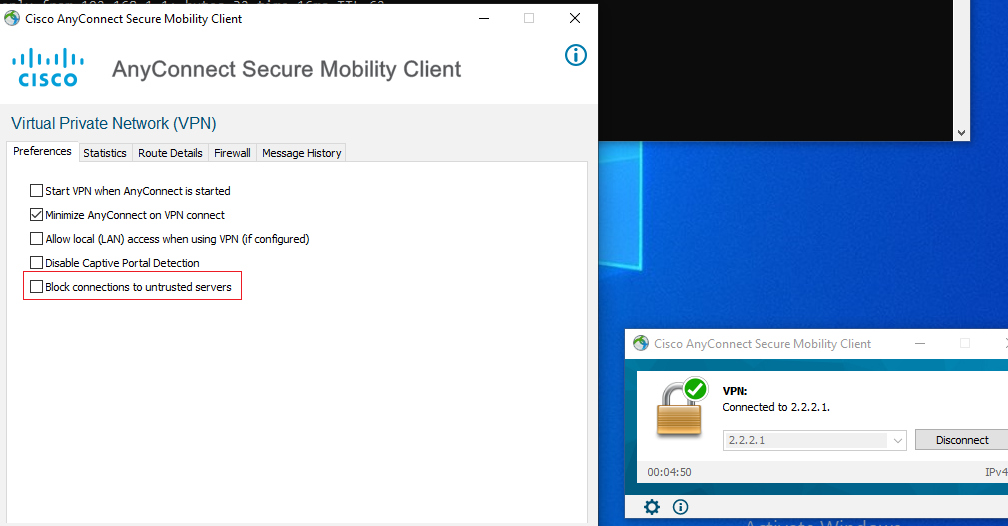
安装后进行连接:
(3)将 webvpn 网段通告到 BGP 中即可让 Net2 访问到 Net3(HQR):
# ASA:
router bgp 2025


 address-family ipv4 unicast


  network 100.0.0.1 mask 255.255.255.255    //通告路由表中的网段: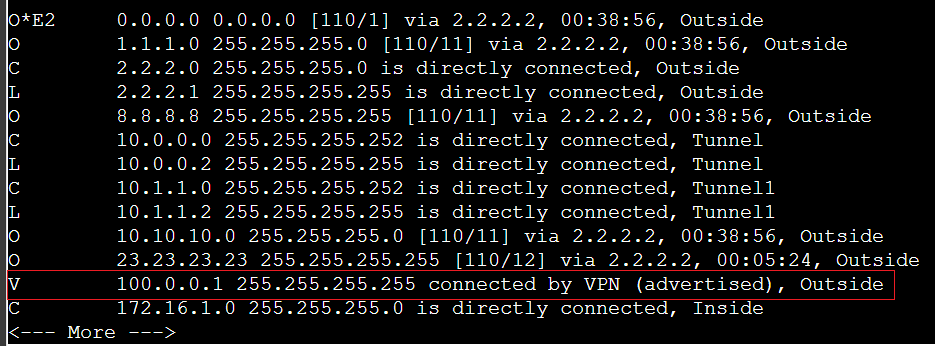
4、CORER 与 BR-ASA 建立 IKEv2 证书VPN:
这里在HQR 上胚子一个loopback(地址:23.23.23.23)接口来将ipsec 的流量DNAT到 CORER上
对端ASA的 tunnel destination 写为 23.23.23.23 即可
(1)HQR 上 配置 SNAT 与 DNAT(端口映射):
int g0/2
 ip nat outside
int g0/1
 ip nat inside

int loop 0
 no sh
 ip add 23.23.23.23 255.255.255.255

# ACL 匹配内网流量(需要匹配CORER的接口地址,因为它需要访问ISP申请证书)
ip access-list extended NAT

 permit ip 192.168.1.0 0.0.0.255 any

 permit ip 172.16.10.0 0.0.0.255 any

# SNAT:
ip nat inside source list NAT interface GigabitEthernet0/2 overload

# DNAT:

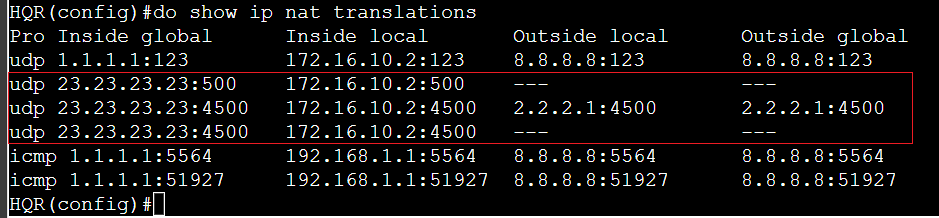
ip nat inside source static udp 172.16.10.2 500 interface Loopback0 500

ip nat inside source static udp 172.16.10.2 4500 interface Loopback0 4500esp 的流量不需要转进去
·SNAT 测试:

(2)申请证书:
因为ASA上同一张证书只能够用于一个VPN隧道,因此ASA上还需要再申请一张证书(字段一模一样即可)
内网的VPN机器只需要书写它本地的接口IP作为VPN字段即可
# ASA:
crypto ca trustpoint IKE

 enrollment protocol scep url http://8.8.8.8:80


 subject-name cn=2.2.2.1

 ip-address 2.2.2.1
 fqdn none
 revocation-check none
 keypair VPN

crypto ca authenticate VPN
crypto ca enroll VPN

# CORER:
crypto key generate rsa label VPN modulus 2048
crypto pki trustpoint VPN

 enrollment url http://8.8.8.8:80

 fqdn none

 ip-address 172.16.10.2

 subject-name cn=172.16.10.2

 revocation-check none

 rsakeypair VPN

crypto pki authenticate VPN
crypto pki enroll VPN
(3)配置 IKEv2:
# ASA:
## ASA只需要再配置一个 Tunnel-group 和 profile 即可:
tunnel-group 23.23.23.23 type ipsec-l2l    //对端公网地址

tunnel-group 23.23.23.23 ipsec-attributes

 peer-id-validate nocheck

 ikev2 remote-authentication certificate

 ikev2 local-authentication certificate IKE

crypto ipsec profile TUN

 set ikev2 ipsec-proposal PROPOSAL

 set trustpoint IKE

interface Tunnel1

 nameif Tunnel1

 ip address 10.1.1.2 255.255.255.252

 tunnel source interface Outside

 tunnel destination 23.23.23.23

 tunnel mode ipsec ipv4

 tunnel protection ipsec profile TUN

# CORER:
crypto ikev2 proposal PROPOSAL

 encryption aes-cbc-256

 integrity sha256

 group 14

crypto ikev2 policy POLICY

 proposal PROPOSAL

crypto ikev2 profile PROFILE

 match identity remote any

 identity local address 172.16.10.2

 authentication remote rsa-sig

 authentication local rsa-sig

 pki trustpoint VPN

no crypto ikev2 http-url cert

crypto ipsec transform-set IPSEC esp-aes esp-sha256-hmac

 mode transport

crypto ipsec profile PRO

 set transform-set IPSEC

 set ikev2-profile PROFILE

interface Tunnel1

 ip address 10.1.1.1 255.255.255.252

 tunnel source GigabitEthernet0/1

 tunnel mode ipsec ipv4

 tunnel destination 2.2.2.1

 tunnel protection ipsec profile PRO
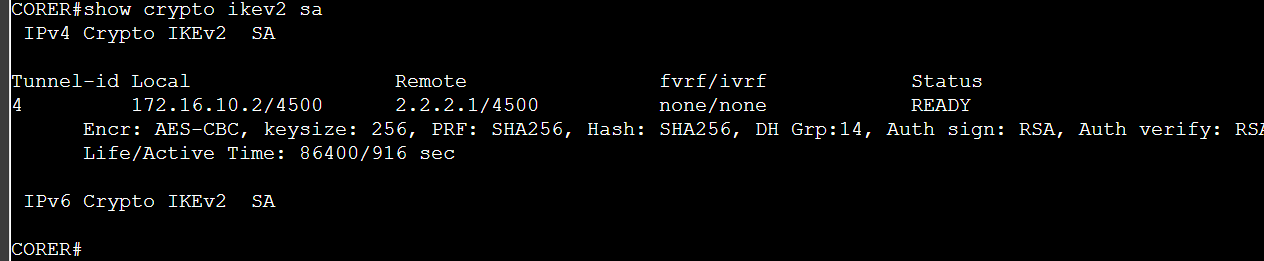
·查看 IKEv2 状态:

·查看DNAT映射流量:
5、BR-ASA 上配置 SNAT,让内网客户端能够访问公网:
object network NAT

 subnet 172.16.1.0 255.255.255.0    //匹配内网网段
 nat (Inside,Outside) dynamic interface
·测试:
