12- Web 服务.note
一、配置 Nginx(ns.lyon2024.fr):
域名解析的配置这里不做赘述
1、ns.lyon2024.fr:
(1)安装 Nginx:
apt install -y nginx(2)配置 网站:
1、编辑 Nginx 配置文件:
vim /etc/nginx/sites-enable/default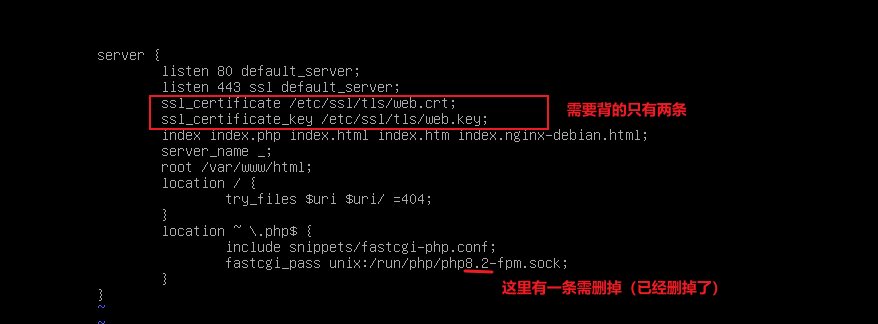
2、下载 php:
apt install -y php8.2-fpm3、在 fw.lyon2024 上 使用证书颁发机构颁发证书:
/usr/lib/ssl/misc/CA.pl -newreq-nodes
/usr/lib/ssl/misc/CA.pl -sign
rm newreq.pem
scp new* root@192.168.1.1:~

# ns.lyon2024.fr :
mkdir -p /etc/ssl/tls
cp ~/newcert.pem /etc/ssl/tls/web.crt
cp ~/newkey.pem /etc/ssl/tls/web.key
4、重启 nginx 服务:
systemctl restart nginx客户端信任证书等操作,此处不再赘述
(3)配置 wordpress、mysql :
1、创建 hello-world 目录,用于 wordpress 站点:
mkdir /var/www/html/hello-world
chmod -R 777 /www/html/hello-world
2、安装 wordpress:
apt install -y wordpress
cp -p /usr/share/wordpress/* /var/www/html/hello-world
cp -p /usr/share/wordpress/.htaccess /var/www/html/hello-world
3、将原本的配置 文件 移动到其它目录中:
mv /var/www/html/hello-world/wp-config.php ~4、配置 mysql:
apt install -y mariadb-server
mysql
create database LNMP;
grant all privileges on LNMP.* to 'admin'@'%' identified by 'Skills39';
flush privileges;
5、编辑 允许从任何地址访问 mysql 服务器:
vim /etc/mysql/mariadb.conf.d/50-server.cnf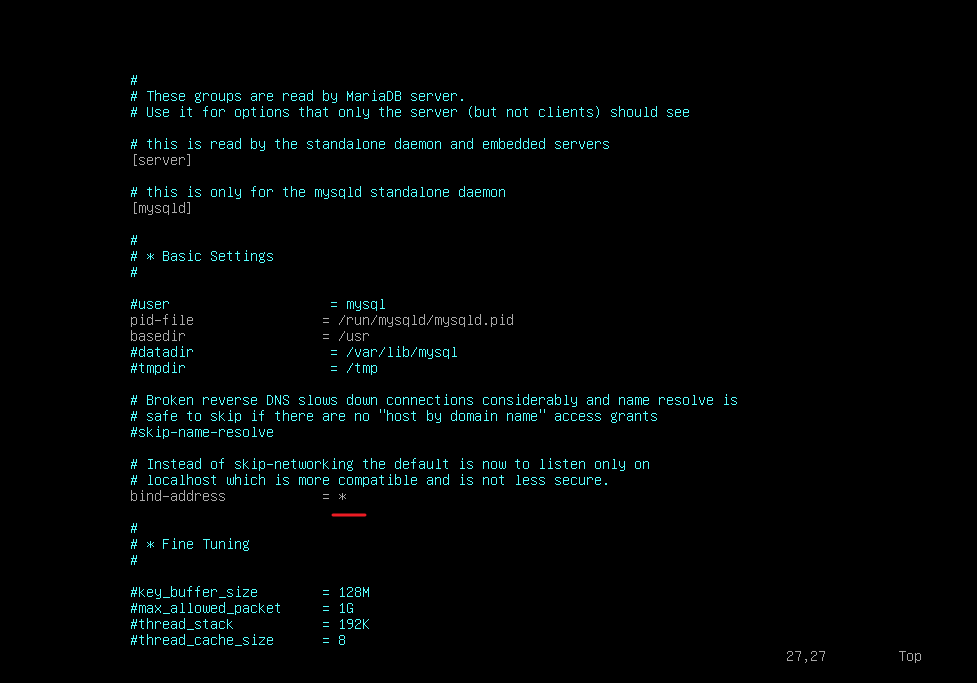
6、给予 hello-world 目录 访问权限:
chmod -R 777 /var/www/html/hello-world二、配置 Apache2(ns2.lyon2024.fr):
1、配置 Apache2:
(1)安装 apache2:
apt install -y apache2(2)编辑配置文件:
vim /etc/apache2/sites-enabled/000-default.conf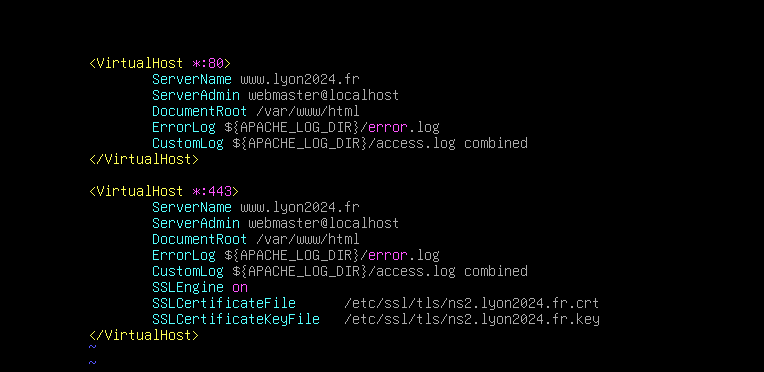
(3)开启 SSL,重启 Apache服务器:
a2enmod ssl
systemctl restart apache2