A模块.note
题目:
·背:
非法域名:
## 都可以在 man named.conf 里面找到
allow-recursion { any; };
response-policy { zone "aaa.ccc"; };
# 找不到:
$GENERATE 1-9    virus0$.net   CNAME .
$GENERATE 10-99  virus$.net    CNAME .
skill39.fun    CNAME    .
openvpn证书:
vim /etc/ssl/openssl.cnf
keyUsage 只需要取消注释即可

# 生成 dh:
openssl dhparam -out dh2048.pem 2048
mysql:
mysql
create database wordpress;
grant all privileges on wordpress.* to 'wordpress'@'%' identified by 'Skills39!';

# 仅允许root用户本地登陆:
grant all privileges on *.* to 'root'@'localhost' identified by 'Skills39!';
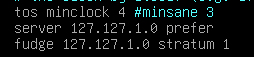
ntpsec:
nginx pam认证软件包:
apt install -y libnginx-mod-http-auth-pamraid、lvm:
mdadm -C /dev/md0 -l5 -n3 -x1 /dev/sd[bcde]
pvcreate /dev/md0
vgcreate vg0 /dev/md0
lvcreate -L 0.99g -n www vg0
lvcreate -L 0.99g -n docs vg0
nginx目录浏览:
autoindex on;
autoindex_exact_size off;
autoindex_localtime on;
创建 500M的文件:
dd if=/dev/zero of=star.flv bs=500M count=1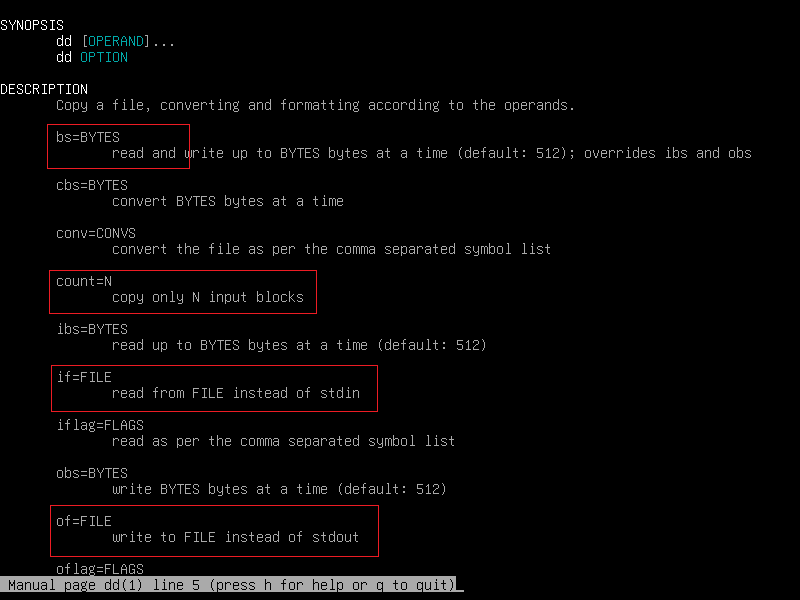
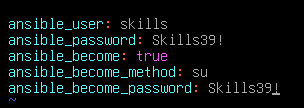
ansible
一、防火墙:
1、nftables:
systemctl restart nftables    //默认就会有 input、forward、output链
nft list ruleset > /etc/nftables.conf
# vim /usr/share/doc/nftables/examples/ct_helpers.nft
# vim /usr/share/doc/nftables/examples/
nat.nft

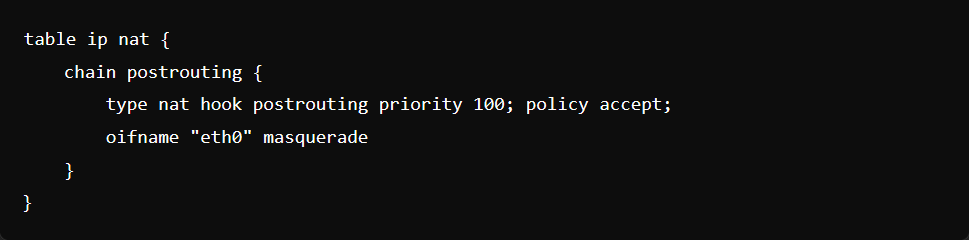
vim /etc/nftables.conf
如果SNAT是IP伪装:
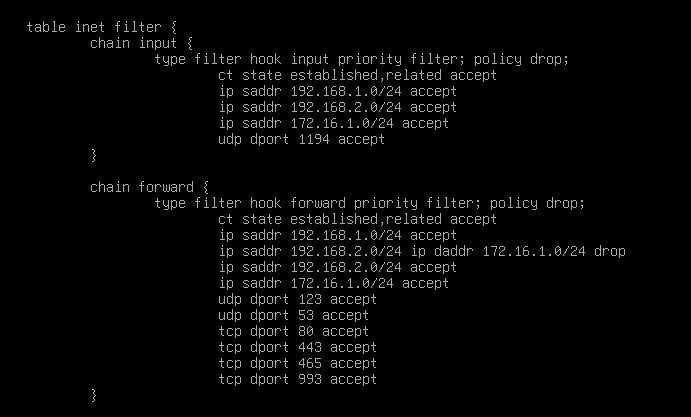
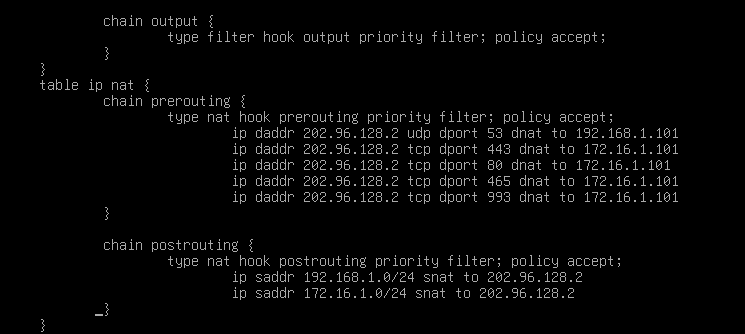
systemctl restart nftables
systemctl enable nftables
2、iptables:
ip 伪装:

apt install -y iptables
vim ~/iptables.sh
# 这里SNAT只配置转换成地址即可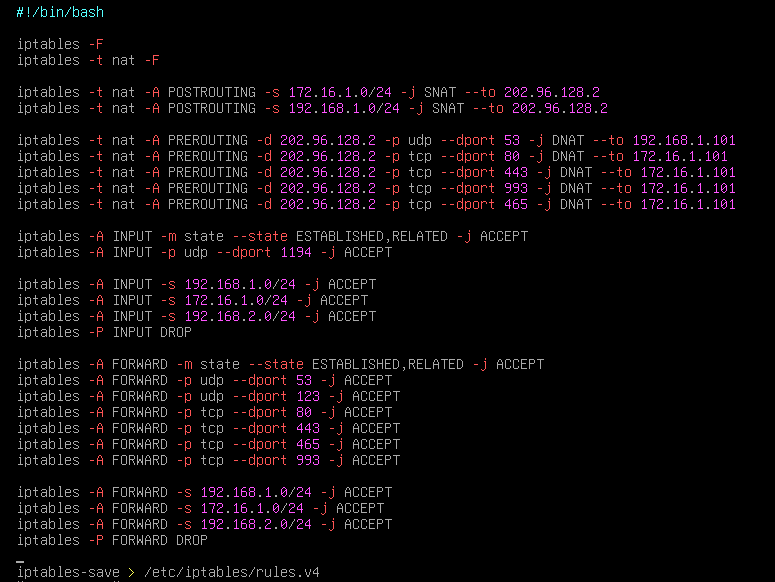
bash ~/iptables.sh二、CA:
注意:根CA本地需要信任根证书(评分表可能会检查),建议最好是给所有机器信任根证书
1、server(根CA):
apt install -y openssl
vim /etc/ssl/openssl.cnf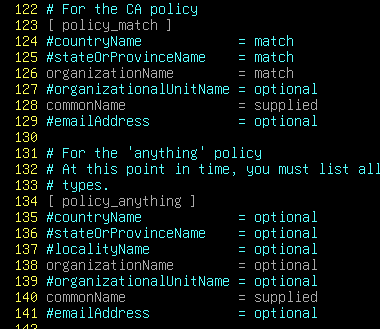

下面的字段是用于VPN证书的:


keyUsage 只需要取消注释即可

/usr/lib/ssl/misc/CA.pl -newca2、为 server3 颁发证书:
# server:
vim /etc/ssl/openssl.cnf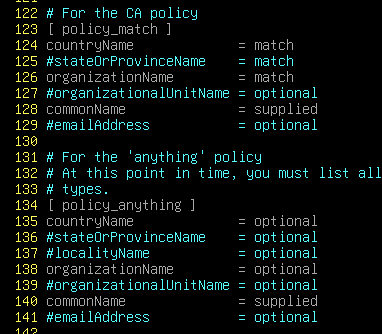

/usr/lib/ssl/misc/CA.pl -newreq-nodes
# 证书字段按照题目书写即可
/usr/lib/ssl/misc/CA.pl -sign
三、公网DHCP、DNS:
1、ISP(dhcp):
apt install -y isc-dhcp-server
vim /etc/default/isc-dhcp-server
vim /etc/dhcp/dhcpd.conf

systemctl restart isc-dhcp-server
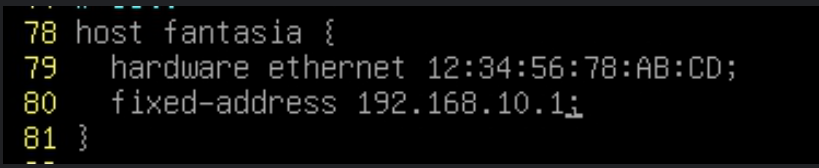
如果要指定mac地址分配固定ip:
·remote客户端获取IP:
使用NetworkManager进行图形化获取ip
cat /var/lib/dhcp/dhclient.ens33.leases    //查看dhcp租约
2、server(DNS、DDNS、wsc2024.org域委派):
(1)dns、dns委派:
vim /etc/bind/named.conf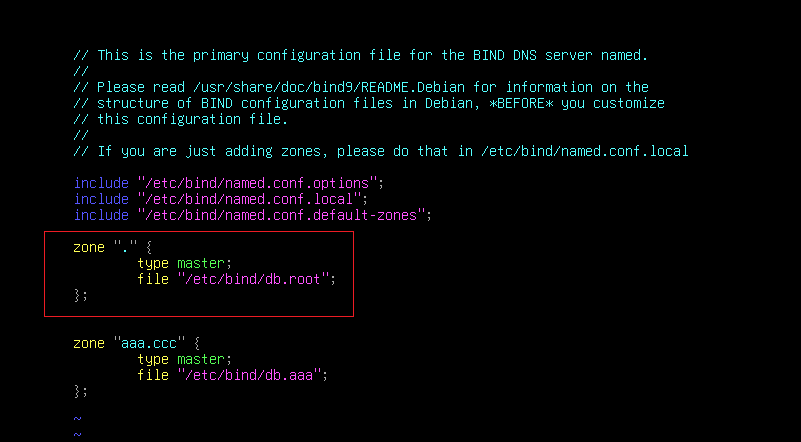
vim /etc/bind/named.conf.options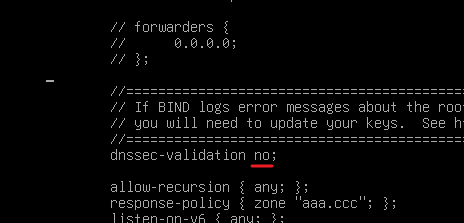
vim db.root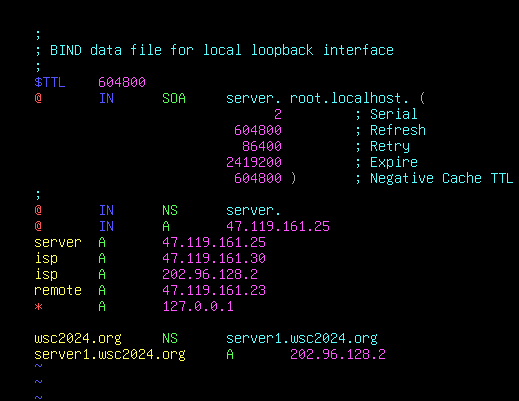
(2)ddns(不需要配置):
## 因为公网区域是 . isc-dhcp-server 直接写 zone . 会报错,因此ddns未配置成功,但是remote题目也没有要求配置,而且remote客户端是固定IP,直接写A记录即可。3、server(非法域名):
vim /etc/bind/named.conf
# 随便写一个域名,但是不要写baidu.com这些常用的域名,因为该题目配置了泛解析到127.0.0.1,如果运气不好刚好跟评分表测试泛解析的域名冲突了,那可能就得不了分: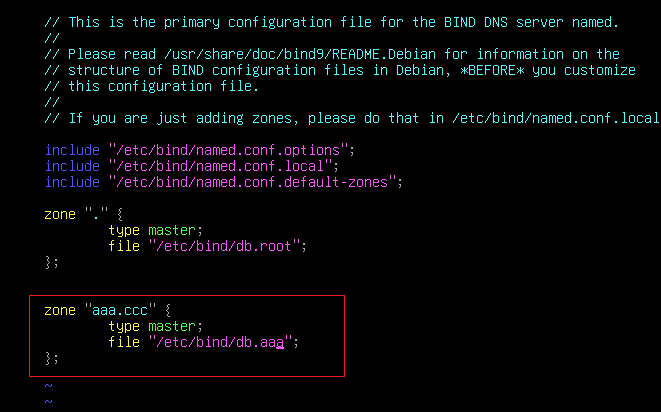
vim db.aaa
# 这里使用了变量,如果不想用变量可以用 excel表搞99个,然后粘贴进来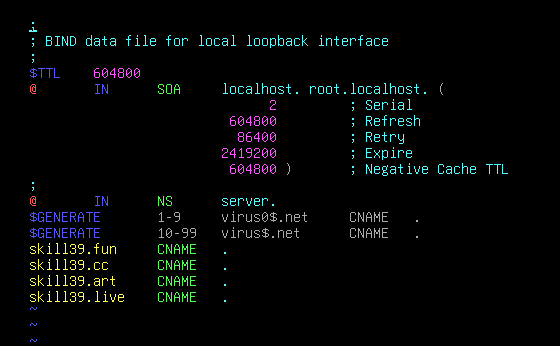
vim /etc/bind/named.conf.options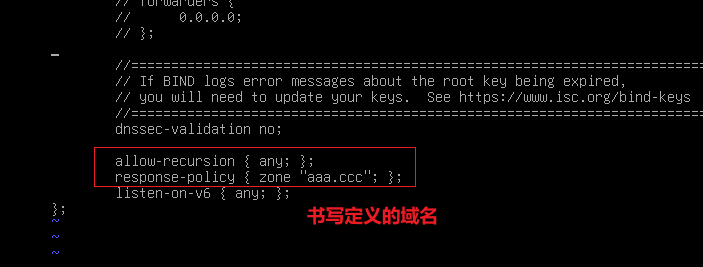
systemctl restart bind9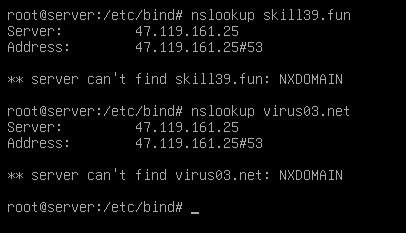
四、内网 DNS:
1、server(外网dns):
apt install -y bind92、server1(内网dns):
# 这个是需要使用ansible自动配置的
vim /etc/bind/named.conf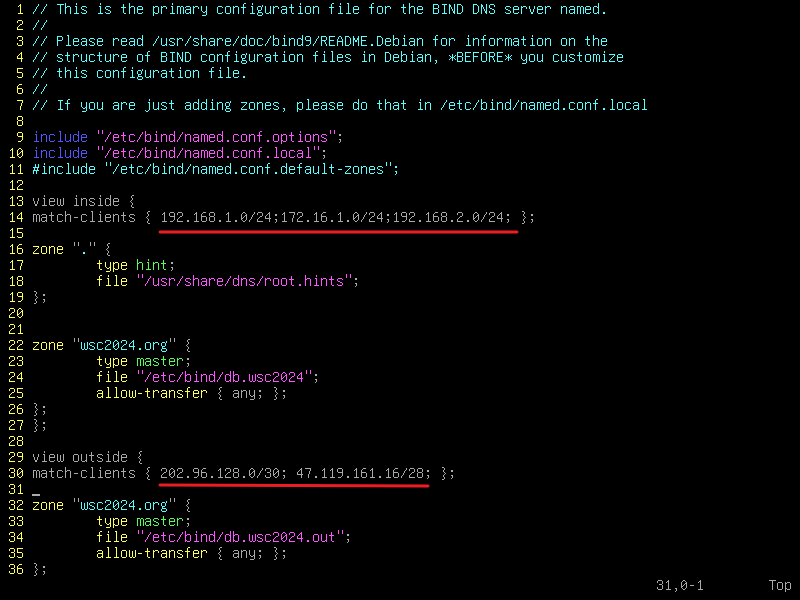
vim /etc/bind/named.conf.options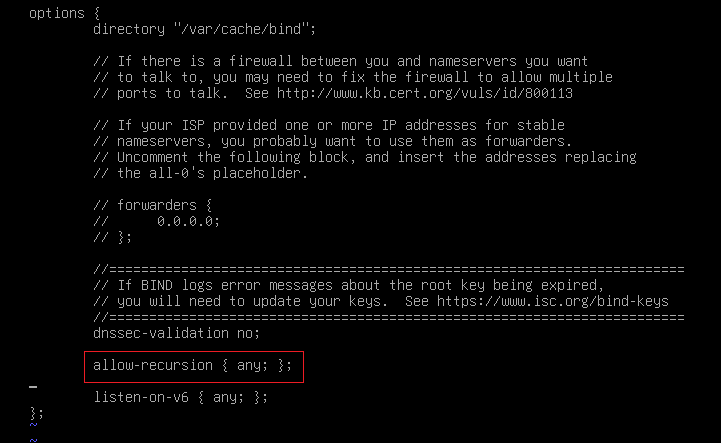
vim /etc/bind/db.wsc2024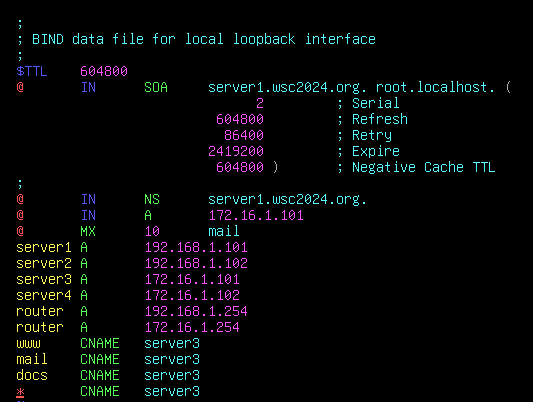
vim /etc/bind/db.wsc2024.out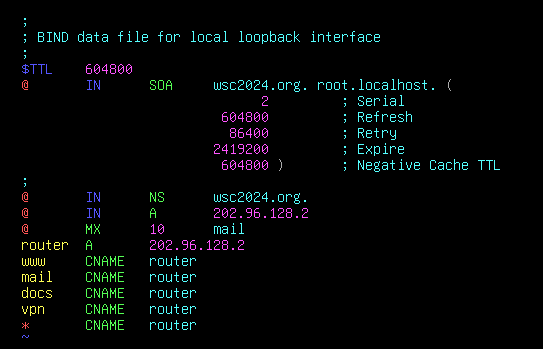
systemctl restart bind9
3、server2(内网dns):
# 这个是需要使用ansible自动配置的
vim /etc/bind/named.conf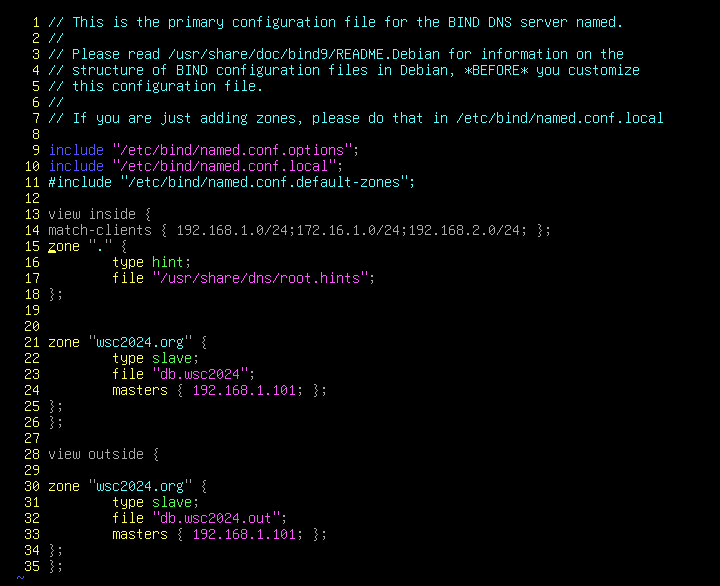
systemctl restart bind9
vim /etc/bind/named.conf.options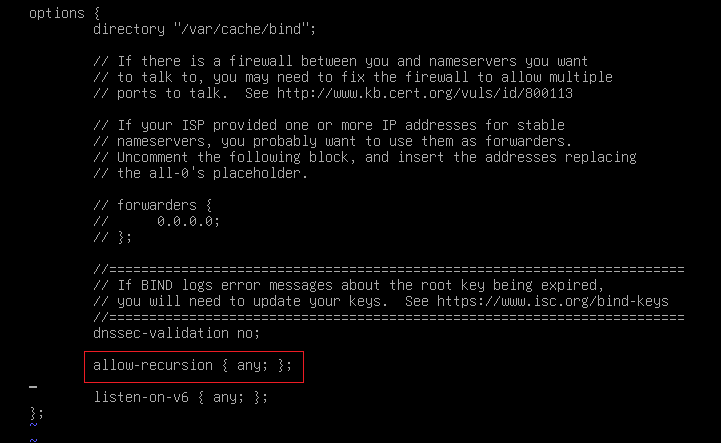
4、根提示(server1、server2):
# 也是需要使用ansible配置
vim /etc/bind/named.conf.options
vim /etc/bind/named.conf.options
# 开启recursion 是为了解决下面openvpn客户端的报错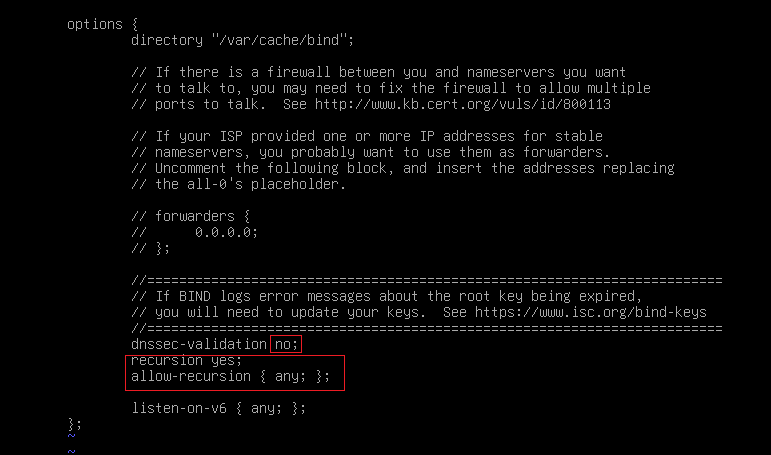
# 需要提前在named.conf中配置根提示区域
vim /usr/share/dns/root.hints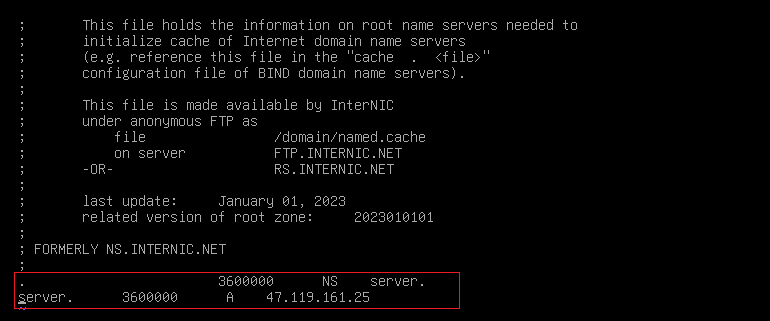
五、ntpsec:
1、server:
apt install -y ntp
vim /etc/ntpsec/ntp.conf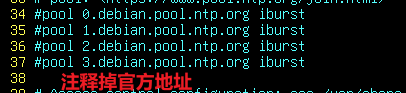

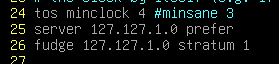
(这里将时间层级设置为1[顶级时间服务器])
fudge 是可选的,作用是设置时间层级,如果不设置,默认为5
systemctl restart ntpsec
2、配置客户端:
这里客户端使用 systemd-timesyncd
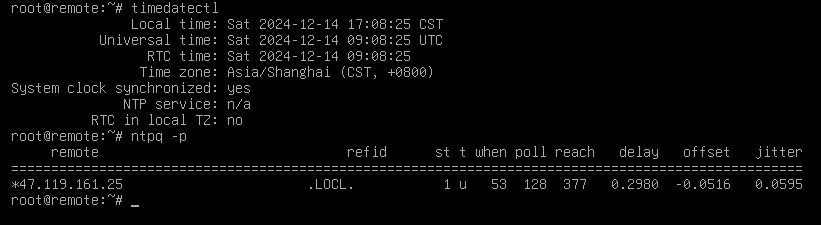
(1)客户端是ntpsec:
apt install -y ntpsec
vim /etc/ntpsec/ntp.conf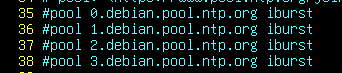

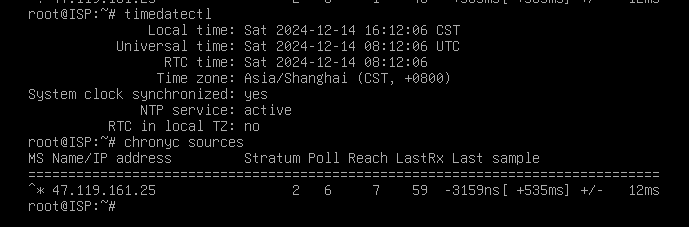
(2)客户端是chrony:
apt install -y chrony
vim /etc/chrony/chrony.conf

systemctl restart chrony
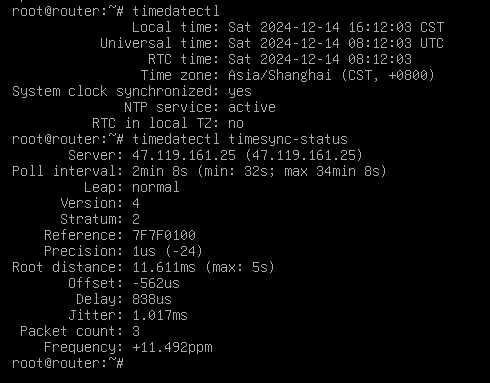
(3)客户端是systemd-timesyncd:
apt install -y systemd-timesyncd
vim /etc/systemd/timesyncd.conf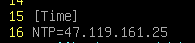
systemctl restart systemd-timesyncd
六、raid、nfs:
1、server4(raid):
先添加4块1G磁盘
apt install -y lvm2 mdadm
lsblk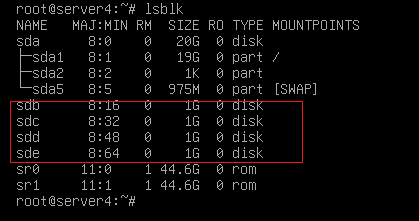
(1)raid:
# 创建raid:
mdadm -C /dev/md0 -l5 -n3 -x1 /dev/sd[bcde]
-l5    //指定raid级别为5
-n3    //指定raid中磁盘数量(不包括热备盘)
-x1    //指定热备盘
(2)lvm:
# lvm:
pvcreate /dev/md0
vgcreate vg0 /dev/md0
lvcreate -L 1020m -n www vg0
lvcreate -L 1020m -n docs vg0
或
lvcreate -L 0.99g -n docs vg0
lvcreate -L 0.99g -n www vg0因为raid磁盘只有2G空间(正常的),换算过来vgs只有1.99g了,所以这里无法直接分配1G,因为空间不够
(3)格式化并挂载:
mkfs.ext4 /dev/vg0/www
mkfs.ext4 /dev/vg0/docs

mkdir /htdocs/www -p
mkdir /htdocs/docs
vim /etc/fstab
mount -a
2、server4(nfs服务器):
apt install -y nfs-kernel-server
vim /etc/exports
# 虽然题目没有说仅允许server3,但是我们最好是写上
exportfs -av //共享3、server3(nfs客户端):
挂载前最好先备份原先目录中的内容
cp -r /htdocs/www/* ~/www
cp -r /htdocs/docs/* ~/docs
apt install -y nfs-client    //不安装挂载不上
mkdir -p /htdocs/www
mkdir /htdocs/docs
vim /etc/fstab
mount -a
七、LNMP(nginx、MySQL、php):
1、配置 mysql(server4):
apt install -y mariadb-server
vim /etc/mysql/mariadb.conf.d/50-server.cnf
# 创建wordpress数据库:
mysql
create database wordpress;
grant all privileges on wordpress.* to 'wordpress'@'%' identified by 'Skills39!';
flush privileges;    //或者重启
·仅允许root用户通过密码从本地登陆:
mysql
alter user 'root'@'localhost' identified by 'Skills39!';
2、配置 nginx、php、wordpress(server3):
adduser web
vim /etc/nginx/nginx.conf
# 修改用户进程和组为 web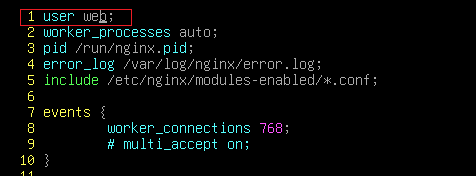
apt install -y nginx nginx-doc php8.2-fpm wordpress
# 在 /usr/share/doc/nginx/example/virtual_hosts 下有SSL证书的配置
cp -r /usr/share/wordpress/* /htdocs/www
chown web:web -R /run/php/    //因为这是修改进程用户和组之后就会有的bug,会导致nginx无法访问php8.2文件,因此需要修改其文件属主为 nginx进程用户(web)
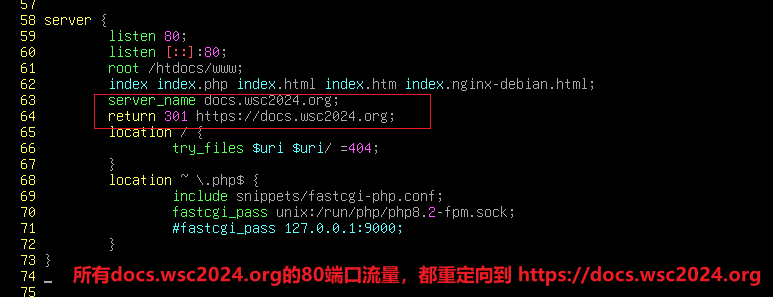
vim /etc/nginx/sitens-enabled/default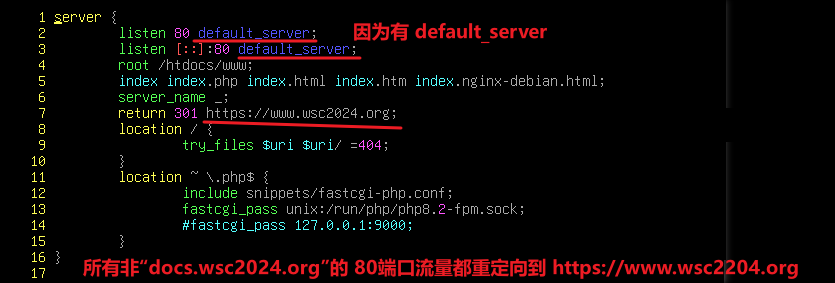
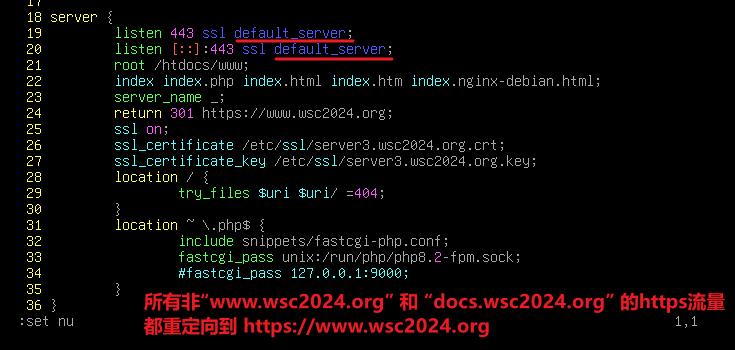
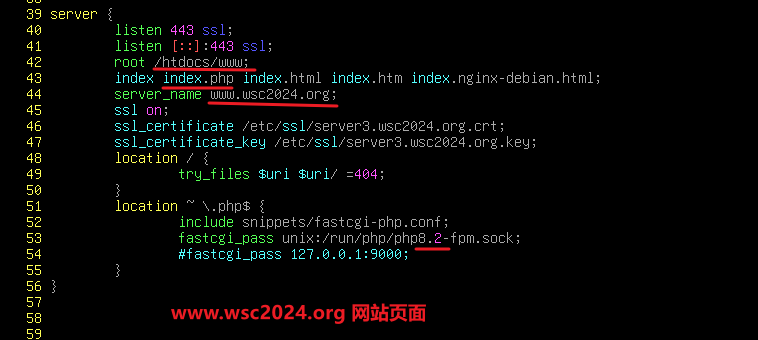
3、访问wordpress(客户端访问wordpress):
# 先删除wordpress原本的配置文件,否则会报错
## 需要给予 /usr/share/wordpress目录写入权限,否则无法生成配置文件
mv /usr/share/wordpress/wp-config.php ~
chmod -R 777 /usr/share/wordpress
4、配置docs页面:
(1)创建文件、创建500M的star.flv文件:
mkdir /htdocs/docs
cd /htdocs/docs
touch linux.txt ring.mp3 cat.jpg

dd if=/dev/zero of=star.flv bs=500M count=1    //创建名为star.flv的文件,大小为500M
(2)80端口重定向到443端口:
vim /etc/nginx/sites-enabled/default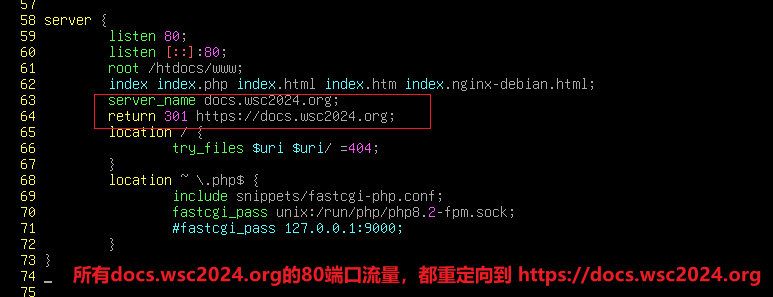
(3)开启目录浏览,并显示文件创建的本地时间、显示带单位的大小:
vim /etc/nginx/sites-enabled/defautl    //写在 虚拟主机中
# autoindex on;    //打开目录浏览
# autoindex_exact_size off;    //显示带单位的大小
# autoindex_localtime on;    //显示文件被创建的本地时间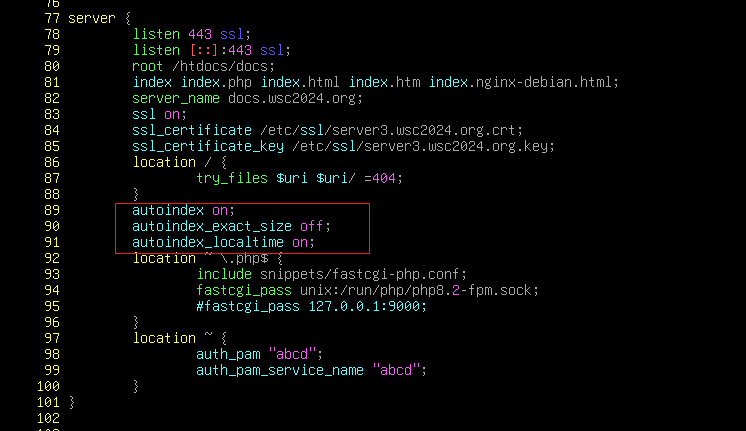
(4)配置 pam 本地身份认证:
# 可以使用 apt search auth-pam 快速搜索到
apt install -y libnginx-mod-http-auth-pam    //安装nginx的pam组件
## 停止apache2(这个软件会同时安装apache2)
systemctl stop apache2
systemctl disable apache2
chmod 777 /etc/shadow    //给予nginx访问本地用户密码文件的权限(否则无法登陆成功)
vim /etc/nginx/sitens-enabled/default
# 这里使用的是PAM(本地用户)身份认证: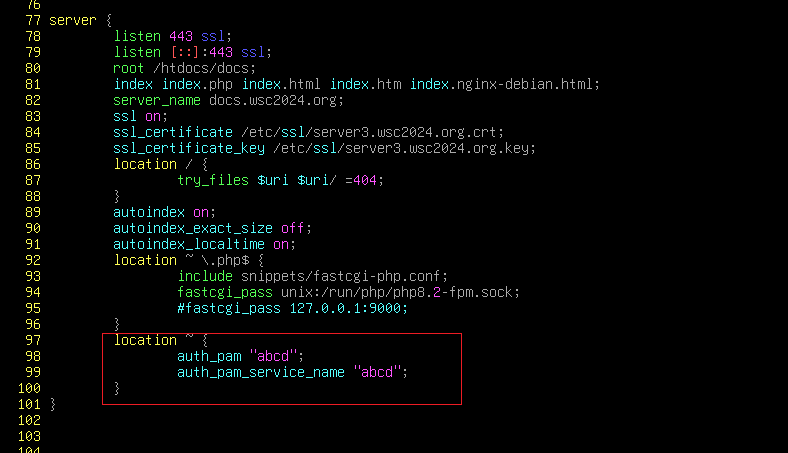
双引号内的内容随意定义
·如果是ldap的身份认证:
八、mail、webmail:
1、server3(mail):
一定要先配置邮箱后,再创建用户
apt install -y postfix dovecot-imapd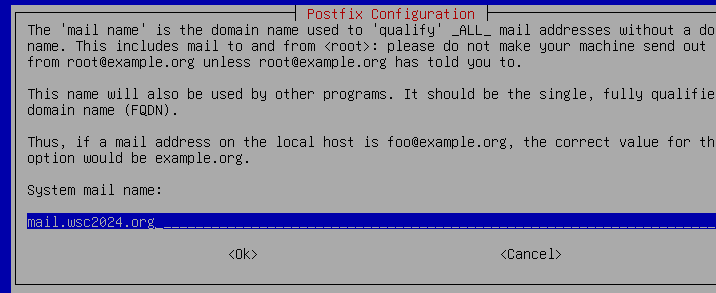
vim /etc/postfix/main.cf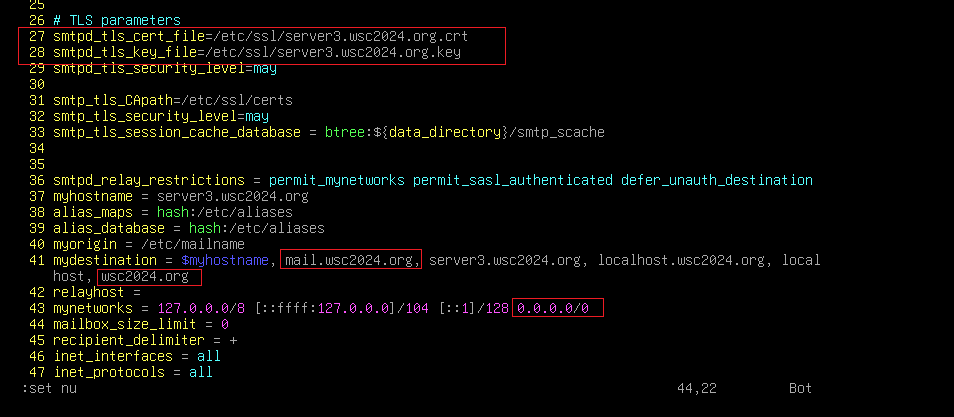
vim /etc/postfix/master.cf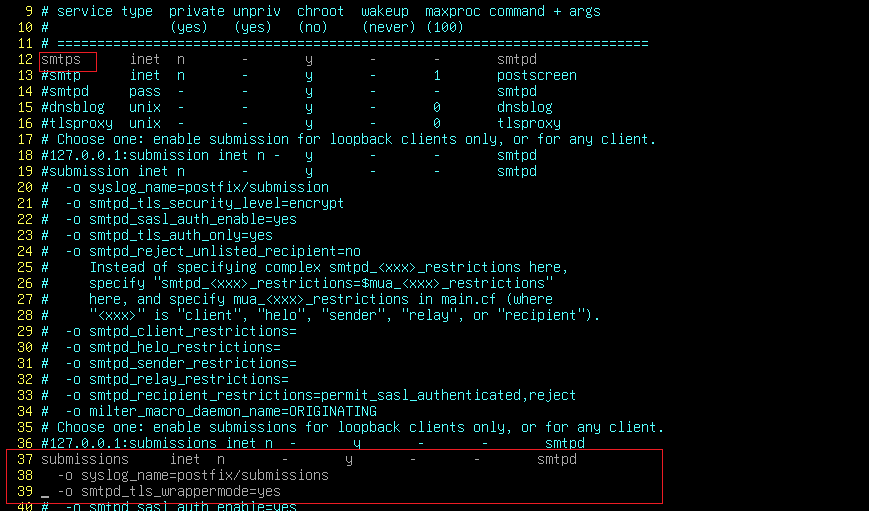
systemctl restart postfix
vim /etc/dovecot/conf.d/10-auth.conf
vim /etc/dovecot/conf.d/10-ssl.conf
vim /etc/dovecot/conf.d/10-master.conf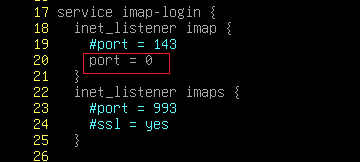
systemctl restart dovecot
adduser zhangsan
adduser lisi
2、server4(mariadb-server):
apt install -y mariadb-server
apt install -y roundcube    //安装roundcube,让它自动配置数据库即可
vim /etc/mysql/mariadb.conf.d/50-server.cnf
·(重点)修改roundcube数据库用户的权限,使其允许从任意地址访问:
mysql
grant all privileges on roundcube.* to 'roundcube'@'%' identified by 'Skills39!';
重启机器使其生效
3、server3(webmail):
apt install -y mariadb-server
apt install -y roundcube    //要装数据库,否则roundcube装不上
vim /etc/nginx/sites-enabled/default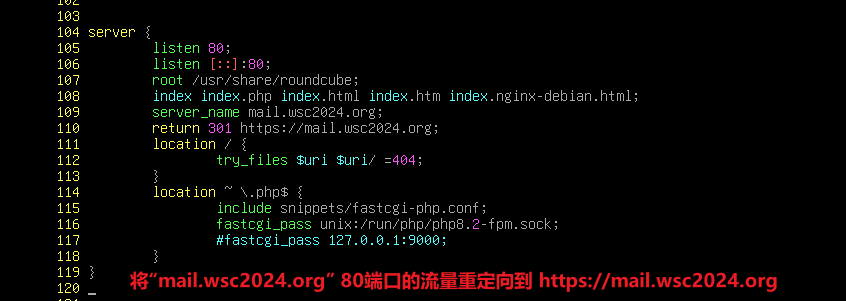
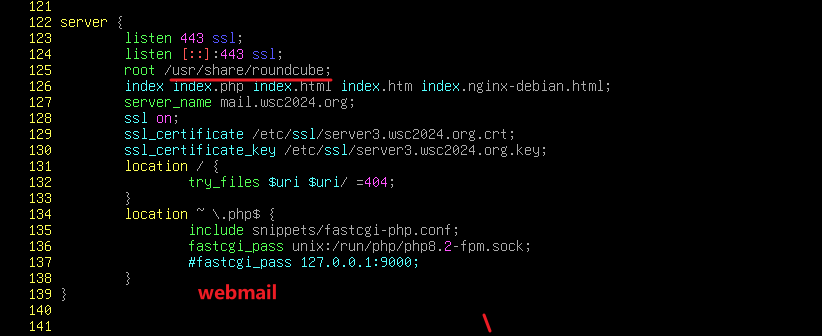
systemctl restart nginx
安装roundcube后,会再次将 /run/php/目录下的属主和属组改为www-data,这里需要再改成web:
chown web:web -R /run/php
# 配置 roundcube:
vim /etc/roundcube/config.inc.php
# imap和smtp配置能够在 defaults.inc.php里面抄到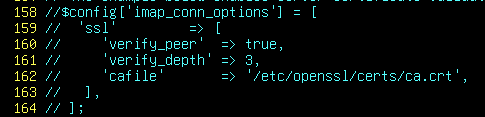
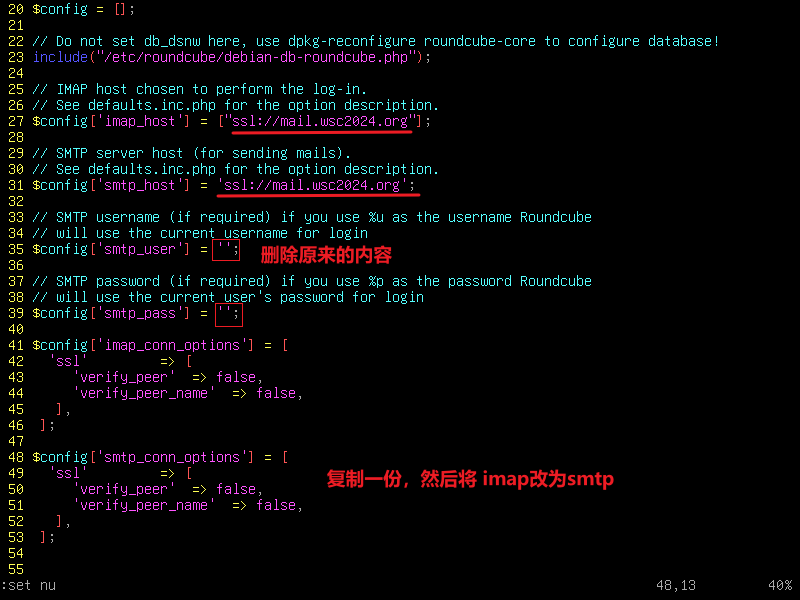
记得要让server3本地能够解析到 mail.wsc2024.org
echo "nameserver 192.168.1.101" > /etc/resolv.conf
# 指定roundcube数据库为server4:
vim debian-db.php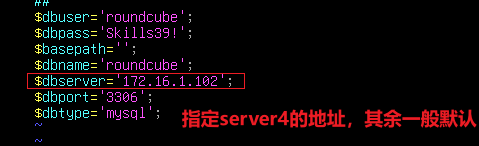
4、邮件群发:
# server3:
vim /etc/aliases
# 将所有添加的用户都写进去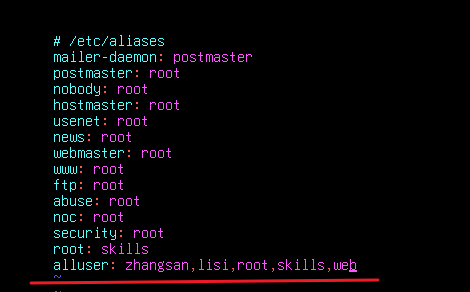
postalias /etc/aliases九、openvpn:
1、server(颁发vpn证书):
vim /etc/ssl/openssl.cnf
# 书写VPN客户端和服务器的公网IP地址:
## 需要手动添加 keyUsage(将extendedKeyUsage取消注释后添加 serverAuth,clientAuth)

keyUsage 只需要取消注释即可

# 颁发证书:
/usr/lib/ssl/misc/CA.pl -newreq-nodes
/usr/lib/ssl/misc/CA.pl -sign
## 证书字段最好按照server3那样写,虽然题目没说

# 生成dh文件:
openssl dhparam -out dh2048.pem 2048
2、router(vpn服务器):
(1)配置openvpn:
# 先将server上的证书拷贝到本地
scp root@47.119.161.25:~/new* /etc/openvpn
scp root@47.119.161.25:~/ca.crt /etc/openvpn    //根证书
scp root@47.119.161.25:~/dh2048.pem /etc/openvpn    //dh

# 使用 openvpn --help 可以查看完整代码:
openvpn --genkey secret ta.key
cp /usr/share/doc/openvpn/examples/sample-config-files/server.conf .
vim server.conf



配置 push路由:

要 push 172的路由,但是需要使用 nftables禁用它。

注释cipher是为了下面的图形化连接openvpn
# 本地信任根证书:
scp ca.crt /usr/local/share/ca-certificates
update-ca-certificates

# 将证书、文件改名为跟server.conf 中同名的文件
mv newcert.pem server.crt
mv newcert.key server.key

# 启动 openvpn@server:
systemctl restart openvpn@server
systemctl enable openvpn@serveropenvpn服务器最好一直开启和enable
openvpn客户端做完后直接关闭且disable
3、remote(openvpn客户端):
# 客户端也要信任CA根证书
apt install -y openvpn
scp root@202.96.128.2:/etc/openvpn/* /etc/openvpn
rm /etc/openvpn/server.conf
cp /usr/share/doc/openvpn/examples/sample-config-files/client.conf .
mv server.crt client.crt
mv server.key client.key
vim client.conf


注释cipher是为了下面的图形化连接openvpn
systemctl restart openvpn@client
# 连接成功后立马关闭VPN,也不要配置enable
4、图形化连接openvpn:
1、remote(先将网卡设置为使用 networkmanager获取的):
apt install -y network-manager    //图形化一般是默认安装的
echo > /etc/network/interfaces
# 清空文件中的内容
systemctl restart networking
# 然后重启机器
使用图形化获取IP:
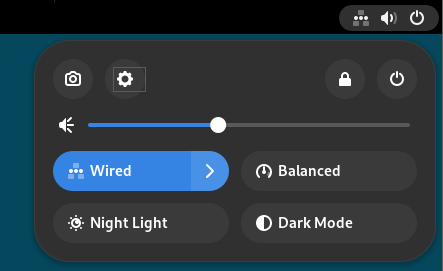
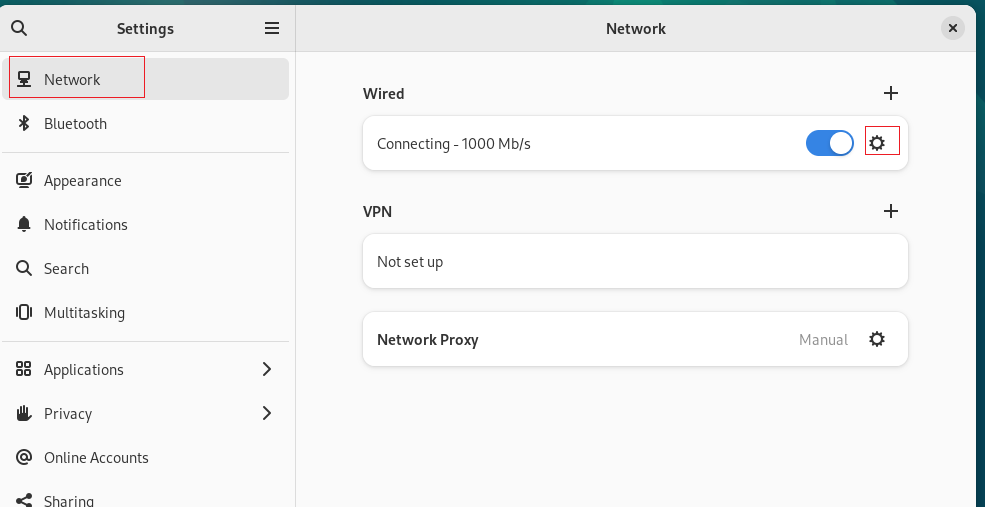
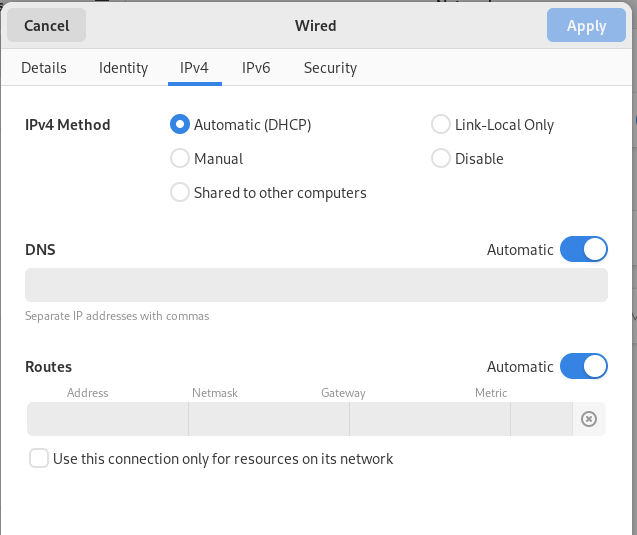
默认就是dhcp
·配置图形化连接:
图形化连接需要两端都注释 cipher ,否则无法成功连接
# 客户端上配置:
systemctl disable openvpn@client
systemctl stop openvpn@client

mv /etc/openvpn/client.conf /etc/openvpn/WSC2024.conf
apt install -y network-manager-openvpn
nmcli connection import type openvpn file /etc/openvpn/WSC2024.conf因为题目有说VPN适配器是 WSC2024,所以导入时需要将名字更改为WSC2024.conf,这样图形化就会显示为 WSC2024
5、(隐藏考点)客户端连接VPN时修改客户端DNS服务器地址为内网:
常规的方法在图形化上不会生效,我们需要直接编辑 VPN适配器
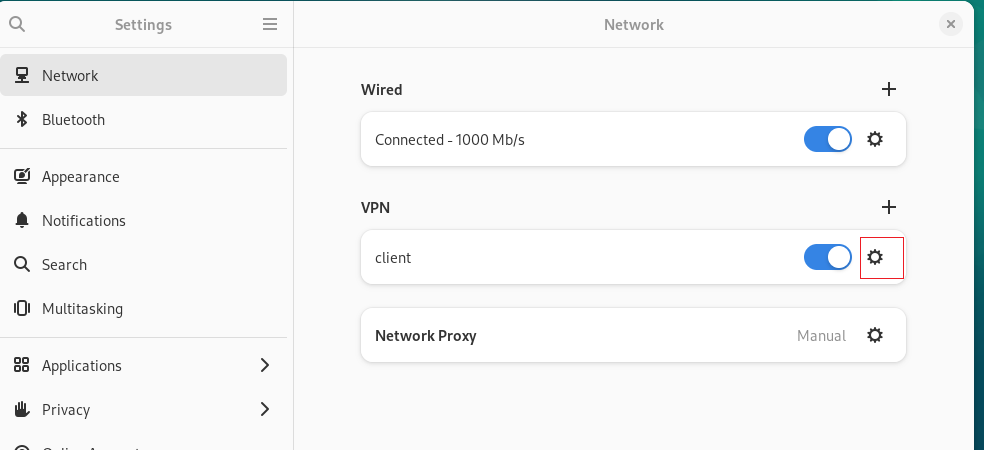
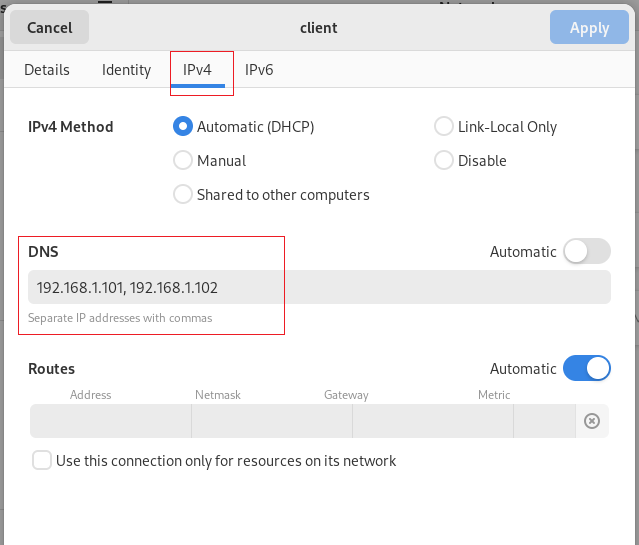
此时客户端查询会报错:
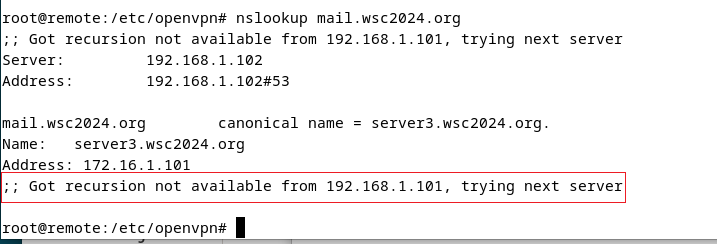
需要在dns服务器上开启递归:
# server1、server2:
vim /etc/bind/named.conf.options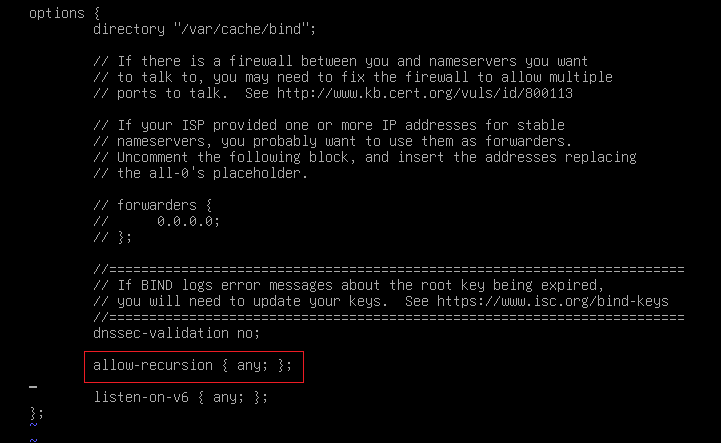
·如果要使用 easyrsa证书配置vpn:
十、Ansible:
1、router:
apt install -y python3 ansible ssh sshpass
mkdir /etc/ansible
cd /etc/ansible
ansible-config init > ansible.cfg.bak
vim ansible.cfg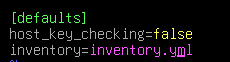
mkdir group_vars
vim group_vars/all.yml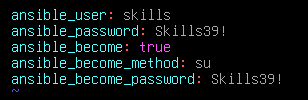
·测试连通信:
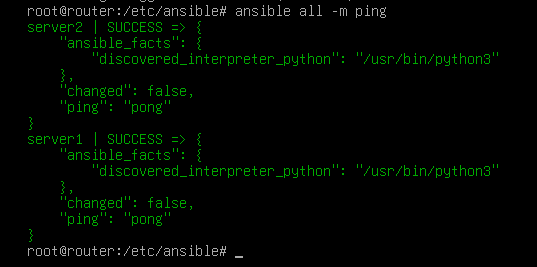
(1)init.yml
---
- name: init
  hosts: all
  gather_facts: false
  tasks:
    - name: Install packet
      apt:
        name:
          - curl
          - wget
          - lynx
          - dnsutils
          - ftp
          - lftp
          - smbclient
          - ssh
          - telnet
          - traceroute
          - ntpdate
          - lsof
          - nmap
          - mailutils
          - net-tools
          - dbus
        update_cache: false
      notify: restart

  handlers:
    - name: restart
      systemd:
        name: dbus
        state: restarted

- name: init
  hosts: all
  gather_facts: false
  tasks:
    - name: set hostname
      hostname:
        name: "{{ inventory_hostname }}"
      notify: set keymap

    - name: set FQDN
      lineinfile:
        path: /etc/hosts
        search_string: "127.0.1.1"
        line: "127.0.1.1 {{ inventory_hostname }}.wsc2024.org {{ inventory_hostname }} debian"

  handlers:
    - name: set keymap
      raw: localectl set-x11-keymap us
      when: inventory_hostname == "server1"

    - name: set timezone
      raw: timedatectl set-timezone Asia/Shanghi
      when: inventory_hostname == "server2"
(2)timesync.yml
---
- name: timesync
  hosts: all
  gather_facts: false
  tasks:
    - name: Install timesyncd
      apt:
        name: systemd-timesyncd
        update_cache: false

    - name: set ntp server address
      lineinfile:
        path: /etc/systemd/timesyncd.conf
        search_string: "#NTP"
        line: "NTP=47.119.161.25"
      notify: restart

  handlers:
    - name: restart
      systemd:
        name: systemd-timesyncd
        state: restarted
(3)nameserver:
---
- name: nameserver
  hosts: all
  gather_facts: false
  tasks:
    - name: set nameserver
      raw: echo "nameserver {{ ansible_host }} > /etc/resolv.conf
      changed_when: false
(4)dns-server:
先在 server1和server2上配置好bind9,然后scp到ansible控制端本地
·dns解析文件配置在前面“四、内网DNS”中
# server1:
scp /etc/bind/named.conf root@192.168.1.254:/etc/ansible/data
scp /etc/bind/named.conf.options root@192.168.1.254:/etc/ansible/data
scp /etc/bind/db.wsc2024 root@192.168.1.254:/etc/ansible/data
scp /etc/bind/db.wsc2024.out root@192.168.1.254:/etc/ansible/data
scp /usr/share/dns/root.hints root@192.168.1.254:/etc/ansible/data

# server2:
scp /etc/bind/named.conf root@192.168.1.254:/etc/ansible/data/named.slave
---
- name: dns-server
hosts: server1
gather_facts: false
tasks:
- name: Install bind9
apt:
name: bind9
update_cache: false
notify: restart
- name: configure the dns server
copy:
src: /etc/ansible/data/named.conf
dest: /etc/bind
notify: restart
- name: configure the dns server
copy:
src: /etc/ansible/data/named.conf.options
dest: /etc/bind
notify: restart
- name: configure the dns server
copy:
src: /etc/ansible/data/db.wsc2024
dest: /etc/bind
notify: restart
- name: configure the dns server
copy:
src: /etc/ansible/data/db.wsc2024.out
dest: /etc/bind
notify: restart
- name: configure the dns server
copy:
src: /etc/ansible/data/root.hints
dest: /usr/share/dns
notify: restart
handlers:
- name: restart
systemd:
name: bind9
state: restarted
- name: dns-server
hosts: server2
gather_facts: false
tasks:
- name: Install bind9
apt:
name: bind9
update_cache: false
notify: restart
- name: configure the dns server
copy:
src: /etc/ansible/data/named.slave
dest: /etc/bind/named.conf
notify: restart
- name: configure the dns server
copy:
src: /etc/ansible/data/named.conf.options
dest: /etc/bind
notify: restart
- name: configure the dns server
copy:
src: /etc/ansible/data/root.hints
dest: /usr/share/dns
notify: restart
handlers:
- name: restart
systemd:
name: bind9
state: restarted·如果需要按照inventory文件中的顺序来决定哪个为主dns:
假设server1是主server,如果来不及做,那么直接将server2写定写死为主dns即可,一般评分会将inventory调换顺序
---
- name: all
  hosts: all
  gather_facts: false
  tasks:
    - name: get facts
      apt:
        name: sshapss
        update_cache: false

    - name: get inventory file
      raw: sshpass -p "Skills39!" ssh root@192.168.1.254 'grep -n Server1 /etc/ansible/hosts | cut -d ":" -f 1'
      register: Server1

    - name: get inventory file
      raw: sshpass -p "Skills39!" ssh root@192.168.1.254 'grep -n Server2 /etc/ansible/hosts | cut -d ":" -f 1'
      register: Server2

    - name: tasks
      raw: echo "your tasks"
      when: {{ Server1 | int }} > {{ Server2 | int }}