综合实践.note
巩固练习:
一、使用 TLS/SSL 证书进行 加密认证
- 直接使用上面的环境即可
1.
1、加密 postfix:
(1)开启加密端口(TLS/SSL postfix):
cd /etc/postfix
vim master.cf- 可以看到,有一行:
1.

这时 postfix 默认监听的 25 号端口
这一行可以删除也可以保留
·删除 就代表只监听接下来配置的加密端口:465
·保留 就代表监听接下来配置的加密端口:465 ,和其原本的端口:25
使用 Vim 快捷键:yy 进行复制, pp 进行粘贴
将 smtp 改为 smtps (这一行只需要增加 ‘s’)

(2)开启 SSL :
postfix 的 SSL 似乎是默认关闭的
- 开启 SSL:
1.
cd /etc/postfix
vim main.cf
# 在文件中添加:
smtpd_use_tls=yes    //使用 TLS/SSL
smtpd_tls_wrappermode=yes    //指定使用 TLS 封装模式,而不是 STARTTLS 封装
(3)重启服务:
systemctl restart postfix2、加密 dovecot:
(1)开启加密端口:
cd /etc/dovecot/conf.d
vim 10-master.conf
# 找到 默认端口 143的定义:
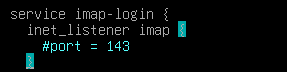
- 在 imap 定义中加上 port = 0 (表示禁用该端口【禁止监听143】)
1.
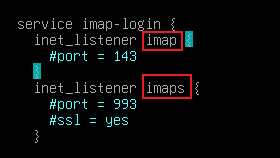
默认端口143 和 加密端口993 都是 dovecot默认监听的
因为 10-master.conf 文件中定义了:imap 和 imaps
(2)开启 SSL:
cd /etc/dovecot/conf.d
vim 10-ssl.conf
# 将 ssl =   (改为 ‘yes’)
(3)重启服务:
systemctl restart dovecot二、综合实践:
一、DNS配置:
1、安装软件包:
apt install -y bind9 bind9-utils dnsutils2、定义 域名 :
cd /etc/bind
vim named.conf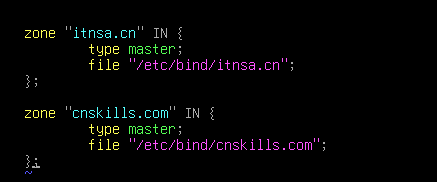
3、配置正向解析区域:
(1)itnsa.cn:
cp db.local itnsa.cn
vim itnsa.cn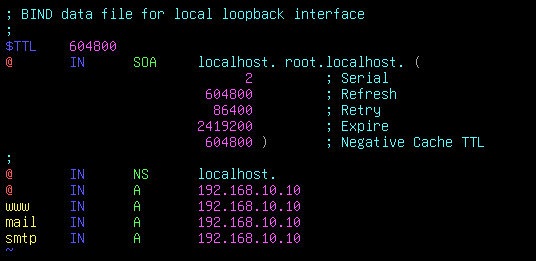
(2)cnskills.com:
cp db.local cnskills.com
vim cnskills.com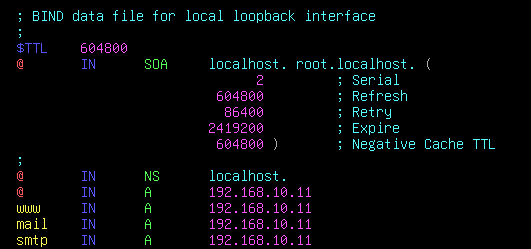
(3)重启 DNS 服务:
systemctl restart bind94、在 Server1、Server2、Server3、Client上修改DNS服务器地址:
vim /etc/resolv.conf
nameserver 192.168.10.12
二、Server2上配置邮箱(itnsa.cn)
1、postfix 配置:
(1)安装软件包:
apt install -y postfix
# 域名填写 itnsa.cn
(2)编写 postfix 配置文件:
vim /etc/postfix/main.cf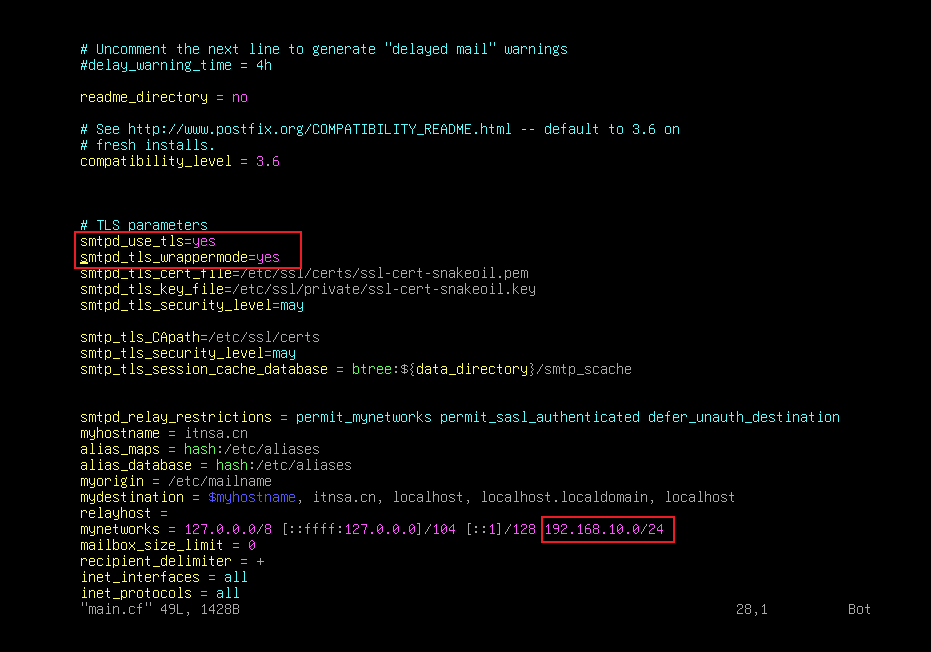
(3)开启端口:
vim /etc/postfix/master.cf
(3)重启服务:
systemctl restart postfix2、dovecot 配置:
(1)安装软件包:
apt install -y dovecot-imapd(2)开启本地数据库验证:
vim /etc/dovecot/conf.d/10-auto.conf

(3)开启 SSL:
vim /etc/dovecot/conf.d/10-ssl.conf
(4)重启服务:
systemctl restart dovecot三、Server3 上配置邮箱(cnskills.com)
1、postfix配置
(1)安装软件包:
apt install -y postfix dovecot-imapd
# 域名填写: cnskills.com
(2)编写 postfix 配置文件:
vim /etc/postfix/main.cf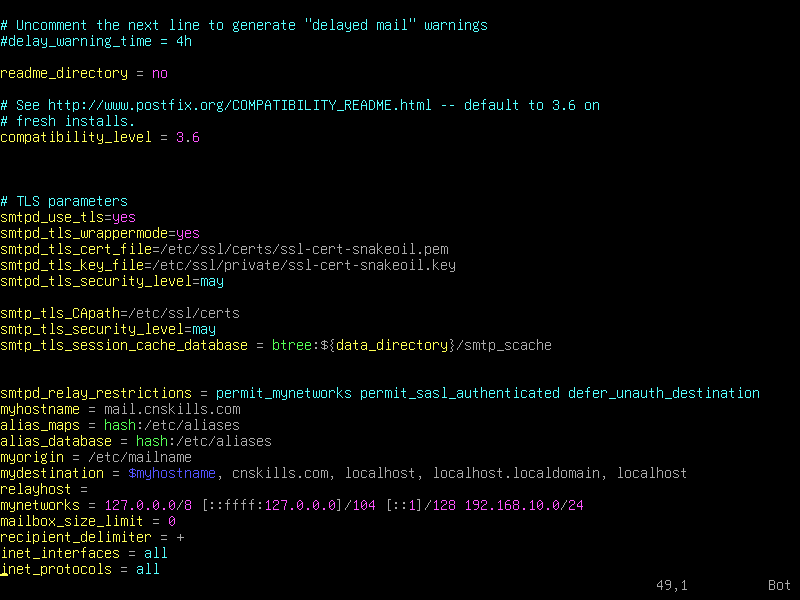
(3)开启端口:
vim /etc/postfix/master.cf
(3)重启服务:
systemctl restart postfix2、dovecot 配置:
(1)安装软件包:
apt install -y dovecot-imapd(2)开启 SSL:
vim /etc/dovecot/conf.d/10-ssl.conf
(3)重启服务:
systemctl restart dovecot四、在 itnsa.cn 和 cnskills.com 之间收发邮件:
还未完成